wifidog+authpuppy认证页面的配置
路由器上我们使用wifidog 网关协议,服务器后端管理用authpuppy。
首先,选择自己的操作系统,在http://www.authpuppy.org/doc/Main_Page网站里面,操作系统是Linux。
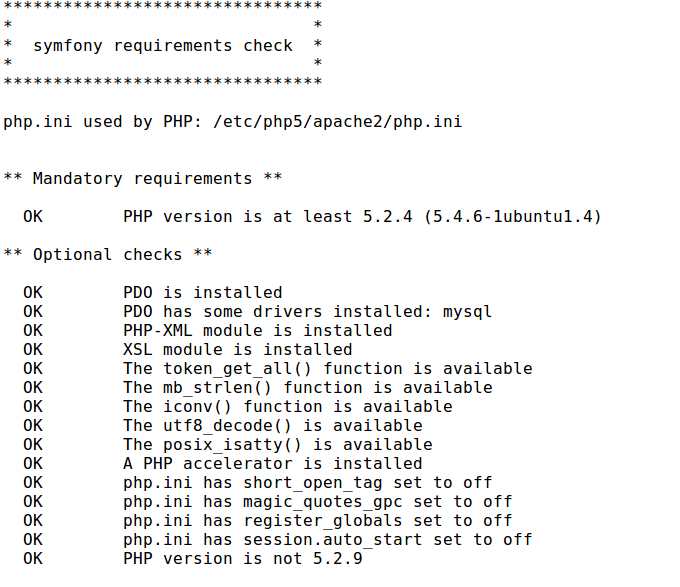
然后到这个网站http://www.authpuppy.org/doc/Getting_Started去下载check_configuration.php 这个文件是检测电脑安装authpuppy需要哪些环境,下面是配置好的环境
然后到这个http://launchpad.net/authpuppy 下载authpuppy的源码,然后把解压后的authpuppy目录放到apache2的站点目录,我的是ubuntu12.10,安装后的apache2目录是/etc/apache2/sites-available/default,
打开的内容是
    <VirtualHost *:80>
    ServerAdmin webmaster@localhost

    DocumentRoot /var/www/
    <Directory />
        Options FollowSymLinks
        AllowOverride All
        </Directory>
        <Directory /var/www/authpuppy/web/>
            Options Indexes FollowSymLinks MultiViews
            AllowOverride All
            Order allow,deny
            allow from all
    </Directory>

    ScriptAlias /cgi-bin/ /usr/lib/cgi-bin/
    <Directory "/usr/lib/cgi-bin">
        AllowOverride None
        Options +ExecCGI -MultiViews +SymLinksIfOwnerMatch
        Order allow,deny
        Allow from all
    </Directory>
    ErrorLog ${APACHE_LOG_DIR}/error.log

    # Possible values include: debug, info, notice, warn, error, crit,
    # alert, emerg.
    LogLevel warn

    CustomLog ${APACHE_LOG_DIR}/access.log combined
</VirtualHost>
下面挑几个来说明下:
DocumentRoot /var/www 这个目录是apache2服务器的根目录,也就是说当你打开浏览器在地址栏输入127.0.0.1时,就是进入/var/www/这个目录里面
<Directory /var/www/>
            Options Indexes FollowSymLinks MultiViews
            AllowOverride All
            Order allow,deny
            allow from all
    </Directory>
这个是你在apache里面架设服务器的根目录,比如我架设的是authpuppy,当我一进入authpuppy是/var/www/authpuppy/web/这个目录下的文件,其他的也没什么好讲的。所以我们应该把authpuppy目录放在/var/www/这个目录下面。
接下来就是配置这个apache这个,这个是让我最头疼的地方,配置了好几天,才搞明白是怎么回事。
首先咱们来看下http://www.authpuppy.org/doc/Getting_Started这个里面的配置内容
我一开始也没多想就直接复制和粘帖,结果安装到第三步就出错了。哦,忘了说怎么安装了,在浏览器的地址栏上输入127.0.0.1查看authpuppy的目录在哪,然后进入authpuppy里面web的目录,就会在网页上跳出安装页面。
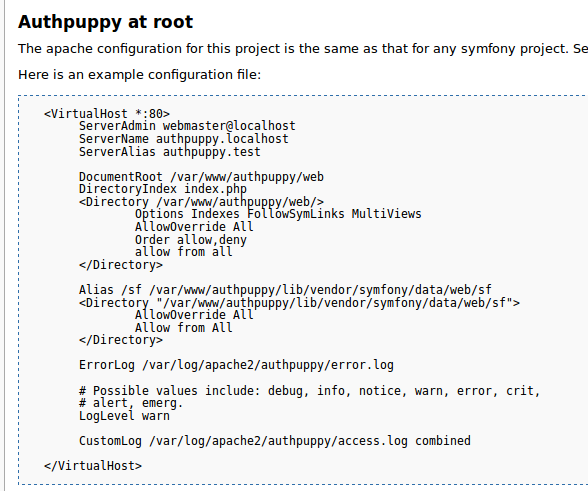
再回过来说说apache怎么配置吧,先给大家看看我的配置文件
<VirtualHost *:80>
   ServerAdmin webmaster@localhost
   ServerName authpuppy.localhost
   ServerAlias authpuppy.test

   DocumentRoot /var/www/
   DirectoryIndex index.php

    <Directory /var/www/authpuppy/web/>
           Options Indexes FollowSymLinks MultiViews
           AllowOverride All
           Order allow,deny
           allow from all
   </Directory>

   Alias /sf /var/www/authpuppy/lib/vendor/symfony/data/web/sf
   <Directory "/var/www/authpuppy/lib/vendor/symfony/data/web/sf">
           AllowOverride All
           Allow from All
   </Directory>

   ErrorLog ${APACHE_LOG_DIR}/error.log
   # Possible values include: debug, info, notice, warn, error, crit,
   # alert, emerg.
   LogLevel warn

   CustomLog ${APACHE_LOG_DIR}/access.log combined
不知道大家有没发现这两个目录不一样
ErrorLog /var/log/apache2/authpuppy/error.log
CustomLog /var/log/apache2/authpuppy/access.log
我在我的电脑里面发现/var/log/apache2/里面没有authpuppy这个目录,后来我就把这两个目录改了,最后安装成功。当你见到如下图片的时候就说明你已经安装成功,接下来尽管next就行了。

现在authpuppy已经安装完了,先松一口气吧。
接下来我们就来配置wifidog.conf文件以实现和authpuppy相链接。
这是wifidog.conf文件
http://dev.wifidog.org/browser/trunk/wifidog/wifidog.conf
由于第一次接触路由,所以有几个地方先说明下,自己老是搞乱,给以后的新手留给经验。
最最重要的一点是,在这个配置文件里面第一格不能是空格,否则就会出错。
ExternalInterface br-lan 这个是lan口,这样才能连上路由,比如手机
GatewayInterface eth0.2 这个是wan口,通过这个与authpuppy server通信。所以主机的网卡要和wan同一网络,
我的wan口ip是192.168.2.200,要和Hostname同一网段,才能通信。
AuthServer {
Hostname 192.168.2.2
SSLAvailable yes
Path /authpuppy/web/
}
还有这个Path,一开始我是设置成 / 根目录,结果不行,出现了这个问题:
HTTP Response from Server: [HTTP/1.1 404 Not Found
后来设置成这个目录才可以。还有一点要注意的是Path的目录两边都要加/,不然也会出错。
本文章由 http://www.wifidog.pro/2014/12/10/wifidog-authpuppy.html 整理编辑,转载请注明出处