Wifidog的协议梳理
wifidog的认证流程图:
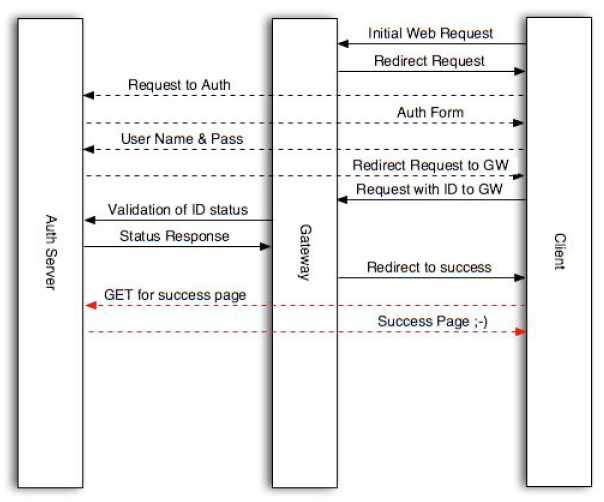
1· 用户连接WIFI会跳转到以下地址:
http://auth_server/login?gw_id=[GatewayID, default: "default"]gw_address=[GatewayAddress, internal IP of router]gw_port=[GatewayPort, port that wifidog Gateway is listening on]
url=[user requested url]
auth_server #即认证的域名
gw_id #配置的网关名称
gw_address #回调的内网地址
gw_port #回调的端口

在这个阶段需要返回登录的页面,即授权的首页,并且需要将所有涉及跳转的第三方地址加入白名单。
2· 当验证用户身份之后,即用户登录成功之后重定向到网关地址
http://GatewayIP:GatewayPort/wifidog/auth?token=[auth token]

auth token #系统为用户生成的token
3· 网关地址接受到消息后,会周期的发送用户信息,并确认是不是允许继续网络访问 请求地址
http://auth_server/auth/index.php?
stage=counters
ip=
mac=
token=
incoming=
outgoing=


ip,mac,token为用户的基本信息,incoming/outgoing为用户的连接计数信息,用来限定用户是否可以继续连接

此时auth_server需要返回该请求:
0——拒绝,删除防火墙内用户以及用户的信息
6——用户验证失败,超时,会删除防火墙内信息(即会重新要求登录)
1——用户验证通过,并跳转到http://auth_server/portal/?gw_id=%s
5——用户需要验证,允许规则内的访问进行验证
-1——用户验证出错,用户可以继续访问网络

返回数据格式:
Auth: <number from user status list>
如Auth: 1 #中间有个空格
4· 系统会周期性发送心跳包,用来确认网关验证和认证服务器的正常工作请求地址
http://auth_sever/ping/?
gw_id=%s
sys_uptime=%lu
sys_memfree=%u
sys_load=%.2f
wifidog_uptime=%lu

auth_server此时需要返回“Pong”
可以通过该心跳包来监控整个认证的工作
本文章由 http://www.wifidog.pro/2014/12/11/wifidog-%E5%8D%8F%E8%AE%AE.html整理编辑,转载请注明出处