wifidog 源码初分析(4)
在上一篇《wifidog 源码处分析(3)》的流程结束后,接入设备的浏览器重定向至 路由器 上 wifidog 的 http 服务(端口 2060) /wifidog/auth 上(且携带了 认证服务器 为此接入设备分配的 token),本篇就是从 wifidog 接收到 /wifidog/auth 的访问后的 校验流程。
根据《wifidog 源码初分析(2)》中描述的,在 wifidog 启动 http 服务前,注册了一个针对访问路径 /wifidog/auth 的回调,如下:
httpdAddCContent(webserver, "/wifidog", "about", 0, NULL, http_callback_about);
httpdAddCContent(webserver, "/wifidog", "status", 0, NULL, http_callback_status);
    // 注册了针对 /wifidog/auth 的访问回调 http_callback_auth
httpdAddCContent(webserver, "/wifidog", "auth", 0, NULL, http_callback_auth);
这样对于 接入设备(or 客户端) 重定向过来的 /wifidog/auth 就进入了 http_callback_auth 函数中,如下:
http_callback_auth(httpd *webserver, request *r)
{
    t_client    *client;
    httpVar * token;
    char    *mac;
    // 1, 获取条件参数中的 logout 值
    httpVar *logout = httpdGetVariableByName(r, "logout");

    // 2, 获取条件参数中的 token 值
    if ((token = httpdGetVariableByName(r, "token"))) {
        /* They supplied variable "token" */
        // 3, 可以看到, 这里要求必须能够通过 ARP 协议获取到 接入设备 的 MAC 地址
        if (!(mac = arp_get(r->clientAddr))) {
            /* We could not get their MAC address */
            debug(LOG_ERR, "Failed to retrieve MAC address for ip %s", r->clientAddr);
            send_http_page(r, "WiFiDog Error", "Failed to retrieve your MAC address");
        } else {
            /* We have their MAC address */
            LOCK_CLIENT_LIST();
            // 4, 检查该客户端(接入设备)是否已经在 wifidog 维护的接入客户端列表中
            if ((client = client_list_find(r->clientAddr, mac)) == NULL) {
                debug(LOG_DEBUG, "New client for %s", r->clientAddr);
                client_list_append(r->clientAddr, mac, token->value);
            } else if (logout) {
                // 5, 退出处理
                t_authresponse  authresponse;
                s_config *config = config_get_config();
                unsigned long long incoming = client->counters.incoming;
                unsigned long long outgoing = client->counters.outgoing;
                char *ip = safe_strdup(client->ip);
                char *urlFragment = NULL;
                t_auth_serv *auth_server = get_auth_server();

                fw_deny(client->ip, client->mac, client->fw_connection_state);
                client_list_delete(client);
                debug(LOG_DEBUG, "Got logout from %s", client->ip);

                /* Advertise the logout if we have an auth server */
                if (config->auth_servers != NULL) {
                    UNLOCK_CLIENT_LIST();
                    auth_server_request(&authresponse, REQUEST_TYPE_LOGOUT, ip, mac, token->value,
                                        incoming, outgoing);
                    LOCK_CLIENT_LIST();

                    /* Re-direct them to auth server */
                    debug(LOG_INFO, "Got manual logout from client ip %s, mac %s, token %s"
                    "- redirecting them to logout message", client->ip, client->mac, client->token);
                    safe_asprintf(&urlFragment, "%smessage=%s",
                        auth_server->authserv_msg_script_path_fragment,
                        GATEWAY_MESSAGE_ACCOUNT_LOGGED_OUT
                    );
                    http_send_redirect_to_auth(r, urlFragment, "Redirect to logout message");
                    free(urlFragment);
                }
                free(ip);
            }
            else {
                // 6, 已经登录校验通过
                debug(LOG_DEBUG, "Client for %s is already in the client list", client->ip);
            }
            UNLOCK_CLIENT_LIST();
            if (!logout) {
                // 7, 到 auth server 上进一步校验 token
                authenticate_client(r);
            }
            free(mac);
        }
    } else {
        /* They did not supply variable "token" */
        // 8, 未携带 token, 直接拒绝
        send_http_page(r, "WiFiDog error", "Invalid token");
    }
}
在该函数中主要处理了 客户端退出,非法校验,以及 客户端校验等流程,下面分别描述注释中的各个步骤:
1,对于客户端退出,则会携带 logout 参数信息,并走到第 5 步(当然,如果连 token 参数都没有的话,会直接走到第 8 步,也就是拒绝);
2,按照正常的认证流程,会携带由认证服务器分配的 token 参数;
3,正如注释说明的,这里要求必须能够通过 ARP 协议获取到 接入设备 的 MAC 地址;(其实通过查看 arg_get 的实现,可以看到是直接解析 /proc/net/arp 文件 -- ARP cache -- 来获取对应客户端 IP 地址的 MAC 信息的),类似如下:
[steven@sasd ~]$ more /proc/net/arp
IP address       HW type     Flags       HW address            Mask     Device
192.168.1.203    0x1         0x2         18:03:73:d5:1b:a2     *        eth0
192.168.1.1      0x1         0x2         00:21:27:63:c0:ce     *        eth0
[steven@sasd ~]$
4,在能够获取到该客户端的 MAC 地址后,根据客户端的 IP 和 MAC 地址检查该客户端是否已经在 wifidog 维护的接入设备(or客户端)列表中,如果不在,则追加到此列表中(关于此列表的数据结构在后面再详细描述);
5,如果该客户端已经存在,且本次访问是要求 logout 退出的,则进入此退出处理的流程,该流程主要包括几个步骤:关闭该客户端 ip/mac 的出口(outgoing)规则 --> 从客户端列表中删除该客户端记录 --> 通知 认证服务器 该客户端退出(且携带该客户端的token, 上下行流量等信息) --> 返回重定向至 认证服务器 的 #define DEFAULT_AUTHSERVMSGPATHFRAGMENT "gw_message.php?" 访问路径(携带一个已退出的 message);
6,如果该客户端已经登录校验过,且本次访问非 logout 退出,则直接跳转到第 7 步;
7,这一步就是 token 校验的过程,具体实现在 authenticate_client 函数中:
authenticate_client(request *r)
{
    t_client    *client;
    t_authresponse  auth_response;
    char    *mac,
        *token;
    char *urlFragment = NULL;
    s_config    *config = NULL;
    t_auth_serv *auth_server = NULL;
    LOCK_CLIENT_LIST();
    // 根据 IP 地址获取 客户端的 MAC 地址以及本次会话分配的 token
    // 主要用于 token 校验过程
    client = client_list_find_by_ip(r->clientAddr);
    if (client == NULL) {
        debug(LOG_ERR, "authenticate_client(): Could not find client for %s", r->clientAddr);
        UNLOCK_CLIENT_LIST();
        return;
    }

    mac = safe_strdup(client->mac);
    token = safe_strdup(client->token);

    UNLOCK_CLIENT_LIST();

    /*
     * At this point we've released the lock while we do an HTTP request since it could
     * take multiple seconds to do and the gateway would effectively be frozen if we
     * kept the lock.
     */
    // 通过 "login" 到 认证服务器 上进行客户端的 token 校验
    auth_server_request(&auth_response, REQUEST_TYPE_LOGIN, r->clientAddr, mac, token, 0, 0);

    LOCK_CLIENT_LIST();

    /* can't trust the client to still exist after n seconds have passed */
    // 这里主要防止在到 认证服务器 上进行 token 校验的过程中
    // 该客户端已经退出的情形, 此时就不需要再进行处理
    client = client_list_find(r->clientAddr, mac);
    if (client == NULL) {
        debug(LOG_ERR, "authenticate_client(): Could not find client node for %s (%s)", r->clientAddr, mac);
        UNLOCK_CLIENT_LIST();
        free(token);
        free(mac);
        return;
    }

    free(token);
    free(mac);
    /* Prepare some variables we'll need below */
    config = config_get_config();
    auth_server = get_auth_server();
    // 根据返回的校验结果做不同的处理
    switch(auth_response.authcode) {
    case AUTH_ERROR:
    case AUTH_DENIED:
    case AUTH_VALIDATION:
    case AUTH_VALIDATION_FAILED:
        ... ...
        break;
    case AUTH_ALLOWED:
        /* Logged in successfully as a regular account */
        debug(LOG_INFO, "Got ALLOWED from central server authenticating token %s from %s at %s - "
                "adding to firewall and redirecting them to portal", client->token, client->ip, client->mac);
        client->fw_connection_state = FW_MARK_KNOWN;
        fw_allow(client->ip, client->mac, FW_MARK_KNOWN);
        served_this_session++;
        safe_asprintf(&urlFragment, "%sgw_id=%s",
            auth_server->authserv_portal_script_path_fragment,
            config->gw_id
        );
        http_send_redirect_to_auth(r, urlFragment, "Redirect to portal");
        free(urlFragment);
        break;
    }
    UNLOCK_CLIENT_LIST();
    return;
}
这里主要是两大步骤:
1,通过调用 auth_server_request(&auth_response, REQUEST_TYPE_LOGIN, r->clientAddr, mac, token, 0, 0); 让 认证服务器 对该客户端的 token 进行校验;
2,根据 认证服务器 返回的 token 校验结果进行不同的处理(主要是对该客户端的防火墙过滤规则进行不同的设置),这里主要以 AUTH_ALLOWED 校验结果进行分析,这里主要是两个动作:
2.1,通过 fw_allow 函数调用对此客户端"放行";
2.2,返回重定向至 认证服务器的 portal 路径访问的响应;
这里就简要分析一下 fw_allow 函数的实现,查看fw_allow的实现可以看到真正设置allow客户端通过防火墙的动作是在iptables_fw_access中实现的,如下:
/** Set if a specific client has access through the firewall */
// 针对上面的流程,这里的输入参数
// type 为 FW_ACCESS_ALLOW,tag 为 FW_MARK_KNOWN
int iptables_fw_access(fw_access_t type, const char *ip, const char *mac, int tag)
{
    int rc;
    fw_quiet = 0;
    switch(type) {
        case FW_ACCESS_ALLOW:
            iptables_do_command("-t mangle -A " TABLE_WIFIDOG_OUTGOING " -s %s -m mac --mac-source %s -j MARK --set-mark %d", ip, mac, tag);
            rc = iptables_do_command("-t mangle -A " TABLE_WIFIDOG_INCOMING " -d %s -j ACCEPT", ip);
            break;
        case FW_ACCESS_DENY:
            iptables_do_command("-t mangle -D " TABLE_WIFIDOG_OUTGOING " -s %s -m mac --mac-source %s -j MARK --set-mark %d", ip, mac, tag);
            rc = iptables_do_command("-t mangle -D " TABLE_WIFIDOG_INCOMING " -d %s -j ACCEPT", ip);
            break;
        default:
            rc = -1;
            break;
    }
    return rc;
}
同样的,我们这里主要分析一下ALLOW时的iptables的防火墙设置规则,对执行的两个iptables命令展开来就是下面两个步骤:
1) 在mangle表中追加WiFiDog_$ID$_Outgoing外出过滤链,该链的规则如下几条:
a) IP 地址为该客户端的IP地址;
b) MAC地址为该客户端的MAC地址;
c) 设置MARK为FW_MARK_KNOWN;
iptables –t mangle –AWiFiDog_$ID$_Outgoing -s 客户端IP地址 -m mac --mac-source 客户端MAC地址 -j MARK --set-mark FW_MARK_KNOWN
2)在mangle表中追加一条[接受所有目的地址为此客户端IP地址的] WifiDog_$ID$_Incoming输入过滤链;
iptables -t mangle -AWiFiDog_$ID$_Incoming -d 客户端IP地址 -j ACCEPT
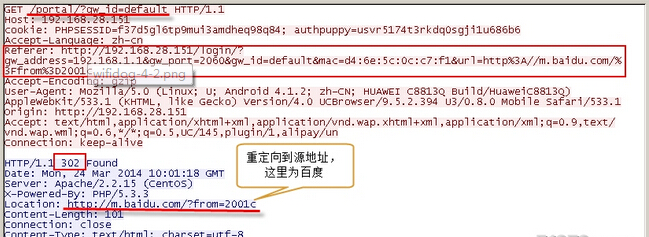
最后,看一下 wifidog 返回的重定向请求到 认证服务器 的请求报文 以及 认证服务器 返回给 客户端的(重定向到原始访问 baidu.com 的)响应报文:
转载时请务必以超链接形式标明文章 原始出处 、作者信息和本声明。否则将追究法律责任。http://quietmadman.blog.51cto.com/3269500/1386291
本文章由 http://www.wifidog.pro/2015/01/23/wifidog%E6%BA%90%E7%A0%81%E5%88%86%E6%9E%90-4.html 整理编辑,转载请注明出处