2015年1月

CentOS6.6下的authpuppy源码安装与配置

安装与配置authpuppy:
源码包:

#wget https://launchpad.net/authpuppy/trunk/1.0.0-stable/+download/authpuppy-1.0.0-stable.tgz

#cd /home
tar -xvf authpuppy-1.0.0-stable.tgz

#// apache配置一个虚拟域名(比如http://authpuppy.localhost/)指向目录 /home/authpuppy

打开http://authpuppy.localhost/
按提示完成对依赖包的安装(Requirements下的最好都安装), 如下:
依赖库: // 主要是PHP扩展包

APCu:
http://blog.163.com/liyi8798@126/blog/static/674546582012012115111847/
#wget http://pecl.php.net/get/apcu-4.0.6.tgz
#phpize
#./configure --with-php-config=/usr/local/php/bin/php-config --enable-apcu --enable-apc-bc
#make -s
#make install
#vi /usr/local/php/etc/php.ini
extension=apcu.so
// 其他类似

Permissions下出现红色部分,则需要做下面操作:

#chmod a+w authpuppy/ -R
#//自动创建authpuppy.yml

// 必须需要启用pdo_mysql,因为symfony的用的是PDO, 灵感来自http://bbs.csdn.net/topics/390036982
#cd php-5.6.2/ext/pdo_mysql
#phpize
#./configure --with-php-config=/usr/local/php/bin/php-config --with-pdo-mysql=/usr/local/mysql/
#make -s
#make install

#mysqladmin -uroot -p create authpuppy
#mysql -uroot -p

#create user 'authpuppy'@'localhost' identified by 'authpuppydev';
#grant all privileges on authpuppy.* to 'authpuppy'@'localhost' with grant option;

// 按界面来走就好了。

问题卡在连接不上mysql服务器上了两天,解决办法:
步骤1, 在http://authpuppy.localhost/install/3中点击next会有提示,如下:
Impossible to connect to the database with those credentials. Please make sure the database exists and try again.
此时,从/home/authpuppy目录中找到php的源码,如下:

#grep "Impossible to connect to the database" * -R
apps/frontend/modules/install/actions/actions.class.php: $this->getUser()->setFlash('error', "Impossible to connect to the database with those credentials. Please make sure the database exists and try again.", false);

打开上面文件,找到相应的行,将Exception $e打印出来

#vi apps/frontend/modules/install/actions/actions.class.php
// $this->getUser()->setFlash('error', "Impossible to connect to the database with those credentials. Please make sure the database exists and try again.", false);
$this->getUser()->setFlash('error', $e, false);

再在http://authpuppy.localhost/install/3中点击next, 出现提示:

exception 'Doctrine_Connection_Exception' with message 'Couldn't locate driver named mysql' in /home/www/authpuppy/lib/vendor/symfony/lib/plugins/sfDoctrinePlugin/lib/vendor/doctrine/Doctrine/Connection.php:486 Stack trace: #0 
/home/www/authpuppy/lib/vendor/symfony/lib/plugins/sfDoctrinePlugin/lib/vendor/doctrine/Doctrine/Connection/Mysql.php(101): Doctrine_Connection->connect() #1 
/home/www/authpuppy/lib/form/apDatabaseInstallForm.php(133): Doctrine_Connection_Mysql->connect() #2
/home/www/authpuppy/apps/frontend/modules/install/actions/actions.class.php(173): apDatabaseInstallForm->save() #3
/home/www/authpuppy/apps/frontend/modules/install/actions/actions.class.php(71): installActions->executePage3(Object(sfWebRequest)) #4
/home/www/authpuppy/cache/frontend/prod/config/config_core_compile.yml.php(459): installActions->executeIndex(Object(sfWebRequest)) #5
/home/www/authpuppy/lib/model/authpuppycore/util/apActions.class.php(56): sfActions->execute(Object(sfWebRequest)) #6 
/home/www/authpuppy/cache/frontend/prod/config/config_core_compile.yml.php(945): apActions->execute(Object(sfWebRequest)) #7 
/home/www/authpuppy/cache/frontend/prod/config/config_core_compile.yml.php(940): sfExecutionFilter->executeAction(Object(installActions)) #8 
/home/www/authpuppy/cache/frontend/prod/config/config_core_compile.yml.php(926): sfExecutionFilter->handleAction(Object(sfFilterChain), Object(installActions)) #9 
/home/www/authpuppy/cache/frontend/prod/config/config_core_compile.yml.php(1021): sfExecutionFilter->execute(Object(sfFilterChain)) #10 
/home/www/authpuppy/apps/frontend/lib/CheckDBAvailabilityFilter.class.php(95): sfFilterChain->execute() #11 
/home/www/authpuppy/cache/frontend/prod/config/config_core_compile.yml.php(1021): CheckDBAvailabilityFilter->execute(Object(sfFilterChain)) #12 
/home/www/authpuppy/cache/frontend/prod/config/config_core_compile.yml.php(988): sfFilterChain->execute() #13 /home/www/authpuppy/cache/frontend/prod/config/config_core_compile.yml.php(1021): sfRenderingFilter->execute(Object(sfFilterChain)) #14 
/home/www/authpuppy/cache/frontend/prod/config/config_core_compile.yml.php(658): sfFilterChain->execute() #15 
/home/www/authpuppy/cache/frontend/prod/config/config_core_compile.yml.php(2340): sfController->forward('install', 'index') #16 
/home/www/authpuppy/lib/vendor/symfony/lib/util/sfContext.class.php(170): sfFrontWebController->dispatch() #17 
/home/www/authpuppy/web/index.php(15): sfContext->dispatch() #18 {main}

步骤2, 从第一句“'Doctrine_Connection_Exception' with message 'Couldn't locate driver named mysql'”中可以看出,肯定是没有相关连接mysql的驱动,于是网上查找
www.baidu.com 查找“'Doctrine_Connection_Exception' with message 'Couldn't locate driver named mysql'”
有一个类似的问题,点击链接http://bbs.csdn.net/topics/390036982
其中一行是:
dream1206回复于: 2012-05-06 00:50:17
你需要启用pdo_mysql
windows下去掉 pdo_mysql.dll前面的注释,重启服务器。linux下编译时加上 with-pdo-mysql。
如果你已经这么做了,那么看看phpinfo()中的配置是否有生效
步骤3, 果断安装pdo_mysql
// 必须需要启用pdo_mysql,因为symfony的用的是PDO, 灵感来自http://bbs.csdn.net/topics/390036982

cd php-5.6.2/ext/pdo_mysql
phpize
./configure --with-php-config=/usr/local/php/bin/php-config --with-pdo-mysql=/usr/local/mysql/
make -s
make install

本文章由 http://www.wifidog.pro/2015/01/22/centos-authpuppy.html 整理编辑,转载请注明出处
搭建无线钓鱼 2/2:authpuppy搭建web认证系统

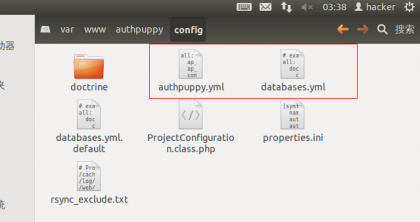
这里2个文件都需要替换 我也不知道为啥
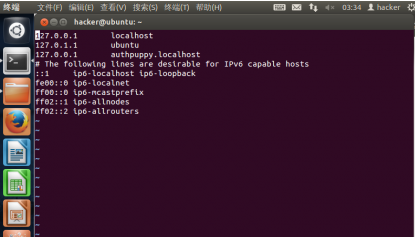
然后修改 /etc/hosts 文件 添加 127.0.0.1 authpuppy.localhost
1.png

然后给 权限:这个目录权限 /var/www/authpuppy
命令:
sudo chmod 777 /var/www/authpuppy
还要给
这个2个文件权限
2.png

然后 配置 msql

命令:
mysqladmin -uroot -p create authpuppy
Enter password: #你的密码
mysql -uroot -p
Enter password:你设置的root密码
create user 'authpuppy'@'localhost' identified by 'authpuppydev';
创建数据库
grant all privileges on authpuppy.* to 'authpuppy'@'localhost' with grant option;
就这样 环境配置完成
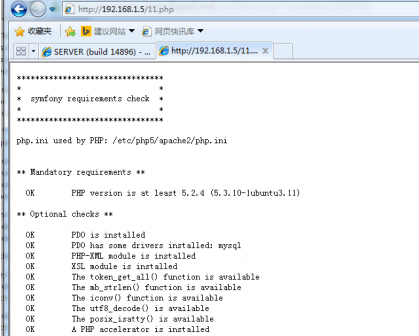
3.png

这里需要全部ok 如果你是架站高手的话这些应该都难不到你吧
然后进入你ip
安装

下一步即可
然后配置插件

以管理员帐号登录。
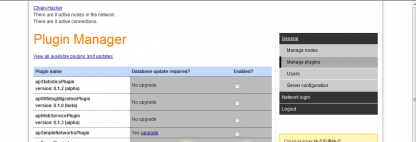
登录后可见菜单如图:
4.png

就可以做一些基本的Authpuppy配置了,虽然配置顺序没有要求,建议先配置Manage plugins
配置了4个插件,
apAuthLocalUserPlugin的配置

配置后 save。主要和密码认证user相关,配置此插件后才能增加、删除、修改用户。

apAuthSplashOnlyPlugin 插件的主要应用场景是,当你想不认证又保留protalpage时,配置这个插件,并且配置插件apNodeCustomPlugin
勾选上面两项即可。
apExternalCMSPlugin的配置如图:

次此插件的主要配置是,认证后的跳转。

配置manage nodes news创建一个nodes

主要配置要点为 gwid 此处的gwid 必须和路由器端的gwid一致。

User 主要功能是管理管理员帐号。

Server Configure 配置如图:
配置关键是 main url就是认证服务器的地址 如:http://192.168.100.121/authpuppy/web
其他几个看需要选择。

Manage local users 主要管理WiFi的认证账号。 增加、删除、修改等操作。

至此完成Authpuppy的安装及基本配置。

Authpuppy登录方式

authpuppy根据基本配置可以有两种登录方式可选,一种无密码认证,一种有密码认证。这两种登录方式均可以通过配置插件的方式来开关。

无密码认证登录:
登录过程:用户选择无密码登陆方式后、点击登陆,页面跳转到配置的页面,登录成功。
有密码认证登录:
登录过程:用户选择密码登陆方式、输入用户名及密码点击登陆,页面跳转到配置的页面,登录成功。有密码认证登录方式,一个账号只限一个用户在线。

本文章由http://www.wifidog.pro/2015/01/22/authpuppy.html 整理编辑,转载请注明出处

搭建无线钓鱼 1/2:authpuppy搭建web认证系统

Ps:其实吧 个人建议 你不买路由器也可以 搞个软路由 也行啊 免费的软路由有很多了 这里不举例 你买软路由就要ap胖 我是学生党 目的就是 以低的价钱换取最高的利益
步骤 :搭建wifi 信号对准女寝室 然后 web认证 然后嗅探。
其实wifi 都离不了嗅探 和钓鱼 你可以吧认证页面伪装成 cmcc热点的 qq空间登录的
大家自由发挥。
不废话了
Wifi有一种web方式认证方案,当连接到某些不加密的热点之后,会跳转到一个网页来认证登陆,大家熟悉的CMCC就采用了这种web的验证方式。首先我们把 web认证 搞好先 因为方便控制整个wifi 认证过程 想要跟专业一点 别被妹子发现 就要伪装的跟官方一些 -然他们放松警惕
如果说仅仅想获取web验证时其他用户的用户名和密码,arp欺骗然后嗅探足够了。因为此时攻击者已经分配到了ip,且同一网关下产生的流量是不会重定向 的。但是目前的情况是,认证服务器用的https加密传输,无法嗅探到明文密码。于是萌生了伪造热点及web认证服务器,然后记录密码的想法。
至于如何搭建web认证系统,百度一大把,但主要是用了wiwiz和wifiap这两个成熟的网站提供的方案。但是,利用第三方的网站无法拦截到用户名和密码,而且无法控制认证的过程。最好的解决方法是自己搭建一个简单的系统。
这是路由器刷的dd 上个有个 wifidog 是协助web认证 就是 想大家所知道 cmcc 一样
Wifidog 官方认证服务 是一个叫authpuppy 的web源码 下面介绍authpuppy 的安装

Authpuppy 刚开始安装的时候 笔者折磨一周才吧这玩意 琢磨好 上图:

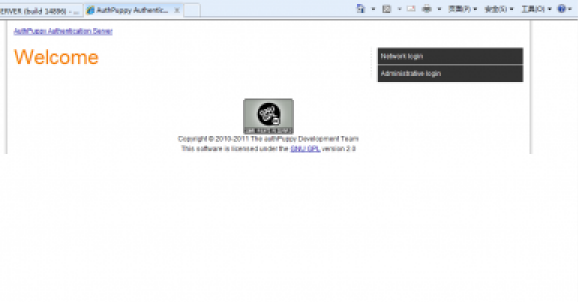
这是安装成功的界面 :
1.png

我介绍的是Ubuntu的安装方法 推荐Ubuntu 因为笔者 试过 各种系统搭建都没成功 都是各种错误 蛋疼啊 一个测试环境的php 稍后奉上
因为该linux比较方便吧
环境是 apache2+php+mysql 本人推荐手工搭建 应为 本人也是被坑在 集成包上面了
Ubuntu 安装环境很方便
执行命令:

sudo apt-get install apache2

安装—————阿帕奇

sudo apt-get install php5

安装————PHP环境

sudo apt-get update
sudo apt-get upgrade --show-upgraded
sudo apt-get install mysql-server

安装——————mysql

sudo apt-get install php5-dev
sudo apt-get install php-pear
sudo apt-get install apache2-prefork-dev build-essential 
pecl install apc

需要安装各种环境
然后在 php.ini 添加extension=apc.so
修改各种 东西 不详细说明 百度都有的
然后在 /var/log/apache2 目录下创建一个叫:authpuppy的目录
然后执行命令:sudo a2enmod rewrite

sudo /etc/init.d/apache2 restart
sudo apt-get install php5-mysql

确保PDO和PDO MySQL或PDO和PDO PGSQL安装正确
然后:

sudo php -m

安装:php 模块

sudo apt-get install php5-curl
sudo apt-get install php5-xsl

然后下载:authpuppy 把他解压到阿帕奇的根目录
cd

sudo tar xvzf authpuppy.tgz 

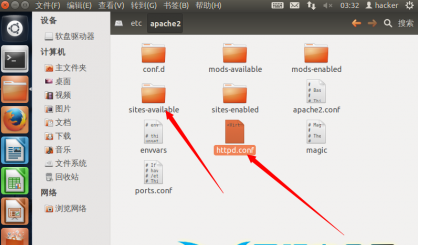
然后在配置 阿帕奇的 httpd.conf文件 把它替换为

<VirtualHost *:80>
       ServerAdmin webmaster@localhost
       ServerName authpuppy.localhost
       ServerAlias authpuppy.test
       DocumentRoot /var/www/authpuppy/web
       DirectoryIndex index.php
       <Directory /var/www/authpuppy/web/>
         Options Indexes FollowSymLinks MultiViews
         AllowOverride All
         Order allow,deny
         allow from all
       </Directory>
       Alias /sf /var/www/authpuppy/lib/vendor/symfony/data/web/sf
       <Directory "/var/www/authpuppy/lib/vendor/symfony/data/web/sf">
         AllowOverride All
         Allow from All
       </Directory>
       ErrorLog /var/log/apache2/authpuppy/error.log
       # Possible values include: debug, info, notice, warn, error, crit,
       # alert, emerg.
       LogLevel warn
       CustomLog /var/log/apache2/authpuppy/access.log combined
</VirtualHost>

2.png

本文章由 http://www.wifidog.pro/2015/01/22/%E6%97%A0%E7%BA%BF%E8%AE%A4%E8%AF%81.html整理编辑,转载请注明出处

wifidog认证服务器authpuppy 搭建

此文仅限于搭建authpuppy 认证服务器,不包含认证插件等安装,仅说明步骤以备下次安装忘记步骤、耽误时间。

环境:ubuntu10.04

软件版本:authpuppy-1.0.0-stable.tgz

准备工作:ubuntu中安装Apache2,php5,mysql,及 postgres。具体的步骤可以去搜下,一般的多是apt-get install 就OK。postgres 安装名为postgresql

具体还可以参照authpuppy官方doc ,http://www.authpuppy.org/doc/Getting_Started。这个一定要看!写的很详细。

1.首先在authpuppy 官网下载源码http://www.authpuppy.org/。找到download,去下载authpuppy-1.0.0-stable.tgz 该版本。

2.将authpuppy-1.0.0-stable.tgz代码解压到/var/www/目录下后,访问http://localhost/authpuppy/web/ 会访问到preinstall.php,下面开始安装。先按照http://www.authpuppy.org/doc/Getting_Started中,将PostgreSQL数据建立成功。成功后,按照Getting_Started帮助手册,修改/etc/apache2/sites-available/default 这个文件,内容如下:

<VirtualHost *:80>
       ServerAdmin webmaster@localhost
       ServerName authpuppy.localhost
       ServerAlias authpuppy.test

       <span style="color: #ff0000;">#DocumentRoot /var/www/authpuppy/web/</span>  <br>    DocumentRoot /var/www/     <br>    DirectoryIndex index.php
       <Directory /var/www/authpuppy/web/>
               Options Indexes FollowSymLinks MultiViews
               AllowOverride All
               Order allow,deny
               allow from all
       </Directory>

       Alias /sf /var/www/authpuppy/lib/vendor/symfony/data/web/sf
       <Directory "/var/www/authpuppy/lib/vendor/symfony/data/web/sf">
               AllowOverride All
               Allow from All
       </Directory>

       <span style="color: #ff0000;">#ErrorLog /var/log/apache2/authpuppy/error.log
</span>    ErrorLog /var/log/apache2/error.log<br>   
       # Possible values include: debug, info, notice, warn, error, crit,
       # alert, emerg.
       LogLevel warn

       <span style="color: #ff0000;">#CustomLog /var/log/apache2/authpuppy/access.log combined
</span>    CustomLog /var/log/apache2/access.log combined<br>  <br>     
  </VirtualHost>

加红色部分为Getting_Started中给的原样,我针对这个做了部分修改。关于两个log,因为/var/log/apache2/目录下没有authpuppy 这个文件,所以加这个的话Apache重启时会失败,所以将其去掉(或者你自己添加上也可以)。

$ sudo service apache2 restart

重启Apache,访问http://localhost/authpuppy/web/ .会出现第一个页面,点击let's go按钮。然后进到下一个页面上,这里会提示你什么文件没有可写权限或者没有安装某个php的扩展,按照上面提示做就可以了!还有注意一点。有时候点击let's go 就会出错,页面就访问失败了!这里可以将/authpuppy/web/installed.txt 这个删除掉。就可以了!处理好后点击next。进到连接数据库页面。我刚开始这个页面总访问不进来。这时按照http://www.authpuppy.org/doc/Getting_Started,将环境设置了一边后就可以访问了。具体的原因没有查明。然后就是与数据库连接,数据库选择postsql,注意用户名密码是否正确。过了这个页,基本上就是成功了。

用自己的话写的比较粗略,只供自己下次再搭建该环境时有个提醒。(这次就是第二次,又花费了一天多- -),第一次搭建步骤都忘了,所以想记录一下过程。主要是参考这两个链接:

http://www.authpuppy.org/doc/Getting_Started

http://blog.sina.com.cn/s/blog_d2facf270101g7hy.html ;wifidog+authpuppy认证页面的配置

第一个是官方手册上的,第二个是新浪博客上的一篇blog,我也不知道是不是原创。不过这个写的比较好,比我的详细些。到家可以参考下,但转载要注明哈。

本文章由 http://www.wifidog.pro/2015/01/22/wifidog-authpuppy-2.html 整理编辑,转载请注明出处