wifidog认证实现OpenWRT强制认证的WIFI热点
首先安装wifidog到OpenWRT的路由器:
  opkg update

  opkg install wifidog
wifidog依赖下面这些模块:
iptables-mod-extra

iptables-mod-ipopt

kmod-ipt-nat

iptables-mod-nat-extra

libpthread
由于trunk的固件更新会比较频繁,会导致直接opkg install wifidog安装不了,如果你凑巧又没有备份与固件对应的Packages的话,就需要到http://downloads.openwrt.org/snapshots/trunk升级固件,然后再安装wifidog。
如果你的路由器不是openwrt官方支持的版本的话,那就需要自己编译固件。make menuconfig后,在Network–>Captive Portals中选择wifidog.
安装完成后,
/etc/init.d/wifidog enable
/etc/init.d/wifidog start
这时会抛出一个错误,因为我们还没有设置AuthServer的信息。关于安装wifidog更多的信息可以参考:http://wiki.openwrt.org/doc/howto/wireless.hotspot.wifidog
下面安装Auth Server,按照官方的说法:
AuthPuppy is the next generation authentication server for Wifidog networks.
源文档 http://www.authpuppy.org/
不过貌似这wifidog和Authpuppy都已经N久没更新了。。。
AuthPutty是需要安装apache2, php5和MySQL。详细介绍在这里:http://www.authpuppy.org/doc/Getting_Started (Windows版点这里)。
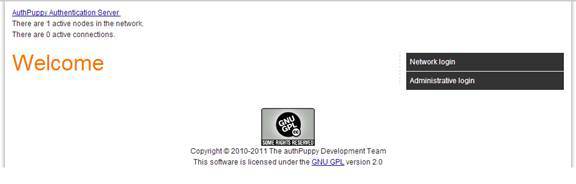
安装成功后,访问AuthPuppy会要求设置一些数据库信息,全部设置完成后能看到首页:
当然了,我们还需要设置管理员的账号。
进入Manage plugins,Install apAuthLocalUserPlugin,记得要enable这个插件。
然后,点击Manage Nodes,把默认节点的status改成deployed。这个GW(Gateway) ID default后面配置wifidog.conf的时候需要使用。
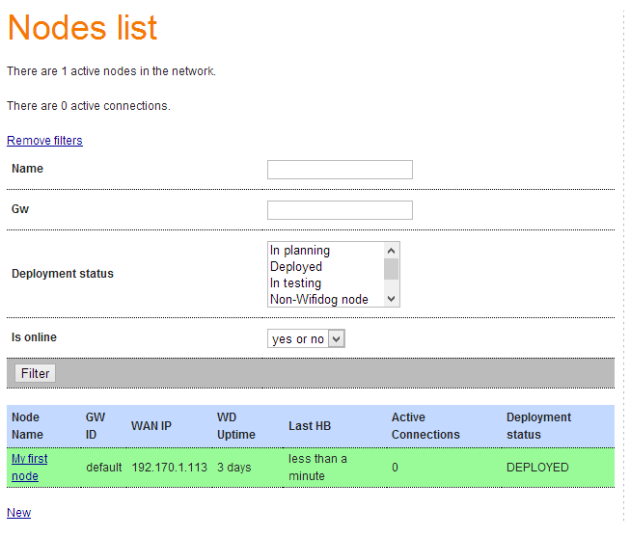
到这里,AuthPuppy就基本配置完毕了。
下面回到路由器,编辑wifidog.conf,一般情况下,我们之后配置ExternalInterface,GatewayInterface和AuthServer这三项就可以,其他默认。下面是我的配置:
GatewayIDdefault           #注意这个ID必须跟AuthPuppy的GW ID一致

# Parameter: ExternalInterface

# Default: NONE

# Optional

#

# Set this to the external interface (the one going out to the Inernet or your larger LAN).

# Typically vlan1 for OpenWrt, and eth0 or ppp0 otherwise,

# Normally autodetected

ExternalInterface eth0      #路由器外网的物理接口


# Parameter: GatewayInterface

# Default: NONE

# Mandatory

#

# Set this to the internal interface (typically your wifi interface).

# Typically br-lan for OpenWrt, and eth1, wlan0, ath0, etc. otherwise

GatewayInterface wlan0      #路由器内网的物理接口

AuthServer {

    Hostname 192.170.1.104

    SSLAvailable no

    Path /

}


CheckInterval 60

ClientTimeout 5

FirewallRuleSet global {

}

FirewallRuleSet validating-users {

    FirewallRule allow to 0.0.0.0/0

}

FirewallRuleSet known-users {

    FirewallRule allow to 0.0.0.0/0

}

FirewallRuleSet unknown-users {

    FirewallRule allow udp port 53

    FirewallRule allow tcp port 53

    FirewallRule allow udp port 67

    FirewallRule allow tcp port 67

}

FirewallRuleSet locked-users {

    FirewallRule block to 0.0.0.0/0

}
注意这个Interface是物理接口。
root@OpenWrt:~# cat /etc/config/network

config interface ‘loopback’

        option ifname ‘lo’

        option proto ‘static’

        option ipaddr ‘127.0.0.1’

        option netmask ‘255.0.0.0’

config globals ‘globals’

        option ula_prefix ‘fd09:fd03:490d::/48′

config interface ‘lan’

        option proto ‘static’

        option ipaddr ‘192.168.1.1’

        option netmask ‘255.255.255.0’

        option ip6assign ’60’

        option _orig_ifname ‘eth0′

        option _orig_bridge ‘false’

config interface ‘WAN’

        option proto ‘dhcp’

        option _orig_ifname ‘gretap0′

        option _orig_bridge ‘false’

        option ifname ‘eth0′
本文章由 http://www.wifidog.pro/2015/04/07/wifidog%E8%AE%A4%E8%AF%81wifi%E7%83%AD%E7%82%B9.html 整理编辑,转载请注明出处