2015年

wifidog认证实现OpenWRT强制认证的WIFI热点

首先安装wifidog到OpenWRT的路由器:

  opkg update

  opkg install wifidog

wifidog依赖下面这些模块:

iptables-mod-extra

iptables-mod-ipopt

kmod-ipt-nat

iptables-mod-nat-extra

libpthread

由于trunk的固件更新会比较频繁,会导致直接opkg install wifidog安装不了,如果你凑巧又没有备份与固件对应的Packages的话,就需要到http://downloads.openwrt.org/snapshots/trunk升级固件,然后再安装wifidog。

如果你的路由器不是openwrt官方支持的版本的话,那就需要自己编译固件。make menuconfig后,在Network–>Captive Portals中选择wifidog.

安装完成后,

/etc/init.d/wifidog enable
/etc/init.d/wifidog start

这时会抛出一个错误,因为我们还没有设置AuthServer的信息。关于安装wifidog更多的信息可以参考:http://wiki.openwrt.org/doc/howto/wireless.hotspot.wifidog

下面安装Auth Server,按照官方的说法:
AuthPuppy is the next generation authentication server for Wifidog networks.
源文档 http://www.authpuppy.org/
不过貌似这wifidog和Authpuppy都已经N久没更新了。。。

AuthPutty是需要安装apache2, php5和MySQL。详细介绍在这里:http://www.authpuppy.org/doc/Getting_Started (Windows版点这里)。

安装成功后,访问AuthPuppy会要求设置一些数据库信息,全部设置完成后能看到首页:
wifidog2.jpg

当然了,我们还需要设置管理员的账号。

进入Manage plugins,Install apAuthLocalUserPlugin,记得要enable这个插件。

然后,点击Manage Nodes,把默认节点的status改成deployed。这个GW(Gateway) ID default后面配置wifidog.conf的时候需要使用。
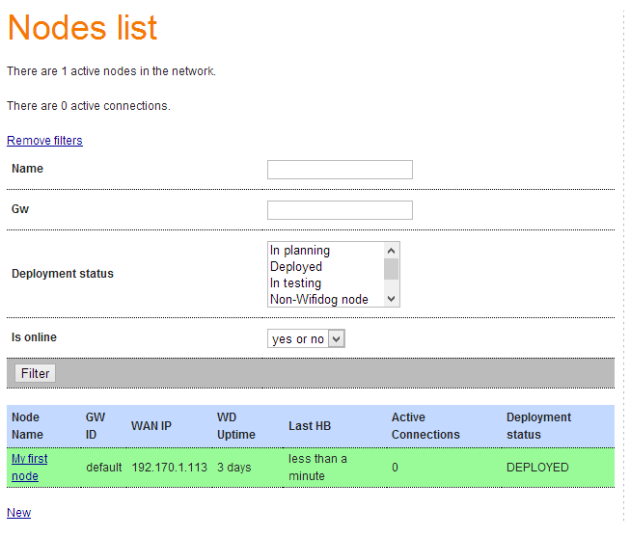
wifidog4.png

到这里,AuthPuppy就基本配置完毕了。

下面回到路由器,编辑wifidog.conf,一般情况下,我们之后配置ExternalInterface,GatewayInterface和AuthServer这三项就可以,其他默认。下面是我的配置:

GatewayIDdefault           #注意这个ID必须跟AuthPuppy的GW ID一致

# Parameter: ExternalInterface

# Default: NONE

# Optional

#

# Set this to the external interface (the one going out to the Inernet or your larger LAN).

# Typically vlan1 for OpenWrt, and eth0 or ppp0 otherwise,

# Normally autodetected

ExternalInterface eth0      #路由器外网的物理接口


# Parameter: GatewayInterface

# Default: NONE

# Mandatory

#

# Set this to the internal interface (typically your wifi interface).

# Typically br-lan for OpenWrt, and eth1, wlan0, ath0, etc. otherwise

GatewayInterface wlan0      #路由器内网的物理接口

AuthServer {

    Hostname 192.170.1.104

    SSLAvailable no

    Path /

}


CheckInterval 60

ClientTimeout 5

FirewallRuleSet global {

}

FirewallRuleSet validating-users {

    FirewallRule allow to 0.0.0.0/0

}

FirewallRuleSet known-users {

    FirewallRule allow to 0.0.0.0/0

}

FirewallRuleSet unknown-users {

    FirewallRule allow udp port 53

    FirewallRule allow tcp port 53

    FirewallRule allow udp port 67

    FirewallRule allow tcp port 67

}

FirewallRuleSet locked-users {

    FirewallRule block to 0.0.0.0/0

}

注意这个Interface是物理接口。

root@OpenWrt:~# cat /etc/config/network

config interface ‘loopback’

        option ifname ‘lo’

        option proto ‘static’

        option ipaddr ‘127.0.0.1’

        option netmask ‘255.0.0.0’

config globals ‘globals’

        option ula_prefix ‘fd09:fd03:490d::/48′

config interface ‘lan’

        option proto ‘static’

        option ipaddr ‘192.168.1.1’

        option netmask ‘255.255.255.0’

        option ip6assign ’60’

        option _orig_ifname ‘eth0′

        option _orig_bridge ‘false’

config interface ‘WAN’

        option proto ‘dhcp’

        option _orig_ifname ‘gretap0′

        option _orig_bridge ‘false’

        option ifname ‘eth0′

本文章由 http://www.wifidog.pro/2015/04/07/wifidog%E8%AE%A4%E8%AF%81wifi%E7%83%AD%E7%82%B9.html 整理编辑,转载请注明出处

wifidog认证无线认证管理

在网上了解到,许多实现无线或者有线Web验证的方案都用到 WiFi无线热点管理系统
目前比较主流的有:ros wiwiz 海蜘蛛这几个。ROS全称RouterOS软路由,最强大,但是比较复杂,海蜘蛛很容易,但效果一般般,WiWiZ实现一般,效果比较好,目前大部分研究的是wiwiz.为什么选择Wiwiz?并不是因为多人选我们就根从,而是因为它适合我们。

Wiwiz是一个开发式的系统,、装配置灵活,可以安装到路由器或者本地计算机、虚拟机都可以。通过Wiwiz Web控制面板创建并定制自己的热点。包括认证方式、是否付费及费率、认证页面的外观样式、颜色、图片以及服务条款都可以进行定制。为用户有偿提供网络服务。

Wiwiz系统,全称Wiwiz HotSpot Builder,一个WiFi无线热点管理系统,也可用于有线,
创建强制门户/认证页面。
Wiwiz HotSpot Builder的组成:
1、Wiwiz Web控制面板
2、客户端-Wiwiz HotSpot Builder Utility
部署了Wiwiz系统的计算机、路由器或者无线路由器充当WIFI网中的Internet网关。
可以实现Web认证。市面上创建商用Wifi热点的做法一般都是用强制网络门户系统(Captive Portal)/热点管理系统
来实现的。他们的原理都类似,需要一个防火墙/网关系统,一个用于认证管理和控制的后台系统。
常见的技术解决方案有NoCat、Wifidog、Chillispot等。有一些整套的解决方案,FON、Wiwiz、
ile sans fil、Sputnik、FreeSpot,这些要money的哦。wifidog 是免费开源的解决方案,只是性能不是很好,用于一般环境是足够的。

本文章由http://www.wifidog.pro/2015/04/07/wifidog%E8%AE%A4%E8%AF%81-5.html 整理编辑,转载请注明出处

海蜘蛛Tomato V3.3系统编译视频教程

很久没发布Tomato固件和帖子,今天给大家奉上一篇Tomato编译的教程,后期可能会陆陆续续地上传一些技术类视频,方便大家学习。由于工作和经济压力原因,没有时间做固件,但是非常感觉大家对我的支持。
未来的一段时间,我会转到幕后做一些Tomato的视频开发教程,让更多的人加入开发队伍中来。

视频是4K录制的,高清的土豆比较模糊,请大家选择超清播放,优酷视频还在审核中,请大家耐心等待。

视频中需要用到的代码和资料

请使用Ubuntu 64位系统

http://dl.hi-spider.com/mips/GPL_Hi-spider_tomatoV3.3.tar.gz

1.设置编译环境
在Ubuntu的系统执行如下命令

sudo apt-get update
sudo apt-get install build-essential linux-headers-$(uname -r)
sudo apt-get install libncurses5 libncurses5-dev m4 bison flex libstdc++6-4.4-dev g++-4.4 g++ libtool sqlite
sudo apt-get install gcc g++ binutils patch bzip2 flex bison make gettext unzip zlib1g-dev
sudo apt-get install libc6 libncurses5-dev  automake


2.配置交叉编译工具

sudo cp -R opt/brcm 源码的位置/shibby_v3/tools/brcm /opt/brcm

vi ~/.bashrc
在最后一行处加入
if [ -d "/opt/brcm" ] ; then
    PATH=/opt/brcm/hndtools-mipsel-uclibc/bin:/opt/brcm/hndtools-mipsel-linux/bin:$PATH
fi
保存退出, 以便每次启动linux时能找到编译器.
source ~/.bashrc


find -type d -exec chmod +x {} \;

技术相关咨询和路由器定制联系:18013582125(QQ和手机是同一个)

本文章由 http://www.wifidog.pro/2015/04/03/tomato%E6%B5%B7%E8%9C%98%E8%9B%9B%E7%BC%96%E8%AF%91.html 整理编辑,转载请注明出处

wifidog配置分析

AuthServer {
    Hostname                  (Mandatory; Default: NONE)
    SSLAvailable              (Optional; Default: no; Possible values: yes, no)
    SSLPort                   (Optional; Default: 443)
    HTTPPort                  (Optional; Default: 80)
    Path                      (Optional; Default: /wifidog/ Note:  The path must be both prefixed and suffixed by /.  Use a single / for server root.)
    LoginScriptPathFragment   (Optional; Default: login/? Note:  This is the script the user will be sent to for login.)
    PortalScriptPathFragment  (Optional; Default: portal/? Note:  This is the script the user will be sent to after a successfull login.)
    MsgScriptPathFragment     (Optional; Default: gw_message.php? Note:  This is the script the user will be sent to upon error to read a readable message.)
    PingScriptPathFragment    (Optional; Default: ping/? Note:  This is the script the user will be sent to upon error to read a readable message.)
    AuthScriptPathFragment    (Optional; Default: auth/? Note:  This is the script the user will be sent to upon error to read a readable message.)
}

# Listen on this port
GatewayPort 2060

# Parameter: CheckInterval
# Default: 60
# Optional
#
# How many seconds should we wait between timeout checks.  This is also
# how often the gateway will ping the auth server and how often it will
# update the traffic counters on the auth server.  Setting this too low
# wastes bandwidth, setting this too high will cause the gateway to take
# a long time to switch to it's backup auth server(s).
CheckInterval 60

# Parameter: ClientTimeout
# Default: 5
# Optional
#
# Set this to the desired of number of CheckInterval of inactivity before a client is logged out
# The timeout will be INTERVAL * TIMEOUT
ClientTimeout 5

wifidog流程参照http://dev.wifidog.org/wiki/doc/developer/FlowDiagram描述,这里介绍下配置内容。

AuthServer是Portal服务器的配置项;GatewayPort是Wifidog监听的地址,默认是2060,一般保持默认即可;CheckInterval是心跳时长,单位是秒,什么是心跳呢,客户端认证成功之后,如果有网络访问动作,Wifidog getway就会每隔一段时间访问Portal服务器的一个脚本,用于认证计费,当然,如果客户使用超时或超流量,也可以通过心跳强制客户端下线。ClientTimeout是用户一次认证成功后的网络访问时长,超过这个时间需要重新认证,这个时长并非由ClientTimeout单独决定,取决于INTERVAL * TIMEOUT。详细的配置信息可以访问:http://dev.wifidog.org/browser/trunk/wifidog/wifidog.conf

重点讨论Portal服务器的配置项,Hostname是Portal服务器的ip或者是域名,SSLAvailable和SSLPort是SSL加密配置,如果你的Portal服务器有配置HTTPS加密,则需要配置这两项;Path是指你的脚本路径(举例,http://a.com/to/,则a.com是域名,/to/是路径),注意路径必须以“/”开头和结尾,如果是根路径,则填一个“/”即可;接下来的5个配置指明你的脚本名,这说明了我们需要写五个脚本,我会详细说明。(以下文中涉及的“第几步”均是指Wifidog认证过程的步骤)

LoginScriptPathFragment配置项配置的是登陆脚本,它通过GET方式接受传入参数gw_address、gw_port、gw_id、mac和url,gw_address是AP Getway的ip地址;gw_port是Wifidog监听的端口,即上面介绍的wifidog.conf中的GatewayPort配置;gw_id是AP Getway的id,配置文件wifidog.conf中可以配置,默认值是default,这个值的作用是当存在多个AP是,服务器或管理员可以根据不同的id确定用户的接入点;mac是客户计算机的网卡物理地址,注意不是AP网关的mac,这个mac是用来识别客户计算机的;url是客户初始访问的Url,这些Querystring都是AP Getway向客户端发出重定向请求自动生成的。这个脚本同时需要提供登陆页面,如果登陆成功,需要向客户;端返回302重定向,重定向到:http://gw_address:gw_port/wifidog/auth?token=[token];即实现第7步,其中[token]是你自己自动生成的token字符串,随机生成一个字符串即可,但是长度最好长些,安全性更高,另外,token需要根据不同用户保存,最好保存于数据库中,之后的AP Getway询问token有效性(第9步)还需要用到。这里最好使用cookie或session,使之后的登陆成功页面可以判断用户已经成功,阻止未登录成功的人访问认证成功页面。

PortalScriptPathFragment配置项配置的是登陆成功后服务器展示的脚本(第11步),它通过GET方式接受1个传入参数,gw_id,这个脚本比较简单,告知用户登陆成功即可,当然,最好重定向到用户之前想要方位的url,即第1步用户输入的URL。
MsgScriptPathFragment配置项配置的是错误信息展示脚本,它通过GET方式接受一个传入参数message,这个脚本也很简单,展示message的内容即可,目的是当认证过程出现错误,AP Getway会重定向到这个脚本,URL中含有错误的信息。

PingScriptPathFragment配置项配置的是心跳脚本,这个脚本它通过GET方式接受5个传入参数,gw_id,sys.uptime,sys.memfree,sys.load,wifidog.uptime,其中,sys.uptime指的是AP Getway的启动时间,sys.memfree指的是AP Getway的空闲内存,sys.load指的是AP Getway的CPU负载,wifidog.uptime指的是wifidog的启动时间,这个脚本每隔一段时间(Wifidog.conf里配置的CheckInterval),Wifidog会自动访问,但是其目的不是用户验证,而是帮助管理员管理AP节点,了解AP节点的负载情况,适时增加节点等,Wifidog访问这个脚本时,需要这个脚本返回Pong,如果你没有统计AP节点负载数据的需求,可以丢弃这些数据,直接回应Pong,注意,这个回应只包含“Pong”字符串,无需包含其他html标签。

AuthScriptPathFragment是用户认证脚本,实现的是第10步的功能,这个脚本它通过GET方式接受7个传入参数:stage、ip、mac、token、incoming、outcoming和gw_id。其中stage的值是login,ip是客户端的ip,注意不是AP Getwap的ip;mac是客户端的网卡物理地址,token就是你在认证脚本生成并返回给客户端的;incoming和outcoming用于流量控制,默认值为0;gw_id同上。如何识别用户登录成功,通过mac和token吧,LoginScriptPathFragment登陆脚本在用户登陆成功后需要记录用户的mac和token,然后在此处验证,如果匹配,回复Auth: 1,否则,回复Auth: 0。另外,这个脚本也是心跳脚本,每隔一段时间Wifidog会自动访问,如果用户使用时间超过限制或流量超过额度,服务器可以及时回应Auth: 0结束用户的访问。另外需要注意的是,回应同样无需包含html标签,另外,在Auth后的冒号和0/1之间,有一个空格,缺少这个空格也会导致出错。
在配置Wifidog的配置文件wifidog.conf是,配置脚本的配置项都必须以“?”结尾,否则以GET方式传递的QueryString会因Url缺少问号访问错误的脚本。

本文章由 http://www.wifidog.pro/2015/04/03/wifidog%E9%85%8D%E7%BD%AE%E5%88%86%E6%9E%90-1.html 整理编辑,转载请注明出处