0:测试场景
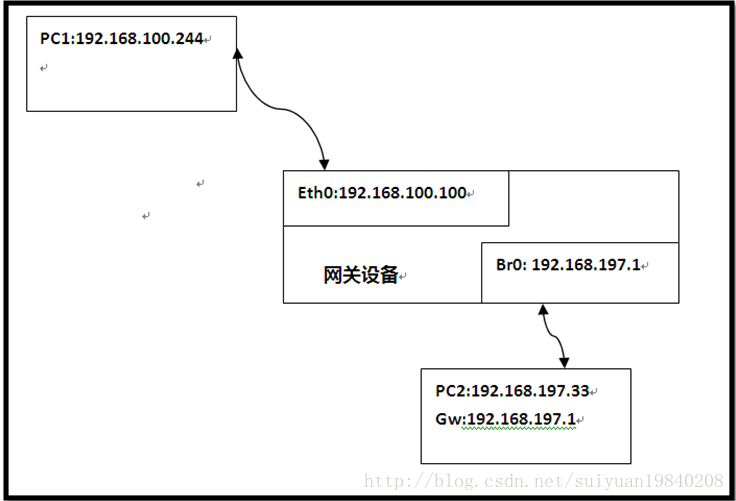
上面是测试使用的环境,其中网关设备是双网卡设备,其中eth0用作外网接口,br0用作内网接口。PC1和PC2分别为外网和内网设备。PC1上面建立web服务器。Home Web Server。最终实现效果是,当PC2上面的主机访问:192.168.100.244的时候,nodogsplash首先将此web页面redirect到nodogsplash内置的页面当中,当用户点击图标之后nodogsplash有会转向最初的访问页面192.168.100.244.。实现了对用户的访问控制。
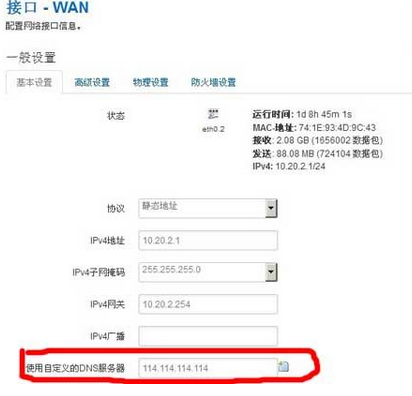
在网关设备上面的IP地址分配如下:
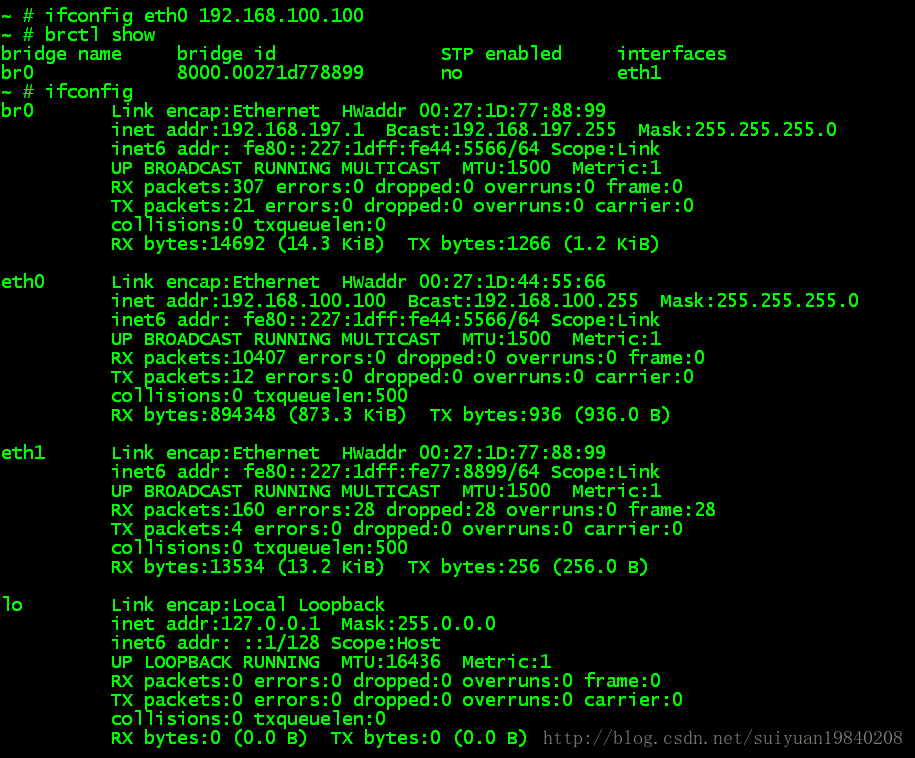
由于此模型中使用是三层模式,即内网和外网之间的通信使用3层协议,必须对在内网访问外网的时候进行SNAT的转化。在网关设备上面配置如下iptables 命令:
iptables -t nat -A POSTROUTING -o eth0 -j MASQUERADE
echo 1 >/proc/sys/net/ipv4/ip_forward
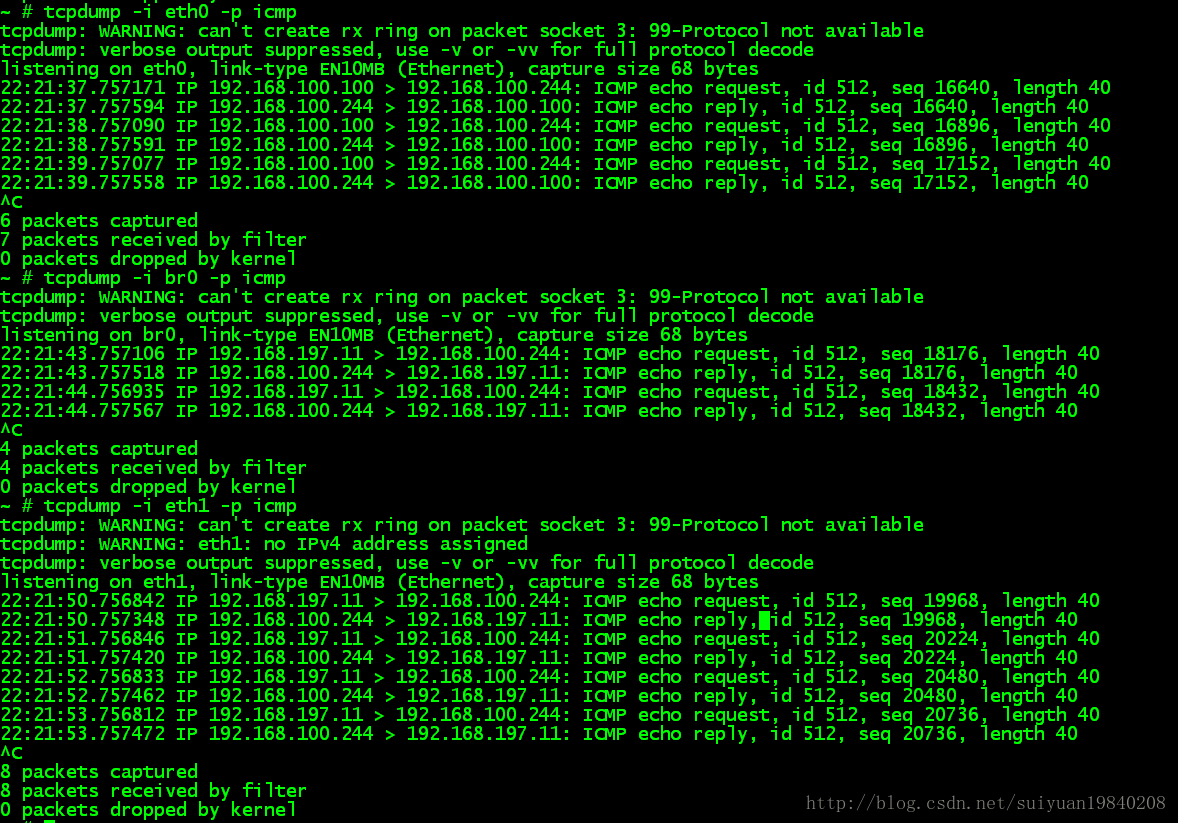
上面的命令是内网访问外网的时候对eth0接口上面的数据包做SNAT。ping包的的SNAT格式如下:
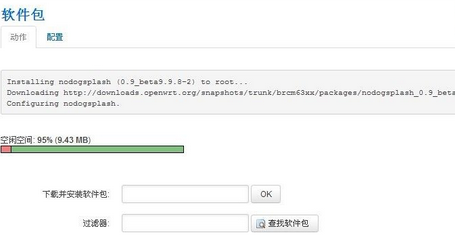
1: nodogsplash编译
在编译前更改一下代码,在测试的时候发现,不能正确的获取IP地址对于的MAC地址。重写arp_get()函数。

root@ocalhost /wlan/portal/nodogsplash-0.9_beta9.9]$分别执行:
export echo=echo
./configure CC=mips-linux---prefix=/wlan/portal/buildroot
make
make install
之后会将编译后的结果安装到/wlan/portal/buildroot目录下:

2:nodogsplash运行
在运行nodogsplash之后,系统会创建一下四个线程:
Gateway.c (z:\wlan\portal\nodogsplash-0.9_beta9.9\src): result = pthread_create(&tid_fw_counter, NULL, (void *)thread_client_timeout_check, NULL);
Gateway.c (z:\wlan\portal\nodogsplash-0.9_beta9.9\src): result = pthread_create(&tid, NULL, (void *)thread_ndsctl, (void *)safe_strdup(config->ndsctl_sock));
Gateway.c (z:\wlan\portal\nodogsplash-0.9_beta9.9\src): result = pthread_create(&tid, NULL, (void *)thread_httpd, (void *)params);
Ndsctl_thread.c (z:\wlan\portal\nodogsplash-0.9_beta9.9\src): result = pthread_create(&tid, NULL, &thread_ndsctl_handler, (void *)fd);
由于在低版本的线程库中,把一个thread当做进程process来处理,故在中断可以看到如下信息:
/tmp # ps
PID USER TIME COMMAND
1 root 0:03 init
2 root 0:00 [kthreadd]
3 root 0:00 [ksoftirqd/0]
4 root 0:01 [events/0]
5 root 0:00 [khelper]
6 root 0:00 [async/mgr]
7 root 0:00 [kblockd/0]
8 root 0:00 [pdflush]
9 root 0:00 [pdflush]
10 root 0:00 [kswapd0]
11 root 0:00 [crypto/0]
32 root 0:00 [mtdblockd]
44 root 0:01 [jffs2_gcd_mtd3]
266 root 0:00 /usr/sbin/telnetd
285 root 0:00 -sh
314 root 0:10 ./nodogsplash -c nodogsplash.conf -d 7 -f
475 root 0:00 ./nodogsplash -c nodogsplash.conf -d 7 -f
476 root 2:00 ./nodogsplash -c nodogsplash.conf -d 7 -f
479 root 0:00 ./nodogsplash -c nodogsplash.conf -d 7 -f
2565 root 0:00 -sh
2704 root 0:00 -sh
2710 root 0:00 -sh
2787 root 0:00 -sh
3478 root 0:00 ps
上面四个线程对于四个进程。
当nodogsplash 运行之后,会在br0上面建立socket server端。
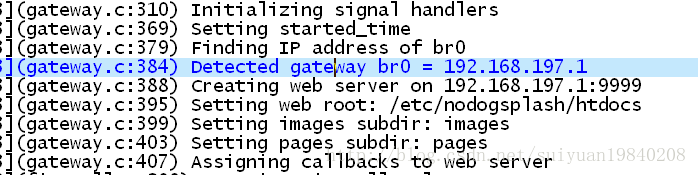
同时设定 web root的目录:
/etc/nodogsplash/htdocs # ls
images infoskel.html splash.html。
3:nodogsplash创建的iptable规则
当以./nodogsplash -c nodogsplash.conf -d 7 -f运行时,打印很详细的调试信息。
首先看一下几个宏的定义说明:
#define CHAIN_TO_INTERNET "ndsNET"
#define CHAIN_TO_ROUTER "ndsRTR"
#define CHAIN_OUTGOING "ndsOUT"
#define CHAIN_INCOMING  "ndsINC"
#define CHAIN_AUTHENTICATED     "ndsAUT"
#define CHAIN_PREAUTHENTICATED  "ndsPRE"
#define CHAIN_BLOCKED    "ndsBLK"
#define CHAIN_ALLOWED    "ndsALW"
#define CHAIN_TRUSTED    "ndsTRU"

typedef enum _t_fw_marks {
  FW_MARK_PREAUTHENTICATED = 0x000,  /* Actually not used as a packet mark */
  FW_MARK_AUTHENTICATED = 0x100,  /* The client is authenticated */
  FW_MARK_BLOCKED = 0x200, /* The client is blocked */
  FW_MARK_TRUSTED = 0x400,  /* The client is trusted */
  FW_MARK_MASK = 0x700 /* Mask to use with FW_MARK's */
} t_fw_marks;
从调试信息中可以取出以下iptables配置命令:
iptables -t mangle -F ndsTRU
iptables -t mangle -F ndsBLK
iptables -t mangle -F ndsALW
iptables -t mangle -F ndsOUT
iptables -t mangle -F ndsINC
iptables -t mangle -X ndsTRU
iptables -t mangle -X ndsBLK
iptables -t mangle -X ndsALW
iptables -t mangle -X ndsOUT
iptables -t mangle -X ndsINC
iptables -t nat -F ndsOUT
iptables -t nat -X ndsOUT
iptables -t filter -F ndsRTR
iptables -t filter -F ndsNET
iptables -t filter -F ndsAUT
iptables -t filter -X ndsRTR
iptables -t filter -X ndsNET
iptables -t filter -X ndsAUT
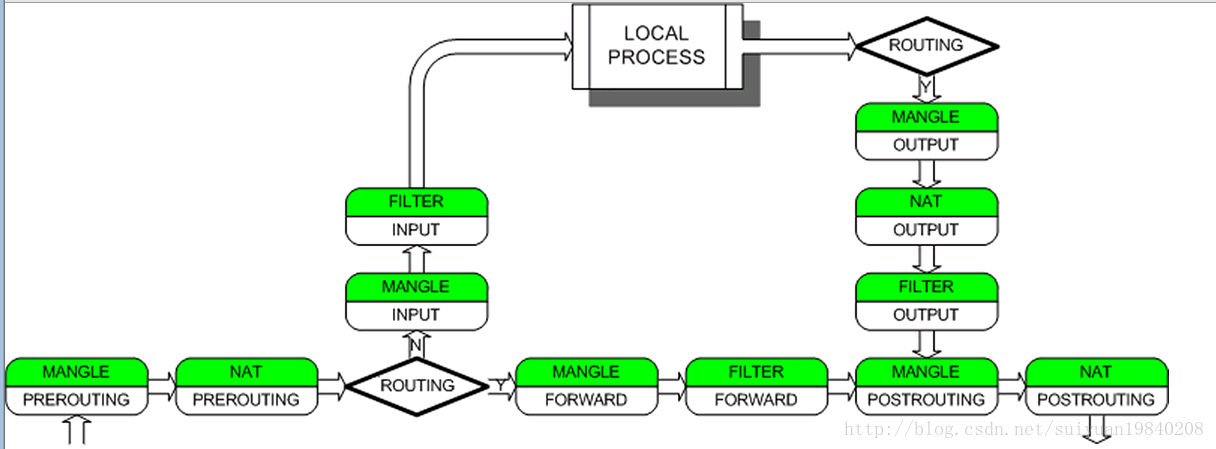
上面的iptables命令主要是删除table:mangle,nat,filter表中的chain
iptables -t mangle -N ndsTRU
iptables -t mangle -N ndsTRU
iptables -t mangle -N ndsINC
iptables -t mangle -N ndsOUT
iptables -t mangle -I PREROUTING 1 -i br0 -s 0.0.0.0/0 -j ndsOUT
iptables -t mangle -I PREROUTING 2 -i br0 -s 0.0.0.0/0 -j ndsBLK
iptables -t mangle -I PREROUTING 3 -i br0 -s 0.0.0.0/0 -j ndsTRU
iptables -t mangle -I POSTROUTING 1 -o br0 -d 0.0.0.0/0 -j ndsINC
上面的iptables命令是在mangle表之下,新建了四个chain:ndsTRU,ndsTRU,ndsINC,ndsOUT。
之后在PREROUTING的chain中添加三个规则,POSTROUTING的chain下面创建一条规则。分别执行四个不同的目标。
在此处的目标是:chain。这个chain就是前面通过-N命令创建的chain。
/tmp # iptables -t mangle --list-rules
-P PREROUTING ACCEPT
-P INPUT ACCEPT
-P FORWARD ACCEPT
-P OUTPUT ACCEPT
-P POSTROUTING ACCEPT
-N ndsBLK
-N ndsINC
-N ndsOUT
-N ndsTRU
-A PREROUTING -i br0 -j ndsOUT
-A PREROUTING -i br0 -j ndsBLK
-A PREROUTING -i br0 -j ndsTRU
-A POSTROUTING -o br0 -j ndsINC
-A ndsINC -d 192.168.197.11/32 -j ACCEPT
-A ndsOUT -s 192.168.197.11/32 -m mac --mac-source F0:4D:A2:7D:E2:75 -j MARK --set-xmark 0x100/0xffffffff
上面显示的是rules.
iptables -t nat -N ndsOUT
iptables -t nat -I PREROUTING -i br0 -s 0.0.0.0/0 -j ndsOUT
iptables -t nat -A ndsOUT -m mark --mark 0x400 -j ACCEPT
iptables -t nat -A ndsOUT -m mark --mark 0x100 -j ACCEPT
iptables -t nat -A ndsOUT -d 0.0.0.0/0 -p tcp --dport 53 -j ACCEPT
iptables -t nat -A ndsOUT -d 0.0.0.0/0 -p udp --dport 53 -j ACCEPT //执行error
iptables -t nat -A ndsOUT -p tcp --dport 80 -j DNAT --to-destination 192.168.197.1:9999
iptables -t nat -A ndsOUT -j ACCEPT
第一条iptables命令新建一个自定义chain,这个chain在后面用来作为PREROUTING的chain的target目标来过滤数据包。其中上面的倒数第二条很重要,将目的port为80的TCP数据包的目的地址及更改为:192.168.197.1:9999.其中192.168.197.1是br0的IP地址,也即是网关的IP地址。nodogsplash在此Ip和port上面监听http的请求。
iptables -t filter -N ndsNET
iptables -t filter -N ndsRTR
iptables -t filter -N ndsAUT
新建filter表中三条自定义chain。
iptables -t filter -I INPUT -i br0 -s 0.0.0.0/0 -j ndsRTR
iptables -t filter -A ndsRTR -m mark --mark 0x200 -j DROP
iptables -t filter -A ndsRTR -m state --state INVALID -j DROP
iptables -t filter -A ndsRTR -m state --state RELATED,ESTABLISHED -j ACCEPT
iptables -t filter -A ndsRTR -p tcp --tcp-flags SYN SYN --tcp-option ! 2 -j DROP
iptables -t filter -A ndsRTR -m mark --mark 0x400 -j ACCEPT
iptables -t filter -A ndsRTR -p tcp --dport 9999 -j ACCEPT
iptables -t filter -A ndsRTR -d 0.0.0.0/0 -p udp --dport 53 -j ACCEPT //error
iptables -t filter -A ndsRTR -d 0.0.0.0/0 -p tcp --dport 53 -j ACCEPT
iptables -t filter -A ndsRTR -d 0.0.0.0/0 -p udp --dport 67 -j ACCEPT //执行error
iptables -t filter -A ndsRTR -d 0.0.0.0/0 -p tcp --dport 22 -j ACCEPT
iptables -t filter -A ndsRTR -d 0.0.0.0/0 -p tcp --dport 80 -j ACCEPT
iptables -t filter -A ndsRTR -d 0.0.0.0/0 -p tcp --dport 443 -j ACCEPT
iptables -t filter -A ndsRTR -j REJECT --reject-with icmp-port-unreachable
此处对经过接口br0数据包的过滤处理,
iptables -t filter -I FORWARD -i br0 -s 0.0.0.0/0 -j ndsNET
iptables -t filter -A ndsNET -m mark --mark 0x200 -j DROP
iptables -t filter -A ndsNET -m state --state INVALID -j DROP
iptables -t filter -A ndsNET -p tcp --tcp-flags SYN,RST SYN -j TCPMSS --clamp-mss-to-pmtu
iptables -t filter -A ndsNET -m mark --mark 0x400 -j ACCEPT
iptables -t filter -A ndsNET -m mark --mark 0x100 -j ndsAUT
iptables -t filter -A ndsAUT -m state --state RELATED,ESTABLISHED -j ACCEPT
iptables -t filter -A ndsAUT -d 192.168.0.0/16 -j REJECT
iptables -t filter -A ndsAUT -d 10.0.0.0/8 -j REJECT
iptables -t filter -A ndsAUT -d 0.0.0.0/0 -p tcp --dport 53 -j ACCEPT
iptables -t filter -A ndsAUT -d 0.0.0.0/0 -p udp --dport 53 -j ACCEPT //执行error
iptables -t filter -A ndsAUT -d 0.0.0.0/0 -p tcp --dport 80 -j ACCEPT
iptables -t filter -A ndsAUT -d 0.0.0.0/0 -p tcp --dport 443 -j ACCEPT
iptables -t filter -A ndsAUT -d 0.0.0.0/0 -p tcp --dport 22 -j ACCEPT
iptables -t filter -A ndsAUT -j REJECT --reject-with icmp-port-unreachable
iptables -t filter -A ndsNET -d 0.0.0.0/0 -p tcp --dport 53 -j ACCEPT
iptables -t filter -A ndsNET -d 0.0.0.0/0 -p udp --dport 53 -j ACCEPT //执行error
iptables -t filter -A ndsNET -j REJECT --reject-with icmp-port-unreachable
iptables -t mangle -A ndsOUT -s 192.168.197.11 -m mac --mac-source f0:4d:a2:7d:e2:75 -j MARK --set-mark 0x100
iptables -t mangle -A ndsINC -d 192.168.197.11 -j ACCEPT
iptables -t mangle -D ndsOUT -s 192.168.197.11 -m mac --mac-source f0:4d:a2:7d:e2:75 -j MARK --set-mark 0x100
iptables -t mangle -D ndsINC -d 192.168.197.11 -j ACCEPT
下面俩个iptables 规则的建立是,可以通过ndsctl命令中:block/unblock MAC来实现。
iptables -t mangle -A ndsBLK -m mac --mac-source f0:4d:a2:7d:e2:75 -j MARK --set-mark 0x200
iptables -t mangle -D ndsBLK -m mac --mac-source f0:4d:a2:7d:e2:75 -j MARK --set-mark 0x200
下面俩个iptables 规则的建立是,可以通过ndsctl命令中:trust/untrust MAC来实现。
iptables -t mangle -A ndsTRU -m mac --mac-source f0:4d:a2:7d:e2:75 -j MARK --set-mark 0x400
iptables -t mangle -D ndsTRU -m mac --mac-source f0:4d:a2:7d:e2:75 -j MARK --set-mark 0x400
4: ndsctl工具
ndsctl是通过unix socket与nodogsplash之间通过socket来实现进程之间的通信。ndsctl的主要作用如下:
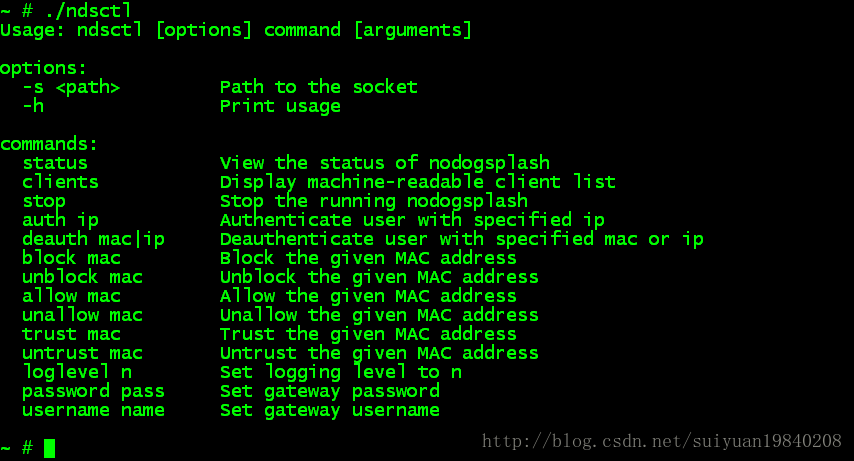
其中上面的的参数中,具有操作功能的参数,主要是用来对特定的MAC和IP地址进行操作,操作的结果就是通过iptables建立不同的数据包过滤机制来达到对用户的访问控制。如下:
~ # ./ndsctl deauth 192.168.197.11
Client 192.168.197.11 deauthenticated.
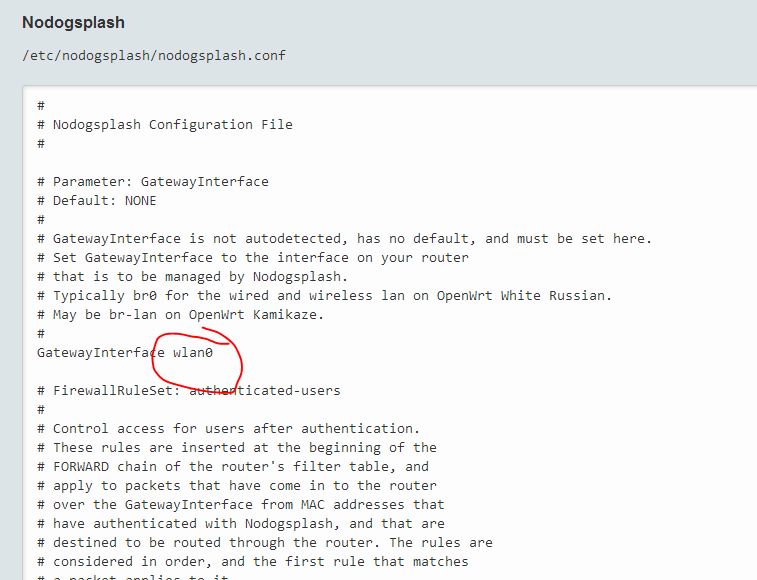
5: 配置文件
其配置文件为:nodogsplash.conf,其中有些很重的参数:目前我使用的有:
RedirectURL http://192.168.197.1/www/index.html 此配置参数说明在进行认证通过之后将要跳转的页面。
GatewayPort 9999 用来进行监听http清楚的socket端口
PasswordAuthentication yes Password 123 表示在进行认证的时候需要输入密码,密码为:123
UsernameAuthentication yes Username root 表示在进行认证的时候需要输入用户名,用户名为:root。
在代码中函数http_nodogsplash_check_userpass(request r, t_auth_target *authtarget) 来完成对输入的用户名和密码的验证工作,验证与否是与上面的参数的配置相关的,在代码中有如下的判断:
if(!config->passwordauth && !config->usernameauth) {
/ Not configured to use username/password check; can't fail. /
return 1;
}
当在配置文件中没有配置的时候,不进行验证。
同时还有一个比较重要的函数:
/ Allocate and return a pointer to a string that is the redirect URL. Caller must free.
/
char http_nodogsplash_make_redir(char* redirhost, char* redirpath) {
s_config config;
char redir;
config = config_get_config();
if(config->redirectURL)
{
safe_asprintf(&redir,"%s?to=%s%s",config->redirectURL,redirhost,redirpath);
debug(LOG_DEBUG,"Redirect request http://%s%s, substituting %s",redirhost,redirpath,config->redirectURL);
printf("Redirect address:%s\n",redir);
//redir = safe_strdup(config->redirectURL);
}
else
{
/* We just assume protocol http; after all we caught the client by
redirecting port 80 tcp packets
*/
safe_asprintf(&redir,"http://%s%s",redirhost,redirpath);
debug(LOG_DEBUG,"http_nodogsp lash_make_redir:no define redirectURL in config, redir= %s ",redir);
}
return redir;
}上面的代码仔细的看一下。
6:测试
当用户在PC2的浏览器中访问:http://192.168.100.244的时候,nodogsplash中的调试信息如下:
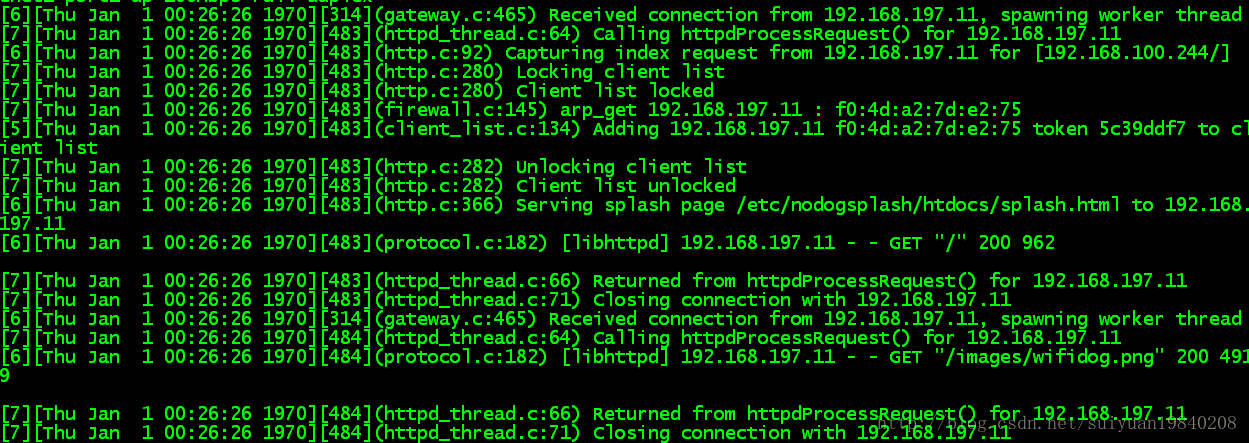
上面的日志信息中,首先可以看到:nodogsplash收到了一个来自192.168.197.11的连接请求,同时从调试信息中可以看到192.168.197.11访问的request是:192.168.100.244。之后从/proc/net/arp中取出192.168.197.11对于的MAC地址。将其对于的ip地址和MAC添加到用户访问列表中来实现对此用户进行监控的目的。
上面serving splash page /etc/nodogsplash/htdocs/splash.html to 192.168.197.11的意思当访问192.168.100.244的时候将显示splash.html 。使用的图标为:/images/wifidog.png。
执行的效果如下:
当点击上面的图标时,会自动跳转到:http://192.168.100.244。当IP:192.168.197.11第一次访问外网的时候,会让用户进行确认,确认之后在默认的时候之内,如果用户再次访问外网服务时,不会再次出现此确认窗口。
当执行下面的命令的时候:
~ # ./ndsctl deauth 192.168.197.11
Client 192.168.197.11 deauthenticated.
nodogsplash中的调试信息如下:
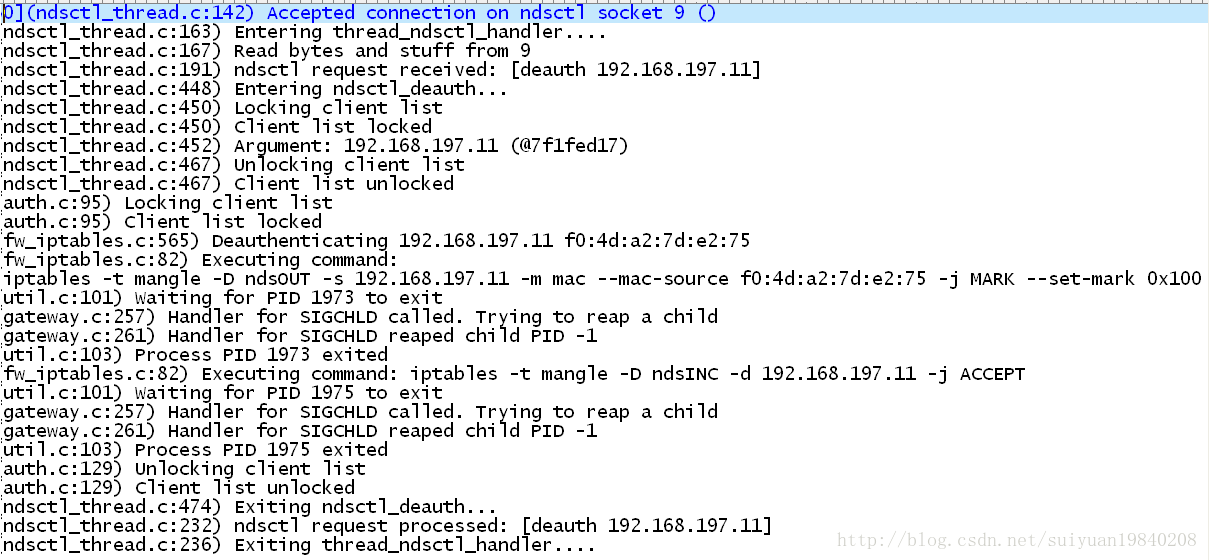
从上面的信息可以看出,当执行ndsctl相关的命令时,ndsctl会与nodogsplash建立一个socket连接。当nodogsplash收到ndsctl的请求之后创建一个thread来处理此请求,上面出现了俩条iptables命令,
第一条:删除mangle表中的ndsOUT规则,就不再对满足192.168.197.11的数据包进行进行MARK操作。
第二条:不再accept ,192.168.197.11的数据包。
本文章由 http://www.wifidog.pro/2015/05/01/nodogsplash-%E4%BD%BF%E7%94%A8%E6%96%B9%E6%B3%95%E5%92%8C%E6%BA%90%E7%A0%81%E5%88%86%E6%9E%90.html]X�230X 整理编辑,转载请注明出处