分类 wifidog openwrt 下的文章

openWrt软件开发教程 - 交叉编译和ipk包生成

一 交叉编译
1· 建立交叉编译环境
在使用buildroot对openwrt进行编译之后,在buildroot目录下会有一个名叫staging_dir的目录,针对当前平台的toolchain都在这个目录下。
1.1 增加toolchain的目录到PATH目录中
Vim ~/.bash_profile
添加代码:

#add openWrt cross-compile path
PATH=$PATH:/home/jason/openWrt/trunk/staging_dir/toolchain-i386_gcc-4.6-linaro_uClibc-0.9.33.2/bin/

1.2 增加staging_dir的目录到toolchain PATH
Vim ~/.bash_profile
添加代码:
STAGING_DIR=/home/jason/openWrt/trunk/staging_dir/
exportSTAGING_DIR
1.3 保存退出
2· 编译
2.1 configure
./configure--target=i486-openwrt-linux-uclibc
2.2 make
make CC=i486-openwrt-linux-uclibc-gcc LD=i486-openwrt-linux-uclibc-ld
二 编译ipk包
1· 编译SDK
在buildroot目录下make menuconfig,然后选中SDK进行编译
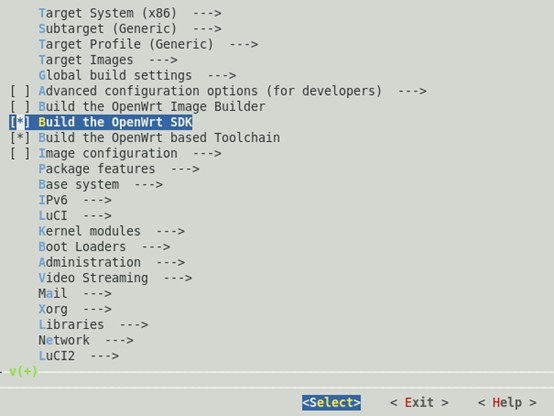
1351761912_4167.jpg

选中后,进行make编译。
编译完成后,对应生成的SDK会出现类似这样的目录:“openWrt/trunk/bin/x86”,进入SDK后,打印当前工作路径如下:
“/openWrt/trunk/bin/x86/OpenWrt-SDK-x86-for-redhat-x86_64-gcc-4.6-linaro_uClibc-0.9.33.2”
2· 创建工程
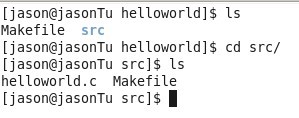
在sdk的package目录下创建我们的工程“helloworld”:
22.jpg

新建目录中包含src目录,这个目录就是我们的源代码所在地,另外一个非常重要的文件Makefile,这个Makefile的组成与GNU的有所不同,有点类似于制作rpm包时的spec文件。到后面会有更详细的介绍。以下是具体文件的位置:
33.jpg

44.jpg

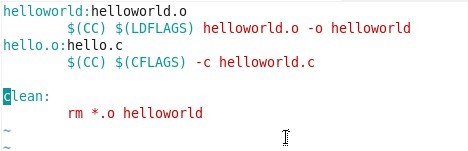
Src目录下的Makefile文件内容如下:
55.jpg

最后是helloworld目录下的Makefile的内容:

##############################################
# OpenWrtMakefile for helloworld program
#
#
# Most ofthe variables used here are defined in
# theinclude directives below. We just need to
# specifya basic description of the package,
# whereto build our program, where to find
# thesource files, and where to install the
#compiled program on the router.
#
# Be verycareful of spacing in this file.
# Indentsshould be tabs, not spaces, and
# thereshould be no trailing whitespace in
# linesthat are not commented.
#
##############################################

include$(TOPDIR)/rules.mk

# Nameand release number of this package
PKG_NAME:=helloworld
PKG_RELEASE:=1

# Thisspecifies the directory where we're going to build the program.
# Theroot build directory, $(BUILD_DIR), is by default the build_mipsel
#directory in your OpenWrt SDK directory
PKG_BUILD_DIR:= $(BUILD_DIR)/$(PKG_NAME)

include$(INCLUDE_DIR)/package.mk

# Specifypackage information for this program.
# Thevariables defined here should be self explanatory.
# If youare running Kamikaze, delete the DESCRIPTION
#variable below and uncomment the Kamikaze define
# directivefor the description below
definePackage/helloworld
SECTION:=utils
CATEGORY:=Utilities
TITLE:=Helloworld-- prints a snarky message
endef

# Specifywhat needs to be done to prepare for building the package.
# In ourcase, we need to copy the source files to the build directory.
# This isNOT the default.  The default uses thePKG_SOURCE_URL and the
#PKG_SOURCE which is not defined here to download the source from the web.
# Inorder to just build a simple program that we have just written, it is
# mucheasier to do it this way.
defineBuild/Prepare
mkdir -p $(PKG_BUILD_DIR)
$(CP) ./src/* $(PKG_BUILD_DIR)/
endef


# We donot need to define Build/Configure or Build/Compile directives
# Thedefaults are appropriate for compiling a simple program such as this one


# Specifywhere and how to install the program. Since we only have one file,
# thehelloworld executable, install it by copying it to the /bin directory on
# therouter. The $(1) variable represents the root directory on the router running
#OpenWrt. The $(INSTALL_DIR) variable contains a command to prepare the install
#directory if it does not already exist. Likewise $(INSTALL_BIN) contains the
# commandto copy the binary file from its current location (in our case the build
#directory) to the install directory.
definePackage/helloworld/install
$(INSTALL_DIR) $(1)/bin
$(INSTALL_BIN) $(PKG_BUILD_DIR)/helloworld$(1)/bin/
endef


# Thisline executes the necessary commands to compile our program.
# Theabove define directives specify all the information needed, but this
# linecalls BuildPackage which in turn actually uses this information to
# build apackage.
$(eval $(call BuildPackage,helloworld))

这个Makefile的语法规则还是参考官网吧:
http://wiki.openwrt.org/doc/devel/packages
3· 编译
将当前目录返回到SDK:
执行make进行编译。如果一切顺利,最后的结果会保存在SDK/bin/x86/packages目录下,名称为helloword_1_x86.ipk。
4· 安装最新编译的包
通过scp将该包拷贝到目的机器上,通过opkg包管理工具进行安装:
opkg install helloworld_1_x86.ipk
一切顺利,包安装成功,在当前路径下执行helloworld查看程序执行结果。

本文章由 http://www.wifidog.pro/2014/12/17/openWrt%E8%BD%AF%E4%BB%B6%E5%BC%80%E5%8F%91%E6%95%99%E7%A8%8B.html 整理编辑,转载请注明出处

WiFidog编译成库

1) 在package/ utils下创建wifidog_lib目录。在wifidog_lib目录下创建一个文件夹src和一个Makefile文件。Makefile文件编写内容如下:

#
# Copyright (C) 2006,2013 OpenWrt.org
#
# This is free software, licensed under the GNU General Public License v2.
# See /LICENSE for more information.
#
include $(TOPDIR)/rules.mk 

PKG_NAME:=wifidog_lib
PKG_VERSION:=20130917

PKG_BUILD_DIR := $(BUILD_DIR)/$(PKG_NAME)

include $(INCLUDE_DIR)/package.mk

define Package/wifidog_lib
  SECTION:=utils
  CATEGORY:=Utilities
  DEPENDS:=+iptables-mod-extra +iptables-mod-ipopt +iptables-mod-nat-extra +libpthread
  TITLE:=A wireless captive portal solution
endef

define Package/wifidog_lib/description
      The Wifidog project is a complete and embeddable captive
      portal solution for wireless community groups or individuals
      who wish to open a free Hotspot while still preventing abuse
      of their Internet connection.
endef

define Build/Prepare
      mkdir -p $(PKG_BUILD_DIR)
      $(CP) ./src/* $(PKG_BUILD_DIR)/
endef

define Build/Configure
endef

define Build/Compile
      $(MAKE) -C $(PKG_BUILD_DIR) \
           CC="$(TARGET_CC)" \
           CFLAGS="$(TARGET_CFLAGS) -Wall" \
           LDFLAGS="$(TARGET_LDFLAGS)"
endef

define Package/wifidog_lib/conffiles
    /etc/wifidog.conf
endef

define Package/wifidog_lib/install
      $(INSTALL_DIR) $(1)/usr/bin
      $(INSTALL_BIN) $(PKG_BUILD_DIR)/test_wifidog $(1)/usr/bin/
      $(INSTALL_DIR) $(1)/usr/lib
      $(CP) $(PKG_BUILD_DIR)/libwifidog.so* $(1)/usr/lib/
      $(INSTALL_DIR) $(1)/etc
      $(INSTALL_DATA) $(PKG_BUILD_DIR)/wifidog.conf $(1)/etc/
endef

$(eval $(call BuildPackage,wifidog_lib))

2) 解压wifidog包进入src目录
tar xzvf wifidog-20130917-440445db60b0c3aff528ea703a828b0567293387.tar.gz –C src

3) 在src下创建Makefile文件,内容如下

LIB_VERMAJOR = 0
LIB_VERMINOR = 1
LIB_FILENAME = libhttpd.so

LIBWIFIDOG_FILENAME = libwifidog.so

OBJEXT = o

CFLAGS += -Os -pipe -mno-branch-likely -mips32r2 -mtune=34kc -fno-caller-saves -fhonour-copts -Wno-error=unused-but-set-variable -msoft-float

LIB_CFLAGS  = $(CFLAGS) -shared -fPIC -DPIC
LIB_LDFLAGS = $(LDFLAGS) -Wl,-soname,$(LIB_FILENAME).$(LIB_VERMAJOR).$(LIB_VERMINOR)
LIBWIFIDOG_LDFLAGS = $(LDFLAGS) -Wl,-soname,$(LIBWIFIDOG_FILENAME).$(LIB_VERMAJOR).$(LIB_VERMINOR)

wifidog_OBJECTS = src/conf.$(OBJEXT) src/commandline.$(OBJEXT)\
  src/debug.$(OBJEXT) src/fw_iptables.$(OBJEXT) src/firewall.$(OBJEXT) \
  src/gateway.$(OBJEXT) src/centralserver.$(OBJEXT) src/http.$(OBJEXT) \
  src/auth.$(OBJEXT) src/client_list.$(OBJEXT) src/util.$(OBJEXT) \
  src/wdctl_thread.$(OBJEXT) src/ping_thread.$(OBJEXT) src/safe.$(OBJEXT) \
  src/httpd_thread.$(OBJEXT) src/wifidogapi.$(OBJEXT)

wdctl_OBJECTS = src/wdctl.$(OBJEXT)

LIB_OBJ = libhttpd/protocol.o libhttpd/api.o libhttpd/version.o libhttpd/ip_acl.o

DEFS = -DHAVE_CONFIG_H
DEFAULT_INCLUDES = -I.-I..
sysconfdir = /etc
AM_CPPFLAGS += \
  -I./libhttpd/ \
  -DSYSCONFDIR='"$(sysconfdir)"'

COMPILE = $(CC) $(DEFS) $(DEFAULT_INCLUDES) $(INCLUDES) $(AM_CPPFLAGS) \
  $(CPPFLAGS) $(AM_CFLAGS) $(CFLAGS)
LTCOMPILE = $(LIBTOOL) --tag=CC $(AM_LIBTOOLFLAGS) $(LIBTOOLFLAGS) \
  --mode=compile $(CC) $(DEFS) $(DEFAULT_INCLUDES) $(INCLUDES) \
  $(AM_CPPFLAGS) $(CPPFLAGS) $(AM_CFLAGS) $(CFLAGS)
CCLD = $(CC)
LINK = $(CCLD) $(AM_CFLAGS) $(CFLAGS) $(AM_LDFLAGS) \
  $(LDFLAGS) -o $@

wifidog_LDADD = libhttpd/$(LIB_FILENAME).$(LIB_VERMAJOR).$(LIB_VERMINOR)

LIBS = -lnsl -lpthread


all: Makefile   libhttpd   libwifidog test_wifidog

test_wifidog: src/test_wifidog.o libhttpd libwifidog
  @rm -f test_wifidog
  $(LINK) src/test_wifidog.o $(LIBWIFIDOG_FILENAME).$(LIB_VERMAJOR).$(LIB_VERMINOR)  $(LIBS)

wdctl: $(wdctl_OBJECTS) libhttpd
  @rm -f wdctl
  $(LINK) $(wdctl_OBJECTS) $(wdctl_LDADD) $(LIBS)
wifidog_test: $(wifidog_OBJECTS) libhttpd
  @rm -f wifidog_test
  $(LINK) $(wifidog_OBJECTS) $(wifidog_LDADD) $(LIBS)          

libhttpd:$(LIB_OBJ) ./libhttpd/httpd_priv.h ./libhttpd/httpd.h
  $(CC) $(LIB_CFLAGS) $(LIB_LDFLAGS) $(LIB_OBJ) $(LIBS) \
       -o libhttpd/$(LIB_FILENAME).$(LIB_VERMAJOR).$(LIB_VERMINOR)

libwifidog:$(wifidog_OBJECTS) $(wdctl_OBJECTS) $(LIB_OBJ) ./libhttpd/httpd_priv.h ./libhttpd/httpd.h
  $(CC) $(LIB_CFLAGS) $(LIBWIFIDOG_LDFLAGS) $(LIB_OBJ) $(wifidog_OBJECTS) $(wdctl_OBJECTS) $(LIBS) \
       -o $(LIBWIFIDOG_FILENAME).$(LIB_VERMAJOR).$(LIB_VERMINOR)

.c.o:
    $(CC) $(DEFS) $(AM_CPPFLAGS) $(DEFAULT_INCLUDES) $(INCLUDES) $(CFLAGS) -MD -fPIC -DPIC -c -o $@ $<


clean:
  rm -f  $(LIB_FILENAME)*

4) 修改src下对应的源代码,同时把scripts/init.d/wifidog脚本提供的功能通过lib库提供,这样 lib库需要提供int wifidogstart(),int wifidogstop(),int wifidogreload(),int wifidogrestart()。make package/wifidog_lib/compile V=s进行编译生成libwifidog.so.0.1和测试程序test_wifidog。

本文章由 http://www.wifidog.pro/2014/12/15/wifidog%E7%BC%96%E8%AF%91%E5%BA%93.html 整理编辑,转载请注明出处

wifidog和authpuppy配合使用,实现wifi认证

通过在路由器系统(比如dd-wrt,openwrt)安装wifi看门狗程序wifidog,在认证服务器安装authpuppy wifi认证程序,可以实现类似在商场、机场、银行经常看到的免费wifi使之前看到的认证页面或产品、企业广告、介绍页面的功能。(wifidog 和 authpuppy 都是开源项目)

wifidog
官网地址:http://dev.wifidog.org/

authpuppy
官网地址:http://www.authpuppy.org

openwrt安装wifidog方法
http://wiki.openwrt.org/doc/howto/wireless.hotspot.wifidog?s[]=wifidog

linux安装authpuppy方法
可以看下这篇文章:
http://blog.csdn.net/sdvch/article/details/16350763
也可以在官网查看http://www.authpuppy.org

如果自己没有服务器搭建authpuppy认证程序,但是路由器是dd-wrt,openwrt系统可以通过安装wificat实现无线认证功能,可参考如下两篇文章
dd-wrt 安装wificat方法:http://bbs.pcpop.com/forum.php?mod=viewthread&tid=10646786
openwrt安装wificat方法:http://www.right.com.cn/forum/thread-141807-1-1.html

本文章由 http://www.wifidog.pro/2014/12/12/wifidog%E5%92%8Cauthpuppy.html 整理编辑,转载请注明出处