openWrt软件开发教程 - 交叉编译和ipk包生成

一 交叉编译
1· 建立交叉编译环境
在使用buildroot对openwrt进行编译之后,在buildroot目录下会有一个名叫staging_dir的目录,针对当前平台的toolchain都在这个目录下。
1.1 增加toolchain的目录到PATH目录中
Vim ~/.bash_profile
添加代码:

#add openWrt cross-compile path
PATH=$PATH:/home/jason/openWrt/trunk/staging_dir/toolchain-i386_gcc-4.6-linaro_uClibc-0.9.33.2/bin/

1.2 增加staging_dir的目录到toolchain PATH
Vim ~/.bash_profile
添加代码:
STAGING_DIR=/home/jason/openWrt/trunk/staging_dir/
exportSTAGING_DIR
1.3 保存退出
2· 编译
2.1 configure
./configure--target=i486-openwrt-linux-uclibc
2.2 make
make CC=i486-openwrt-linux-uclibc-gcc LD=i486-openwrt-linux-uclibc-ld
二 编译ipk包
1· 编译SDK
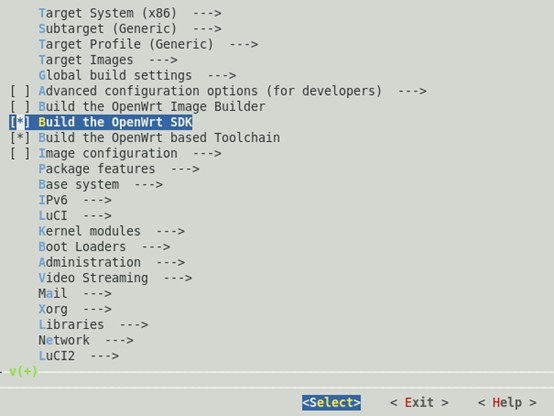
在buildroot目录下make menuconfig,然后选中SDK进行编译
1351761912_4167.jpg

选中后,进行make编译。
编译完成后,对应生成的SDK会出现类似这样的目录:“openWrt/trunk/bin/x86”,进入SDK后,打印当前工作路径如下:
“/openWrt/trunk/bin/x86/OpenWrt-SDK-x86-for-redhat-x86_64-gcc-4.6-linaro_uClibc-0.9.33.2”
2· 创建工程
在sdk的package目录下创建我们的工程“helloworld”:
22.jpg

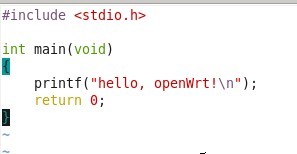
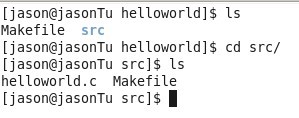
新建目录中包含src目录,这个目录就是我们的源代码所在地,另外一个非常重要的文件Makefile,这个Makefile的组成与GNU的有所不同,有点类似于制作rpm包时的spec文件。到后面会有更详细的介绍。以下是具体文件的位置:
33.jpg

44.jpg

Src目录下的Makefile文件内容如下:
55.jpg

最后是helloworld目录下的Makefile的内容:

##############################################
# OpenWrtMakefile for helloworld program
#
#
# Most ofthe variables used here are defined in
# theinclude directives below. We just need to
# specifya basic description of the package,
# whereto build our program, where to find
# thesource files, and where to install the
#compiled program on the router.
#
# Be verycareful of spacing in this file.
# Indentsshould be tabs, not spaces, and
# thereshould be no trailing whitespace in
# linesthat are not commented.
#
##############################################

include$(TOPDIR)/rules.mk

# Nameand release number of this package
PKG_NAME:=helloworld
PKG_RELEASE:=1

# Thisspecifies the directory where we're going to build the program.
# Theroot build directory, $(BUILD_DIR), is by default the build_mipsel
#directory in your OpenWrt SDK directory
PKG_BUILD_DIR:= $(BUILD_DIR)/$(PKG_NAME)

include$(INCLUDE_DIR)/package.mk

# Specifypackage information for this program.
# Thevariables defined here should be self explanatory.
# If youare running Kamikaze, delete the DESCRIPTION
#variable below and uncomment the Kamikaze define
# directivefor the description below
definePackage/helloworld
SECTION:=utils
CATEGORY:=Utilities
TITLE:=Helloworld-- prints a snarky message
endef

# Specifywhat needs to be done to prepare for building the package.
# In ourcase, we need to copy the source files to the build directory.
# This isNOT the default.  The default uses thePKG_SOURCE_URL and the
#PKG_SOURCE which is not defined here to download the source from the web.
# Inorder to just build a simple program that we have just written, it is
# mucheasier to do it this way.
defineBuild/Prepare
mkdir -p $(PKG_BUILD_DIR)
$(CP) ./src/* $(PKG_BUILD_DIR)/
endef


# We donot need to define Build/Configure or Build/Compile directives
# Thedefaults are appropriate for compiling a simple program such as this one


# Specifywhere and how to install the program. Since we only have one file,
# thehelloworld executable, install it by copying it to the /bin directory on
# therouter. The $(1) variable represents the root directory on the router running
#OpenWrt. The $(INSTALL_DIR) variable contains a command to prepare the install
#directory if it does not already exist. Likewise $(INSTALL_BIN) contains the
# commandto copy the binary file from its current location (in our case the build
#directory) to the install directory.
definePackage/helloworld/install
$(INSTALL_DIR) $(1)/bin
$(INSTALL_BIN) $(PKG_BUILD_DIR)/helloworld$(1)/bin/
endef


# Thisline executes the necessary commands to compile our program.
# Theabove define directives specify all the information needed, but this
# linecalls BuildPackage which in turn actually uses this information to
# build apackage.
$(eval $(call BuildPackage,helloworld))

这个Makefile的语法规则还是参考官网吧:
http://wiki.openwrt.org/doc/devel/packages
3· 编译
将当前目录返回到SDK:
执行make进行编译。如果一切顺利,最后的结果会保存在SDK/bin/x86/packages目录下,名称为helloword_1_x86.ipk。
4· 安装最新编译的包
通过scp将该包拷贝到目的机器上,通过opkg包管理工具进行安装:
opkg install helloworld_1_x86.ipk
一切顺利,包安装成功,在当前路径下执行helloworld查看程序执行结果。

本文章由 http://www.wifidog.pro/2014/12/17/openWrt%E8%BD%AF%E4%BB%B6%E5%BC%80%E5%8F%91%E6%95%99%E7%A8%8B.html 整理编辑,转载请注明出处

wifidog 支持域名白名单

修改源码:
fw_iptables.c,iptables_compile 函数修改:

if (rule->mask != NULL) {
    char *mask=rule->mask;
    int mask_len=strlen(mask);
    int is_domain=0,
        i=0;
    for(;i<mask_len;i++){
        if((mask[i]>=46&&mask[i]<=57)||mask[i]==32){
            continue;
        }else{
            is_domain=1;
            break;
        }
    }
    char * ip =NULL;
    if(is_domain){
        struct in_addr * h_addr =wd_gethostbyname(mask);
        if(h_addr){
            ip= safe_strdup(inet_ntoa(*h_addr));
            free(h_addr);
        }
        if(ip){
            mask=ip;
        }else{
            debug(LOG_ERR, "doamin %s not find ip try again!",mask);
            mask="0.0.0.0";
        }
    }
    snprintf((command + strlen(command)), (sizeof(command) - 
                strlen(command)), "-d %s ", mask);
    if(ip){
        free(ip);
    }
}

conf.c, _parse_firewall_rule 修改:

for (i = 0; *(mask + i) != '\0'; i++)
        if (!isdigit((unsigned char)*(mask + i))
                &&!isalpha((unsigned char)*(mask + i))
                && (*(mask + i) != '-')
                && (*(mask + i) != '.')
                && (*(mask + i) != '/'))
            all_nums = 0; /*< No longer only digits */

本文章由 http://www.wifidog.pro/2014/12/17/wifidog-%E5%9F%9F%E5%90%8D%E7%99%BD%E5%90%8D%E5%8D%95.html 整理编辑,转载请注明出处

ddwrt+wifidog搭建热点认证系统(无线路由器web认证)

先来说说什么是热点认证系统,如果你有用过酒店或者机场的wifi,当你连上网络后试图去浏览某些页面的时候就会被从定向到一个特定的页面要求你登录啊什么的,是的,这就是热点登陆系统,可能也可以叫做wifi login portal。不过是什么,如果你理解了这概念,或者觉得有用,那么我们就来实际的搭建一下吧。

准备工作:
1、一个支持ddwrt的路由器,关于如何得到这个路由器以及那些是兼容的请上ddwrt官网自行搜索,个人比较推荐的是上tb买个二手的linksys wrt54g的路由器,一般这样的一个机器都有被改造过,扩充flash容量以便能安装完全版的ddwrt固件。所以下文将不会讲如何安装ddwrt固件,其实我只是自己也没安装过罢了。。

2、internet环境(其实不连应该也没什么关系,不过我没测试过)。首先有一点很重要的是,如果你把路由器只接个lan口当做交换机来用的话是无法成功的,所以这里我们必须在wan口上插根网线,并在设置里配置好二级路由,开启dhcp服务。

3、一台机器,通过lan口连接路由器,用来配置鉴权服务器。

准备完成后,举例配置如下:
ddwrt路由器 ip:192.168.11.1
鉴权服务器ip:192.168.11.128
就可以进行配置了。先配置服务器吧,wifidog官网上说使用了新的验证服务器authpuppy,于是就下载之,之后如果你想省去麻烦的php和mysql等等配置工作,建议直接使用xampp。
然后把解压的文件夹authpuppy扔到xampp默认的访问目录htdocs下,修改authpuppy部分目录的权限(详细的参看官网设置,这里就整个目录777了)。

打开浏览器输入localhost/authpuppy/web/后来到安装页面,根据要求安装就是了,这部应该没什么问题,需要你建立数据库就按照要求建个就是了,用户名则可以随便分配。
安装完之后用新建的管理员账号登陆,选择manage node,新建一个node,注意这里有个GW ID的设置,随便设个,但必须在路由器端的wifidog设置中也使用这个id,不然无法进行认证。到此为止鉴权服务器的简单功能应该算是配置完成了,之后加入复杂的功能等等则可以通过官网提供的插件和api或者自己看源码理解,可能我下次会说到,这里就不提了。

接着是路由器的配置,点开"服务"标签,二级标签选"热点",在里面会看到被禁用的狗狗,开启之,依下设置:
网关ID,就是前面服务器设的那个GW ID
服务器名,随意了
下面一些默认不要动
鉴权服务器主机名,安装authpuppy服务器的ip地址192.168.11.128
SSL服务禁用
端口,还是看你服务器的配置,默认是80。
鉴权服务器路径,/authpuppy/web/
填写完成后按应用就可以了。这时候你可以登录到路由器上的wifidog看看dog是否正常工作。在浏览器中输入:192.168.11.1:2060/wifidog/status
不过此时还有一部非常重要的事要做,那就是进入路由器管理菜单,重启路由器,之前一直由于这个原因搞了我很久。

测试,随便找个带wifi的电脑或手机,连上我们设的热点后,任意访问个页面,此时如果页面成功跳转了那么便大功告成,没有的话检测看看原因,一般如果wifidog状态正常的话是不会出问题的。
over~其实配置起来还是蛮简单的,关键还是在于后续的开发和管理上面。

本文章由 http://www.wifidog.pro/2014/12/16/68.html整理编辑,转载请注明出处

wifidog认证

前段时间使用wifidog进行wifi强制认证,现在做个小结。

  1. 首先简单说说wifidog认证的过程
    客户端首次连接到wifi后,浏览器请求将会被重定向到:
    login/?gw_address=%s&gw_port=%d&gw_id=%s&url=%s
    验证通过后,客户端被重定向到网关,url格式如下:
    http://网关地址:网关端口/wifidog/auth?token=xxx
    wifidong会启动一个线程周期性地报告每一个用户的状态信息,并通过如下地址发送给认证服务器:
    auth_server:/auth/?stage=
    ip=
    mac=
    token=
    incoming=
    outgoing=
    认证服务器根据该状态信息决定是否允许该用户继续连接,并回复网关,回复格式为:Auth:状态码,
    如:Auth:1
    常用状态码:
    0:AUTH_DENIED,表示拒绝
    1:AUTH_ALLOWED,验证通过
    验证通过后,将重定向到如下地址:
    portal/?gw_id=%s
    wifidog的ping协议
    wifidog通过ping协议将当前状态信息发送给认证服务器,发送地址为:
    http://auth_sever/ping/?
    gw_id=%s
    sys_uptime=%lu
    sys_memfree=%u
    sys_load=%.2f
    wifidog_uptime=%lu
    认证服务器须返回一个“Pong”作为回应。
  2. 实战应用
    struts配置文件:


    /Login/index.jsp
    /error.jsp


Action方法

public String login() {
    try{
        System.out.println("login start!");
                System.out.println("gw_port:"+gw_port);
        System.out.println("login end!");

     }
    catch(Exception e)
    {
        e.printStackTrace();
        return INPUT;
    }
    return "success";
}
public void ping() {
    try{
        System.out.println("ping start!");
        System.out.println(gw_id);
        ServletActionContext.getResponse().getWriter().write("Pong");
        System.out.println("ping end!");
    }
    catch(Exception e)
    {
        e.printStackTrace();
    }
}
public void portal() {
    try{
        System.out.println("portal start");
        System.out.println("protal"+token);
        ServletActionContext.getResponse().sendRedirect("/demo/listAction");
        System.out.println("portal end");
    }
    catch(Exception e)
    {
        e.printStackTrace();
    }
}
public void auth() {
    try{
        System.out.println("auth start!");
        System.out.println("mac"+mac);
        System.out.println("stage"+stage);
        System.out.println("token"+token);
        ServletActionContext.getResponse().getWriter().write("Auth: 1");
        System.out.println("auth end!");                                                                                                                                                                                                                                                                                                                       
     }
    catch(Exception e)
    {
        e.printStackTrace();
    }
}

/Login/index.jsp代码:

<%
String path = request.getContextPath();
String basePath = request.getScheme()+"://"+request.getServerName()+":"+request.getServerPort()+path+"/";
    DateFormat format=new SimpleDateFormat("yyMMddHHmmss");
    String formatData=format.format(new Date());
    int ramdom=new Random().nextInt(1000);
    String token=formatData+ramdom;
    if(session.getAttribute("token")==null)
       session.setAttribute("token",token);

%>
<form method="GET" action='http://192.168.1.1:2060/wifidog/auth'>
<input type='hidden' name='token' value="<s:property value="#session.token" />" />
<input type='submit' value='Welcome!'/>
</form>

上面的192.168.1.1为网关的ip,2060为网关端口。
当然,完全可以在处理完login后直接跳到该地址。我们这里为演示其认证流程,故跳到该页面。
效果:
客户端连接到wifi后,打开任何连接均跳到上面的index.jsp中,点击"Welcome"后,跳到/demo/listAction,即我们的目标地址。此后点击其他连接将不再拦截。
提示:安装wifidog的路由器必须可以访问Internet,否则wifidog拦截失败,无法跳到我们设定的页面。

本文章由 http://www.wifidog.pro/2014/12/16/67.html 整理编辑,转载请注明出处