分类 默认分类 下的文章

编写自己的WifiDog认证服务器

使用的是php来编写auth_server服务器,因为这样比较简单。
1· 首先是login.php:
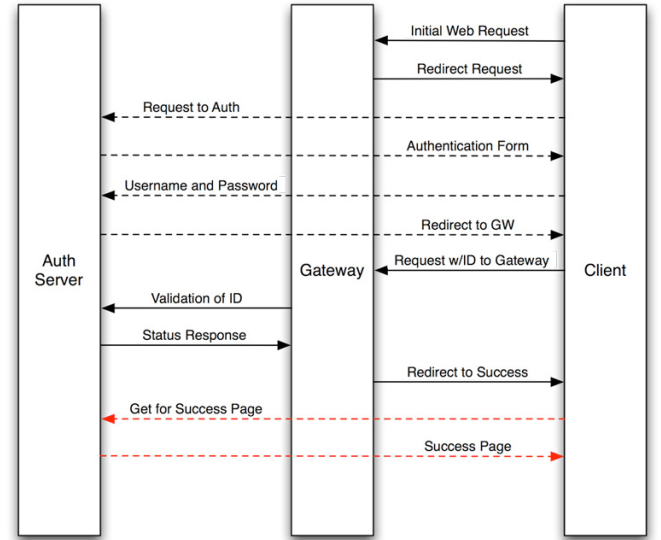
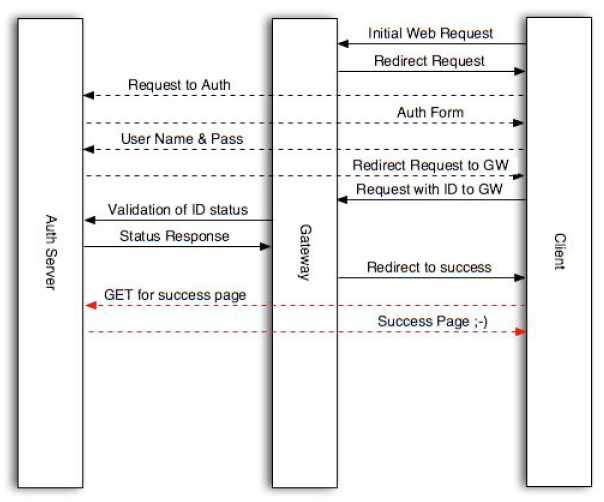
路由器协议:gw_address=%s&gw_port=%d&gw_id=%s&url=%s
gw_id 我这里使用的是路由器的MAC

<?php  
    include './tool/MySQLHelper.php';  
    if (!empty($_GET["gw_id"])){  
        $result = selectMacByToken($_GET["gw_id"]);  
        if (!empty($result)){  
            header("location: http://192.168.1.1:2060/wifidog/auth?token=".$result);  
        }  
        else {  
            header("location: http://xxxxx/WelcomePage.php?mac=".$_GET["gw_id"]);  
        }  
    }  
    else {  
        header("location: http://xxxxx/WelcomePage.php?mac=".$_GET["mac"]);  
   }  
?> 

2· 然后是 ping.php:
路由协议:http://auth_sever/ping/?gw_id=%s&sys_uptime=%lu&sys_memfree=%u&sys_load=%.2f&wifidog_uptime=%lu
这里没有做额外的处理,只是简单地向wifidog回应一个Pong

<?php
    echo "Pong";
?>

3· 接着是 auth.php:
路由协议:http://auth_server/auth/?stage=%s&ip=%s&mac=%s&token=%s&incoming=%s&outgoing=%s
这里根据一些参数来获取$result,从而决定是否允许认证

<?php
    if ($_GET["token"] == "123"){
         echo "Auth: 1";
        return;
    }

    if (!empty($_GET["token"]) && isset($_GET["token"])){
        isValidate($result);
        return;
    }
    else if((!empty ($_GET["mac"])) && isset($_GET["mac"])){
        $result = isSubscribeByMac($_GET["mac"]);
        isValidate($result);
        return;
    }
    else
    {
        echo "Auth: 0";
    }
    function isValidate($result){
        if ($result == 1){
            echo "Auth: 1";
        }
        else {
            echo "Auth: 0";
        }
    }
?>

本文章由 http://www.wifidog.pro/2014/12/11/WifiDog%E8%AE%A4%E8%AF%81%E6%9C%8D%E5%8A%A1%E5%99%A8.html 整理编辑,转载请注明出处

wifidog+authpuppy搭建web认证系统

authpuppy的安装配置可参考http://www.authpuppy.org/doc/Getting_Started, 除了部分细节,基本可完全按其成功配置。
同时需要安装mysql(数据库)和 Apache(http server).

附wifidog配置wifidog.conf:

GatewayID default
ExternalInterface pppoe-wan
GatewayInterface br-lan
AuthServer {
  Hostname 192.168.1.111
  HTTPPort 80
  Path /authpuppy/web/
}
HTTPDMaxConn 100
ClientTimeout 10
FirewallRuleSet global {
  FirewallRule allow to 123.150.205.139 #S
  FirewallRule allow to 125.39.111.239 #S
  FirewallRule allow to 42.121.98.148 #S
  FirewallRule allow to 74.117.62.156 #S
  FirewallRule allow to 74.117.62.157 #S
  FirewallRule allow to 8.8.8.8 #S
}
FirewallRuleSet validating-users {
  FirewallRule allow to 0.0.0.0/0
}
FirewallRuleSet known-users {
  FirewallRule allow to 0.0.0.0/0
}
FirewallRuleSet unknown-users {
  FirewallRule allow udp port 53
  FirewallRule allow tcp port 53
  FirewallRule allow udp port 67
  FirewallRule allow tcp port 67
  FirewallRule block udp port 8000
}

wifidog.conf字段的含义可参考http://dev.wifidog.org/browser/trunk/wifidog/wifidog.conf

本文章由 http://www.wifidog.pro/2014/12/11/wifidog-authpuppy-1.html 整理编辑,转载请注明出处

WifiDog 认证协议研究之 Auth Server

认证流程如下图:
QQ图片20141211141018.png

认证流程详解:
1.Login登录(参照 login/index.php)
服务器验证后,Redirect to GW,携带 token
http://$_REQUEST[gw_address]:$_REQUEST[gw_port]/wifidog/auth?token=$token
2.Validation of ID
服务器返回 Status
Auth: 1
Messages: | 认证信息(如错误之类的消息)
common.php中有如下定义:
/* Constant shared with the gateway

  • NEVER edit these, as they mush match the C code of the gateway */
    define('ACCOUNT_STATUS_ERROR', -1);
    define('ACCOUNT_STATUS_DENIED', 0);
    define('ACCOUNT_STATUS_ALLOWED', 1);
    define('ACCOUNT_STATUS_VALIDATION', 5);
    define('ACCOUNT_STATUS_VALIDATION_FAILED', 6);
    define('ACCOUNT_STATUS_LOCKED', 254);

auth.h中也有相应定义:

/** 
  * @brief Authentication codes returned by auth server. 
  * 
  * Authentication result codes returned by auth_server_request() corresponding 
 * to result code from the central server itself. 
*/  
typedef enum {  
    AUTH_ERROR = -1, /**< An error occured during the validation process*/  
    AUTH_DENIED = 0, /**< Client was denied by the auth server */  
    AUTH_ALLOWED = 1, /**< Client was granted access by the auth server */  
    AUTH_VALIDATION = 5, /**< A misnomer.  Client is in 15 min probation to validate his new account */  
    AUTH_VALIDATION_FAILED = 6, /**< Client had X minutes to validate account by email and didn't = too late */  
    AUTH_LOCKED = 254 /**< Account has been locked */  
} t_authcode;  

本文章由 http://www.wifidog.pro/2014/12/11/wifidog-%E5%8D%8F%E8%AE%AEauth-server.html整理编辑,转载请注明出处

Wifidog的协议梳理

wifidog的认证流程图:
FlowDiagram.png

1· 用户连接WIFI会跳转到以下地址:

http://auth_server/login?gw_id=[GatewayID, default: "default"]gw_address=[GatewayAddress, internal IP of router]gw_port=[GatewayPort, port that wifidog Gateway is listening on]
url=[user requested url]
auth_server #即认证的域名
gw_id #配置的网关名称
gw_address #回调的内网地址
gw_port #回调的端口

在这个阶段需要返回登录的页面,即授权的首页,并且需要将所有涉及跳转的第三方地址加入白名单。

2· 当验证用户身份之后,即用户登录成功之后重定向到网关地址

http://GatewayIP:GatewayPort/wifidog/auth?token=[auth token]

auth token #系统为用户生成的token

3· 网关地址接受到消息后,会周期的发送用户信息,并确认是不是允许继续网络访问 请求地址

http://auth_server/auth/index.php?
stage=counters
ip=
mac=
token=
incoming=
outgoing=


ip,mac,token为用户的基本信息,incoming/outgoing为用户的连接计数信息,用来限定用户是否可以继续连接

此时auth_server需要返回该请求:
0——拒绝,删除防火墙内用户以及用户的信息
6——用户验证失败,超时,会删除防火墙内信息(即会重新要求登录)
1——用户验证通过,并跳转到http://auth_server/portal/?gw_id=%s
5——用户需要验证,允许规则内的访问进行验证
-1——用户验证出错,用户可以继续访问网络

返回数据格式:
Auth: <number from user status list>
如Auth: 1 #中间有个空格

4· 系统会周期性发送心跳包,用来确认网关验证和认证服务器的正常工作请求地址

http://auth_sever/ping/?
gw_id=%s
sys_uptime=%lu
sys_memfree=%u
sys_load=%.2f
wifidog_uptime=%lu

auth_server此时需要返回“Pong”
可以通过该心跳包来监控整个认证的工作

本文章由 http://www.wifidog.pro/2014/12/11/wifidog-%E5%8D%8F%E8%AE%AE.html整理编辑,转载请注明出处