分类 wifidog安装 下的文章

在OpenWrt中安装Wiwiz

  1. 系统需求
    硬件
  • 已安装了OpenWrt固件的无线路由器(典型的有Linksys WRT54G系列)
    软件

  • Wifidog
    你可以尝试执行以下命令安装Wifidog:

    opkg update # Optional

    opkg install wifidog

复制代码将无线路由器接入Internet。
设置并启用无线网络,即,使用无线路由器创建一个可用的Access Point。

  1. 在Web控制面板中创建热点
    登录到Web控制面板,访问http://cp.wiwiz.com/as/s/menu
    点击“我的热点”,在接下来的页面中点击“创建热点”。根据页面的提示完成各项设置,点击保存。
    你将会看到你刚创建热点的Hotspot ID。记下它,接下来的步骤将会用到它。

  2. 安装与设置HotSpot Builder Utility组件
    将一台PC机连接至你的无线路由器,用SSH方式连接到无线路由器。执行以下命令:

    cd; wget http://dl.wiwiz.com/hsbuilder-util-latest-OpenWrt.tar.gz

    cd /; tar -zxf /root/hsbuilder-util-latest-OpenWrt.tar.gz

    /usr/local/hsbuilder/hsbuilder_setup4openwrt.sh setup

复制代码然后按照提示完成设置。
特别地,你需要输入的Hotspot ID就是你在Web控制面板中创建的热点的Hotspot ID(不是热点的名称)。User Name是你在控制面板注册的用户名。

提示:
安装时你将会被提示输入External NIC 与 Internal NIC。External NIC 代表的是连接Internet的网络接口。Internal NIC 代表的是连接局域网的网络接口。如果你不确定,可以执行ifconfig命令,并从执行结果中找到它们。

现在,如果没有报错信息,那么安装已经完成了。
你可以使用一个Wi-Fi客户端(如带WLAN适配器的PC或者支持Wi-Fi的移动电话)测试一下你的热点:

  • 搜索可用Wi-Fi热点,并连接到你的热点。
  • 打开Web浏览器,输入任何一个HTTP开头的网址。如果你的热点的认证页面能够显示出来,就说明你的热点已经正常运转了。

本文章由整理编辑http://www.wifidog.pro/2015/05/13/openwrt%E5%AE%89%E8%A3%85wiwiz.html,转载请注明出处

OpenWrt wifidog 实现收费提醒效果

需求场景

有一个免认证的 Wifi SSID,比如叫:OpenWrt,附近的同学可以随便连上这个 SSID,没有缴过费的同学不管访问什么地址,都会被跳转到收费提醒页面,而缴过费的同学就可以开心上网了。

解决办法

从需求上来说,这是一个非常标准的 WifiDog 效果,如果未来有很复杂的需求,可以直接通过 WifiDog 来实现跳转,然后再通过 AuthPuppy 来实现账户管理,不过想在 OpenWrt 上同时部署 WifiDog 与 AuthPuppy 也不是一件很容易的事情。

因此我们准备考虑直接通过 iptables 来实现这个需求,未来如果有复杂的扩展需求,也不影响扩展到 WifiDog 来实现。

实现流程

通过 SSH 登录到 OpenWrt,打开 /etc/config/uhttpd,在文件的最顶部增加以下配置

config uhttpd 'portal'
list listen_http '0.0.0.0:11990'
option home '/www/portal'
option error_page '/index.html'

然后在 /www/portal 下新建一个名为 index.html 的静态文件,文件内容可以如下

<html>
<head>
  <meta http-equiv="cache-control" content="no-cache">
  <meta name="viewport" content="width=device-width, initial-scale=1">
  <title>Wifi</title>
</head>
<body>
  Email: xxxx@xxx.com
</bodu>
</html>

之后再打开 /etc/firewall.user 文件,在末尾添加如下配置:

iptables -t nat -A prerouting_lan_rule -p tcp -m tcp --dport 80 -m mark ! --mark 8 -j REDIRECT --to-ports 11990
iptables -t filter -A forwarding_lan_rule -m mark ! --mark 8 -j REJECT

保存后执行 /etc/init.d/firewall restart 重新载入 iptables 的配置
然后再执行 /etc/init.d/uhttpd restart 重新载入 uhttpd 的配置

然后用手机连接这个无线网络,你就会发现总是弹出这个提示页面了

用户授权

当有用户缴费了之后,向他要到他的MAC地址,同样打开 /etc/firewall.user 文件,比如这个用户有 2 个设备,MAC 地址分别是 00:00:00:00:BB:AA 与 00:00:00:00:BB:BB 则添加以下 2 条 规则,以后这 2 个设备就可以随便上网了!

iptables -t mangle -A fwmark -m mac --mac-source 00:00:00:00:BB:AA -j MARK --set-mark 8
iptables -t mangle -A fwmark -m mac --mac-source 00:00:00:00:BB:BB -j MARK --set-mark 8

添加后同样需要执行 /etc/init.d/firewall restart 以使配置生效

注意事项

如果通过以太网口访问 OpenWrt luci 管理界面也是那个收费提示,只需要把该机器的 MAC 地址同样授权一样即可

本文章由 http://www.wifidog.pro/2015/04/08/openwrt-wifidog-5.html 整理编辑,转载请注明出处

OpenWrt WifiDog + wiwiz 安装配置

wifidog

WifiDog是路由器的一种上网认证功能,如果开启此功能,所有通过路由器上网的设备都会跳转到指定的界面,需要通过某种方式认证才可以上网,这种认证方式的优势在于安全性高,不容易被破解验证。

WifiDog安装
登录到 OpenWrt luci 后台,打开 System / Software,然后查找 wifidog
NewImage1.png

再点击 Available packages (wifidog),选择安装
NewImage2.png

NewImage.png

WifiDog 安装后,还需要到 System / Startup 使用 WifiDog 服务自动启动
NewImage4.png

然后还要到 Network /Firewall 里,把 lan => wan 的默认 Forward 规则改为 reject
NewImage3.png

wiwiz 账号申请

Wifidog 使用时需要配合认证系统来使用,你可以部署一个 AuthPuppy,不过如果为了测试方便,可以直接申请一个 wiwiz 的账号。Wiwiz是一个有线/无线网络热点管理系统,利用它你可以为你的热点创建一个强制门户/强制认证页面(captive portal)。

申请好账号之后,需要在 Wiwiz 里创建一个热点,这个时候将得到你的 HotSpot ID,把这个 ID 记录下来,等下 WifiDog 配置的时候要用到。

WifiDog配置

使用 SSH 登录到你的 OpenWrt 上,编辑 /etc/wifidog.conf 文件,在文件末尾增加以下配置:

GatewayID 14BBB888BBB
AuthServer {
    Hostname cp.wiwiz.com
    Path /as/s/
}

最后直接重新启动一下路由器,然后用你的终端通过你的路由器访问互联网,就会弹出 Wiwiz 的认证页面

本文章由 http://www.wifidog.pro/2015/04/08/wifidog-openwrt-2.html 整理编辑,转载请注明出处

wifidog安装Oauth login for Google and Facebook on OpenWrt routers

Oauth for OpenWrt routers aims to support authentication via OAuth services (Google, Facebook...) and run on the same box with WifiDog. It is using Luci and provides an alternative to single Auth Server for WifiDog. There is no need to setup a separated machine for authentication.

How does it work?

When a new guest uses Wifi from a router to go to the Internet, he/she will be presented a login page where he/she can use his Facebook or Google accounts to log in order to have permission of using our Wifi to access the Internet. When the session of using the Internet is over, a page with a message informing that the user is unauthenticated is displayed, and he/she is withdrawn the Internet access permission. This means he/she must be login again to have the permission.

System requirements

The followings are all you need to successfully deploy Oauth for OpenWrt:

  • OpenWrt firmware.
  • LuCi package.
  • Wifidog package.
  • Standard wget package.
  • Oauth for OpenWrt package.

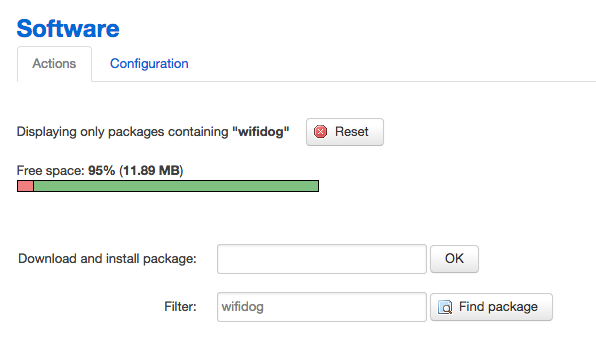
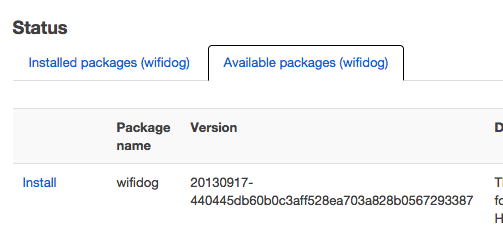
a. Install Wifidog package:

  • Connect with your router via SSH.
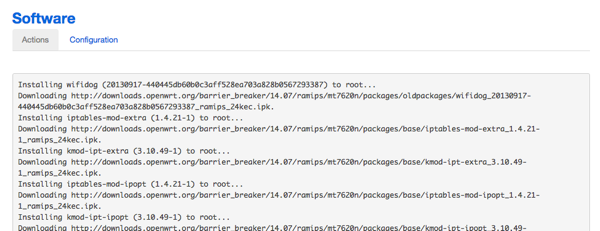
  • Use this command to install Wifidog: opkg install wifidog.

Note: if you can not install wifidog, let's first use this command: “opkg update”, and then install it again.

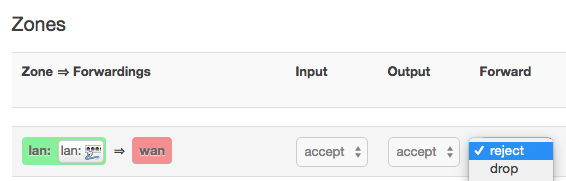
b. Modify Wifidog's configuration file:

The configuration file of Wifidog is in /etc/wifidog.conf.

  • Use this command to access the file: vi /etc/wifidog.conf.
  • There are some parameters that you need to alter, according to your
    system: + ExternalInterface. + GatewayInterface. + GatewayAddress
    (your router) + AuthServer (your router) + GatewayPort.

c. Install Oauth for OpenWrt package:

We provide an ipk package to easily install via opkg.

You can also build your own from source (https://github.com/hongquan/Oauth for OpenWrt):

  • Copy the source folder to openwrt/package (source tree).
  • Rename Makefile_build_standalone to Makefile (replace the old
    Makefile).
  • Rename "dist" folder to "root" Choose the luci-app-Oauth for OpenWrt
    in"make menuconfig".
  • Run "make package/luci-app-Oauth for OpenWrt/compile V=99" to build.

After finishing the whole things above, let's do some more steps following to make Oauth for OpenWrt works:

  • In Terminal, connect to your router via SSH.
  • Run wifidog via this command: “/etc/init.d/wifidog start” (or
    “wifidog -d 7 -f” to see log information)
  • On your web browser, access your router via its IP address. After
    logging in, select tab “Network/Oauth for OpenWrt/Status”. Then,
    press “Apply” button.

Oauth for OpenWrt is now ready to work.

Configure Oauth for OpenWrt

We have created some nice stuffs for you to make Oauth for OpenWrt work as you like. First of all, you need to access the admin page of router by typing the your router address. There are some options that you can choose to bend the Oauth for OpenWrt with your needs.

本文章由 http://www.wifidog.pro/2015/04/07/wifidog%E5%AE%89%E8%A3%85%E6%8E%88%E6%9D%83.html 整理编辑,转载请注明出处