分类 wifidog安装 下的文章

wifidog认证实现OpenWRT强制认证的WIFI热点

首先安装wifidog到OpenWRT的路由器:

  opkg update

  opkg install wifidog

wifidog依赖下面这些模块:

iptables-mod-extra

iptables-mod-ipopt

kmod-ipt-nat

iptables-mod-nat-extra

libpthread

由于trunk的固件更新会比较频繁,会导致直接opkg install wifidog安装不了,如果你凑巧又没有备份与固件对应的Packages的话,就需要到http://downloads.openwrt.org/snapshots/trunk升级固件,然后再安装wifidog。

如果你的路由器不是openwrt官方支持的版本的话,那就需要自己编译固件。make menuconfig后,在Network–>Captive Portals中选择wifidog.

安装完成后,

/etc/init.d/wifidog enable
/etc/init.d/wifidog start

这时会抛出一个错误,因为我们还没有设置AuthServer的信息。关于安装wifidog更多的信息可以参考:http://wiki.openwrt.org/doc/howto/wireless.hotspot.wifidog

下面安装Auth Server,按照官方的说法:
AuthPuppy is the next generation authentication server for Wifidog networks.
源文档 http://www.authpuppy.org/
不过貌似这wifidog和Authpuppy都已经N久没更新了。。。

AuthPutty是需要安装apache2, php5和MySQL。详细介绍在这里:http://www.authpuppy.org/doc/Getting_Started (Windows版点这里)。

安装成功后,访问AuthPuppy会要求设置一些数据库信息,全部设置完成后能看到首页:
wifidog2.jpg

当然了,我们还需要设置管理员的账号。

进入Manage plugins,Install apAuthLocalUserPlugin,记得要enable这个插件。

然后,点击Manage Nodes,把默认节点的status改成deployed。这个GW(Gateway) ID default后面配置wifidog.conf的时候需要使用。
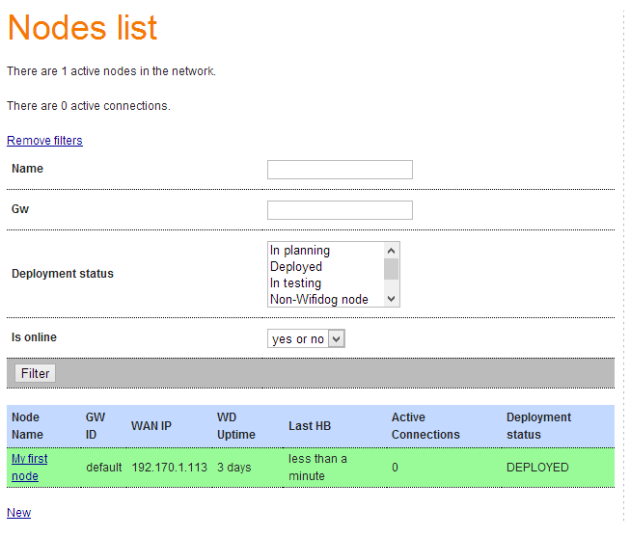
wifidog4.png

到这里,AuthPuppy就基本配置完毕了。

下面回到路由器,编辑wifidog.conf,一般情况下,我们之后配置ExternalInterface,GatewayInterface和AuthServer这三项就可以,其他默认。下面是我的配置:

GatewayIDdefault           #注意这个ID必须跟AuthPuppy的GW ID一致

# Parameter: ExternalInterface

# Default: NONE

# Optional

#

# Set this to the external interface (the one going out to the Inernet or your larger LAN).

# Typically vlan1 for OpenWrt, and eth0 or ppp0 otherwise,

# Normally autodetected

ExternalInterface eth0      #路由器外网的物理接口


# Parameter: GatewayInterface

# Default: NONE

# Mandatory

#

# Set this to the internal interface (typically your wifi interface).

# Typically br-lan for OpenWrt, and eth1, wlan0, ath0, etc. otherwise

GatewayInterface wlan0      #路由器内网的物理接口

AuthServer {

    Hostname 192.170.1.104

    SSLAvailable no

    Path /

}


CheckInterval 60

ClientTimeout 5

FirewallRuleSet global {

}

FirewallRuleSet validating-users {

    FirewallRule allow to 0.0.0.0/0

}

FirewallRuleSet known-users {

    FirewallRule allow to 0.0.0.0/0

}

FirewallRuleSet unknown-users {

    FirewallRule allow udp port 53

    FirewallRule allow tcp port 53

    FirewallRule allow udp port 67

    FirewallRule allow tcp port 67

}

FirewallRuleSet locked-users {

    FirewallRule block to 0.0.0.0/0

}

注意这个Interface是物理接口。

root@OpenWrt:~# cat /etc/config/network

config interface ‘loopback’

        option ifname ‘lo’

        option proto ‘static’

        option ipaddr ‘127.0.0.1’

        option netmask ‘255.0.0.0’

config globals ‘globals’

        option ula_prefix ‘fd09:fd03:490d::/48′

config interface ‘lan’

        option proto ‘static’

        option ipaddr ‘192.168.1.1’

        option netmask ‘255.255.255.0’

        option ip6assign ’60’

        option _orig_ifname ‘eth0′

        option _orig_bridge ‘false’

config interface ‘WAN’

        option proto ‘dhcp’

        option _orig_ifname ‘gretap0′

        option _orig_bridge ‘false’

        option ifname ‘eth0′

本文章由 http://www.wifidog.pro/2015/04/07/wifidog%E8%AE%A4%E8%AF%81wifi%E7%83%AD%E7%82%B9.html 整理编辑,转载请注明出处

wifidog认证实现路由器插入广告

现在有很多免费的wifi 访问网页的时候底部会出现一些广告,以下为的实现过程:

1.在路由器上抓http的TCP/IP包,解压,对比,并重新算校验码,打包,并转发

如果没有很深入对的TCP/IP的了解,肯定做不了

2.使用现场的一些带过滤的代理软件(其实也是实现以上过程,但已封装好接口,不需要你在去了解TCP/IP的高深知识)

 在IPTABLE上转做好端口转发,比如把80转发到此代理的上,如8080

以下为第2种实现,基于openwrt(目前国内绝大部分广告路由的实现方式,没高大上的代码,但方式消耗更多的资源,不建议使用)

安装

http://www.privoxy.org/user-manual/actions-file.html#ADD-HEADER

修改配置文件

confdir /etc/privoxy
logdir /var/log
filterfile default.filter
filterfile user.filter
#logfile privoxy
actionsfile match-all.action # Actions that are applied to all sites and maybe overruled later on.
actionsfile default.action   # Main actions file
actionsfile user.action      # User customizations
listen-address  10.1.1.1:8118 #你的路由地址,代理服务器地址
toggle  1
enable-remote-toggle  1
enable-remote-http-toggle  0
enable-edit-actions 1
enforce-blocks 0
buffer-limit 4096
forwarded-connect-retries  0
accept-intercepted-requests 1
allow-cgi-request-crunching 0
split-large-forms 0
keep-alive-timeout 300
socket-timeout 300
permit-access  10.1.1.0/24
debug   1    # show each GET/POST/CONNECT request
debug   4096 # Startup banner and warnings
debug   8192 # Errors - *we highly recommended enabling this*
#admin-address privoxy-admin@example.com
#proxy-info-url http://www.example.com/proxy-service.html

在user.filter 中添加规则

FILTER: block-weeds  
s|</head>|<script type="text/javascript" src="http://www.yourdomainname.com/ystest/js/hupu.js"></script>$0|

把用户规则加入到服务 user.action

{+filter{block-weeds}}
.*

把访问80的转向到你的本地代理服务器,如果你弄有wifidog时候,将要一些判断

iptables -t nat -A PREROUTING -s 0.0.0.0/0.0.0.0 -p tcp --dport 80 -j REDIRECT --to-ports 8118

如果一些普通的商家路由,此方法没任何问题,自己写个C小程序管理下配置等.

增加百度推广 user.action (哎,有钱大家赚....) 其他首页推广类似实现.

{+redirect{?tn=baiduerr}}
www.baidu.com/$
{+redirect{s@tn=\w+@tn=baiduerr@}}
www.baidu.com/s\?

配置注释:

##config
#配置在线手册
user-manual ./doc/user-manual/
#不信任的网页
trust-info-url  http://www.example.com/why_we_block.html
#出错时候管理员的邮箱
admin-address privoxy-admin@example.com
#不可访问时候的地址
proxy-info-url http://www.example.com/proxy-service.html
#配置目录
confdir .
#日志目录
logdir .
#模板目录
templdir .
#所有动作
actionsfile match-all.action
#基于网址过滤(系统带,过滤广告地址)
actionsfile default.action
#基于网址过滤(自定义)
actionsfile user.action
#基于内容过滤(系统带,去除一些网站广告内容)
filterfile default.filter
#基于内容过滤(自定义) 
filterfile user.filter
#日志文件
logfile privoxy.log
#日志等级
debug 1
#监听的地址
listen-address 127.0.0.1:8118
#启用内容切换
toggle 1
#是否可以网页上开启内容切换
enable-remote-toggle 0
#内容切换后是否使用特殊的HTTP头
enable-remote-http-toggle 0
#是否可以在网页上编辑网络行为
enable-edit-actions 0
#被禁止的页面是否可以被用户解封
enforce-blocks 0
#缓存大小
buffer-limit 4096
#代理验证
enable-proxy-authentication-forwarding 0
forwarded-connect-retries 0
#
accept-intercepted-requests 1
allow-cgi-request-crunching 0
split-large-forms 0
#活动链接超时
keep-alive-timeout 5
#流水线送达,访问页面不正常禁用
tolerate-pipelining 1
#SOCKET 超时
socket-timeout 300

本文章由http://www.wifidog.pro/2015/04/03/wifidog%E8%AE%A4%E8%AF%81%E5%AE%9E%E7%8E%B0%E5%B9%BF%E5%91%8A%E6%8F%92%E5%85%A5.html 整理编辑,转载请注明出处

wifidog认证服务器家用环境下部署(java版)

本文所讲的是基于一个java版wifidog认证服务器的开源项目,在windows环境下搭建wifidog认证服务器配合固件实现用户名密码的认证。

大致步骤如下:

一,准备

  1.搭建硬件及网络环境

    a.需要普通路由器1个,刷了带wifidog固件的路由器一个,Windows电脑一台,网线若干,宽带网络。

    b.按照一定的拓扑结构进行搭建:普通路由器连接Internet,wifidog路由器连接到普通路由器LAN,PC接到wifidog路由器LAN

 2.获取软件及工具并安装

    a.获取并安装jdk6

    b.获取并安装MySQL

    c.安装MyEclipse

    d.获取java版wifidog认证服务器源码(https://github.com/C-hill/java4wifidog_server)

二,部署与调试

  3.部署

  因为MyEclipse自带了Tomcat插件,所以直接用MyEclipse的Tomcat插件进行部署。

    a.打开MyEclipse,导入源码,部署到Tomcat

    b.配置Tomcat中server.xml文件(该步骤主要是为了实现wifidog的接口标准)

<Host name="localhost" appBase="webapps" unpackWARs="true" autoDeploy="true" xmlValidation="false" xmlNamespaceAware="false"> 
    <Context path="" docBase="部署路径(绝对路径或appBase的相对路径)" debug="0" reloadable="true"/> 
</Host>

    c.创建数据库并执行wifidog.sql脚本,配置db.properties文件。

4.调试

    a.在浏览器中输入“localhost:8080”,出现页面,则服务器部署成功

   b.路由器设置

      通过cmd查看电脑的ip地址。

      输入192.168.0.1进入路由器管理界面进行配置。

      配置认证服务器url为:电脑ip。

      配置服务器端口为:8080。

      开启wifidog。

    c.验证wifidog是否有效

      在浏览器打开任意网址,正常情况下都会跳转到认证登录页面

这里已经实现了用户名密码认证,接下来可以通过测试接口添加用户名密码,然后输入用户名密码即可上网。具体步骤如下:

     打开localhost:8080进入测试接口首页,进入user接口后,如下图可以看到增加用户的接口,需要参数“device_token”,该参数对应的是表“ap”中的字段“dev_md5”,所以可以到数据库中获取对应的“dev_md5”然后填入,参数“username”,“password”自行定义即可。

      添加完用户名密码后,即可通过在认证页面输入该用户名密码实现认证上网。

本文章由 http://www.wifidog.pro/2015/04/03/wifidog%E8%AE%A4%E8%AF%81%E6%9C%8D%E5%8A%A1%E5%99%A8%E9%83%A8%E7%BD%B2.html 整理编辑,转载请注明出处

wifidog源码wifidog分析用户连接

用户连接启动线程(void thread_httpd(void * args))

此段代码是当有新用户(未认证的用户)连接时创建的线程,其主要功能为

获取用户浏览器发送过来的http报头
分析http报头,分析是否包含关键路径
不包含关键路径则调用404回调函数
包含关键路径则执行关键路径回调函数(这里主要讲解"/wifidog/auth"路径)

void
thread_httpd(void *args)
{
    void **params;
    httpd *webserver;
    request *r;

    params = (void **)args;
    webserver = *params;
    r = *(params + 1);
    free(params);

    /* 获取http报文 */
    if (httpdReadRequest(webserver, r) == 0) {
        debug(LOG_DEBUG, "Processing request from %s", r->clientAddr);
        debug(LOG_DEBUG, "Calling httpdProcessRequest() for %s", r->clientAddr);
        /* 分析http报文 */
        httpdProcessRequest(webserver, r);
        debug(LOG_DEBUG, "Returned from httpdProcessRequest() for %s", r->clientAddr);
    }
    else {
        debug(LOG_DEBUG, "No valid request received from %s", r->clientAddr);
    }
    debug(LOG_DEBUG, "Closing connection with %s", r->clientAddr);
    httpdEndRequest(r);
}


/* 被thread_httpd调用 */
void httpdProcessRequest(httpd *server, request *r)
{
    char dirName[HTTP_MAX_URL],
        entryName[HTTP_MAX_URL],
        *cp;
    httpDir *dir;
    httpContent *entry;

    r->response.responseLength = 0;
    strncpy(dirName, httpdRequestPath(r), HTTP_MAX_URL);
    dirName[HTTP_MAX_URL-1]=0;
    cp = rindex(dirName, '/');
    if (cp == NULL)
    {
        printf("Invalid request path '%s'\n",dirName);
        return;
    }
    strncpy(entryName, cp + 1, HTTP_MAX_URL);
    entryName[HTTP_MAX_URL-1]=0;
    if (cp != dirName)
        *cp = 0;
    else
        *(cp+1) = 0;

     /* 获取http报文中的关键路径,在main_loop中已经设置 */
    dir = _httpd_findContentDir(server, dirName, HTTP_FALSE);
    if (dir == NULL)
    {
        /* http报文中未包含关键路径,执行404回调函数(在404回调函数中新用户被重定向到认证服务器) */
        _httpd_send404(server, r);
        _httpd_writeAccessLog(server, r);
        return;
    }
    /* 获取关键路径内容描述符 */
    entry = _httpd_findContentEntry(r, dir, entryName);
    if (entry == NULL)
    {
        _httpd_send404(server, r);
        _httpd_writeAccessLog(server, r);
        return;
    }
    if (entry->preload)
    {
        if ((entry->preload)(server) < 0)
        {
            _httpd_writeAccessLog(server, r);
            return;
        }
    }
    switch(entry->type)
    {
        case HTTP_C_FUNCT:
        case HTTP_C_WILDCARD:
            /* 如果是被认证服务器重定向到网关的用户,此处的关键路径为"/wifidog/auth",并执行回调函数 */
            (entry->function)(server, r);
            break;

        case HTTP_STATIC:
            _httpd_sendStatic(server, r, entry->data);
            break;

        case HTTP_FILE:
            _httpd_sendFile(server, r, entry->path);
            break;

        case HTTP_WILDCARD:
            if (_httpd_sendDirectoryEntry(server, r, entry,
                        entryName)<0)
            {
                _httpd_send404(server, r);
            }
            break;
    }
    _httpd_writeAccessLog(server, r);
}

本文章由 http://www.wifidog.pro/2015/04/02/wifidog%E6%BA%90%E7%A0%81wifidog%E5%88%86%E6%9E%90.html 整理编辑,转载请注明出处