分类 wifidog服务器 下的文章

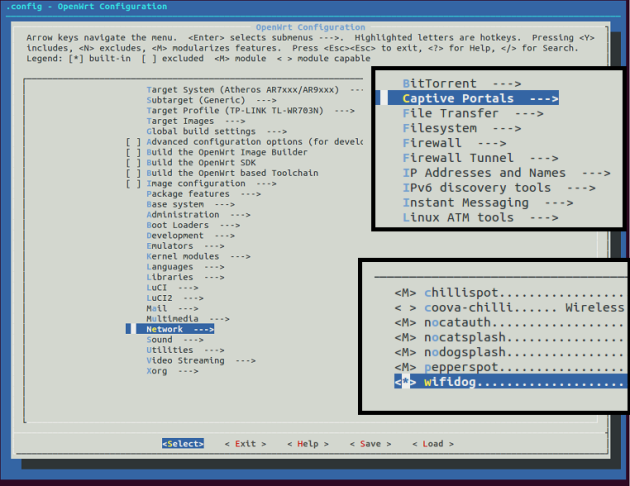
wifidog+authpuppy搭建WiFi 认证平台

0:前提
其实搭建认证环境都是基础,重要的是要对WiFidog的代码进行详细的研究,了解清楚wifidog与authpuppy之间进行了哪些数据交互,WiFidog的程序框架及iptables的建立及生效规则,这才是重点。WiFidog和之前nodogsplash的代码90%是一样的,只是之前没有研究nodogsplash的外部认证机制。
WiFidog可以通过外部认证来控制用户的上网行为,此处的外部认证接口就是:authpuppy。

1:authpuppy安装之前准备
在安装authpuppy的过程遇到很多问题,但是都能根据网上其他朋友的提示可以搞定,我将自己想要的配置文件copy上来。

[root@localhost /etc]$cat host.conf   
multi on  
order hosts,bind  
[root@localhost /etc]$cat hosts  
127.0.0.1       localhost.localdomain   localhost  
127.0.0.1       authpuppy.localhost  


::1         localhost6 localhost6.localdomain localhost6 localhost6.localdomain6

之后就是 httpd相关的配置文件:
/etc/httpd/conf]$cat httpd.conf
同时常用的命令如下:
service httpd restart,service mysqld restart等

其配置文件中主要就是配置一个虚拟目录.其配置内容如下:

<VirtualHost *:80>  
    ServerAdmin webmaster@test  
    ServerName authpuppy.localhost  
    ServerAlias authpuppy.test  

    DocumentRoot "/var/www/"  
    DirectoryIndex index.php  

   <Directory /var/www/authpuppy/web/>  
          Options Indexes FollowSymLinks MultiViews  
          AllowOverride All  
          Order allow,deny  
          allow from all  
  </Directory>  


  Alias /sf /var/www/authpuppy/lib/vendor/symfony/data/web/sf  
  <Directory "/var/www/authpuppy/lib/vendor/symfony/data/web/sf">  
          AllowOverride All  
          Allow from All  
  </Directory>  


    ErrorLog /var/log/httpd/error.log  
    # Possible values include: debug, info, notice, warn, error,crit,  
    # alert, emerg.  
    LogLevel warn  

    CustomLog /var/log/httpd/access.log combined  

</VirtualHost>  
[root@localhost /etc/httpd/conf]$cat httpd.conf 

其中可以看出:

ServerName authpuppy.localhost
DocumentRoot "/var/www/"   #web的根目录
DirectoryIndex index.php   #访问的主页http://192.168.0.142/authpuppy/web/index.php
<Directory /var/www/authpuppy/web/> #authpuppy的目录位置
          Options Indexes FollowSymLinks MultiViews
          AllowOverride All
          Order allow,deny
          allow from all
</Directory>

authpuppy的目录位置及结构如下:
QQ截图20141216162755.png

建立好上面的环境之后,下面就要建立MySQL数据库。建立好的数据如下:

[root@localhost ~]$mysql  
Welcome to the MySQL monitor.  Commands end with ; or \g.  
Your MySQL connection id is 813  
Server version: 5.1.47 Source distribution  

Copyright (c) 2000, 2010, Oracle and/or its affiliates. All rights reserved.  
This software comes with ABSOLUTELY NO WARRANTY. This is free software,  
and you are welcome to modify and redistribute it under the GPL v2 license  

Type 'help;' or '\h' for help. Type '\c' to clear the current input statement.  

mysql> show databases;  
+--------------------+  
| Database           |  
+--------------------+  
| information_schema |  
| authpuppy          |  
| mysql              |  
+--------------------+  
3 rows in set (0.01 sec)  

mysql> use authpuppy;  
Reading table information for completion of table and column names  
You can turn off this feature to get a quicker startup with -A  

Database changed  
mysql> show tables;  
+---------------------------+  
| Tables_in_authpuppy       |  
+---------------------------+  
| ap_applicable_policies    |  
| ap_connection_policies    |  
| ap_node_authenticators    |  
| ap_node_policies          |  
| ap_node_user_bypass       |  
| ap_plugin_config          |  
| ap_plugins_migrations     |  
| ap_user                   |  
| ap_user_remember_me       |  
| connections               |  
| migration_version         |  
| nodes                     |  
| sf_guard_forgot_password  |  
| sf_guard_group            |  
| sf_guard_group_permission |  
| sf_guard_permission       |  
| sf_guard_remember_key     |  
| sf_guard_user             |  
| sf_guard_user_group       |  
| sf_guard_user_permission  |  
+---------------------------+  
20 rows in set (0.00 sec)  

mysql> slect * from ap_user;  
ERROR 1064 (42000): You have an error in your SQL syntax; check the manual that corresponds to your MySQL server version for the right syntax to use near 'slect * from ap_user' at line 1  
mysql> select * from ap_user;  
+----+----------+--------------------------+--------------------+---------------------+------------------------------------------+--------+----------------+  
| id | username | password                 | email              | registered_on       | validation_token                         | status | username_lower |  
+----+----------+--------------------------+--------------------+---------------------+------------------------------------------+--------+----------------+  
|  1 | suiyuan  | H9hK9mgDAXdJnkYghQczkQ== | suiyuan626@163.com | 2014-06-10 16:05:25 | eda2838b1543e16fcfd7da6064886be67c544042 |      5 | suiyuan        |  
|  4 | xue      | H9hK9mgDAXdJnkYghQczkQ== | xue626@163.com     | 2014-06-10 17:04:07 | 117b0cd467900c59b9e60bb52719ce3551d321ce |      5 | xue            |  
+----+----------+--------------------------+--------------------+---------------------+------------------------------------------+--------+----------------+  
2 rows in set (0.00 sec)  

mysql>   

其中上面是创建的俩个用户,是通过authpuppy的管理界面来创建的,用户在认证的时候只有输入正确的用户名及密码才能才算认证通过。同时如果不创建数据库,在启动authpuppy的时候会告诉缺少相应的文件目录。

3:安装过程
由于我们已经安装成功了,安装的过程中没有怎么抓图。

2.png

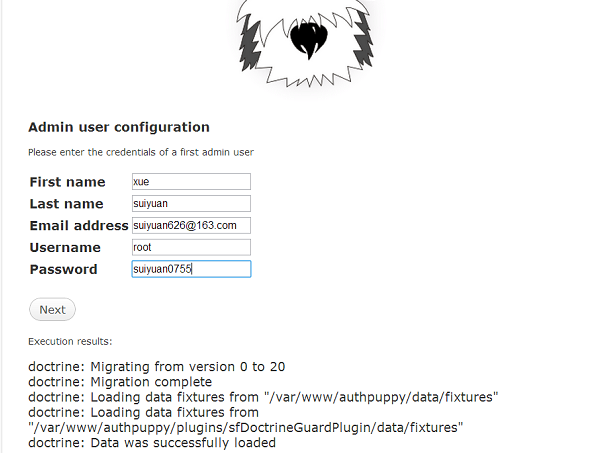
其中过一定要记住上面的用户名及密码,后面登陆的时候要用到,最好也写一个邮箱地址,如果忘记密码也可以找回来。
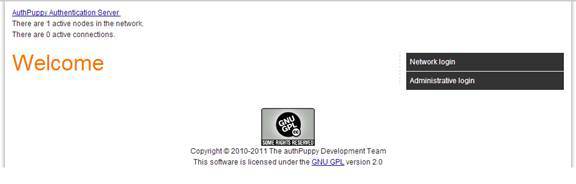
当安装成功之后访问:http://192.168.0.142/authpuppy/web/index.php
如下界面:
4.png

输入之前的用户名及密码(第二张图片上面的用户名及密码)。登陆之后的界面如下:
3.png

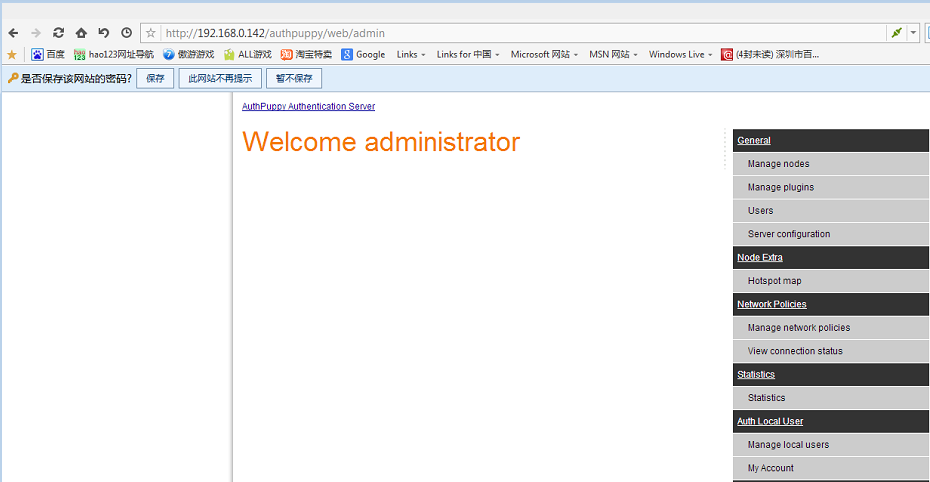
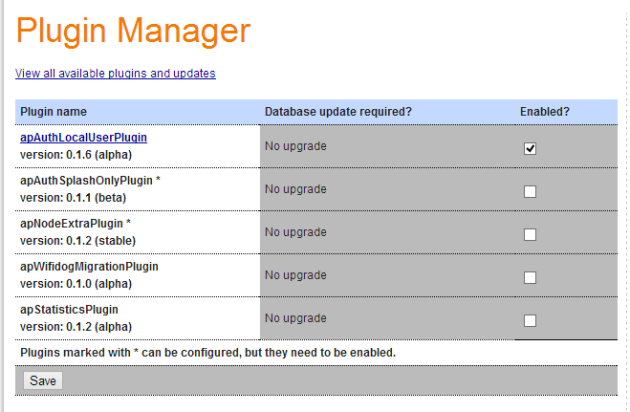
之后就可以安装插件,现在随便看看几个菜单。
6.png

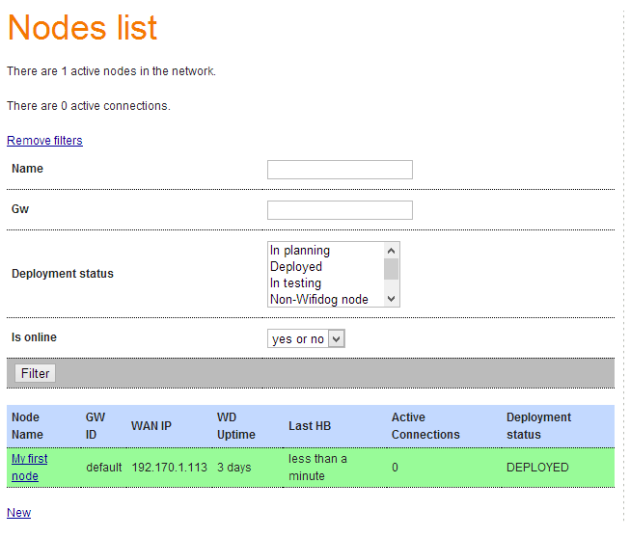
上面就是数据库里面创建的用户suiyaun(用户已此用户名进行登陆认证的)的上网的一些信息。

wifidog运行时的配置文件,其实配置文件只需要几个关键的参数就可以运行。

# WiFiDog Configuration file  

GatewayID 123456789  

ExternalInterface eth0  

GatewayInterface br0  

HtmlMessageFile /opt/wifidog/etc/wifidog-.html  


AuthServer {  
    Hostname 192.168.0.142  
    SSLAvailable no  
    Path /authpuppy/web/  
}  

CheckInterval 60  

# The timeout will be INTERVAL * TIMEOUT  
ClientTimeout 5  

# Parameter: TrustedMACList  
# Comma separated list of MAC addresses who are allowed to pass  
# through without authentication  
#TrustedMACList 00:00:DE:AD:BE:AF,00:00:C0:1D:F0:0D  


FirewallRuleSet validating-users {  
    FirewallRule allow to 0.0.0.0/0  
}  


FirewallRuleSet known-users {  
    FirewallRule allow to 0.0.0.0/0  
}  


FirewallRuleSet unknown-users {  
    FirewallRule allow udp port 53  
    FirewallRule allow tcp port 53  
    FirewallRule allow udp port 67  
    FirewallRule allow tcp port 67  
}  

FirewallRuleSet locked-users {  
    FirewallRule block to 0.0.0.0/0  
}  

本文章由 http://www.wifidog.pro/2014/12/16/wifidog-authpuppy%E6%90%AD%E5%BB%BA.html 整理编辑,转载请注明出处

OpenWRT使用Wifidog实现强制认证的WIFI热点

首先安装wifidog到OpenWRT的路由器:
opkg update
opkg install wifidog

wifidog依赖下面这些模块:
iptables-mod-extra
iptables-mod-ipopt
kmod-ipt-nat
iptables-mod-nat-extra
libpthread

由于trunk的固件更新会比较频繁,会导致直接opkg install wifidog安装不了,如果你凑巧又没有备份与固件对应的Packages的话,就需要到http://downloads.openwrt.org/snapshots/trunk升级固件,然后再安装wifidog。

如果你的路由器不是openwrt官方支持的版本的话,那就需要自己编译固件。make menuconfig后,在Network–>Captive Portals中选择wifidog.

wifidog1.png

安装完成后,
/etc/init.d/wifidog enable
/etc/init.d/wifidog start

这时会抛出一个错误,因为我们还没有设置AuthServer的信息。关于安装wifidog更多的信息可以参考:http://wiki.openwrt.org/doc/howto/wireless.hotspot.wifidog

下面安装Auth Server,按照官方的说法:
AuthPuppy is the next generation authentication server for Wifidog networks.
源文档 http://www.authpuppy.org/
不过貌似这wifidog和Authpuppy都已经N久没更新了。。。

AuthPutty是需要安装apache2, php5和MySQL。详细介绍在这里:http://www.authpuppy.org/doc/Getting_Started (Windows版点http://www.authpuppy.org/doc/Getting_Started_-_Windows)。

安装成功后,访问AuthPuppy会要求设置一些数据库信息,全部设置完成后能看到首页:
wifidog2.jpg

当然了,我们还需要设置管理员的账号。
进入Manage plugins,Install apAuthLocalUserPlugin,记得要enable这个插件。

wifidog3.png

然后,点击Manage Nodes,把默认节点的status改成deployed。这个GW(Gateway) ID default后面配置wifidog.conf的时候需要使用。

wifidog4.png

到这里,AuthPuppy就基本配置完毕了。
下面回到路由器,编辑wifidog.conf,一般情况下,我们之后配置ExternalInterface,GatewayInterface和AuthServer这三项就可以,其他默认。下面是我的配置:

GatewayID default           #注意这个ID必须跟AuthPuppy的GW ID一致
# Parameter: ExternalInterface
# Default: NONE
# Optional
#
# Set this to the external interface (the one going out to the Inernet or your larger LAN).
# Typically vlan1 for OpenWrt, and eth0 or ppp0 otherwise,
# Normally autodetected
ExternalInterface eth0      #路由器外网的物理接口

# Parameter: GatewayInterface
# Default: NONE
# Mandatory
#
# Set this to the internal interface (typically your wifi interface).
# Typically br-lan for OpenWrt, and eth1, wlan0, ath0, etc. otherwise
GatewayInterface wlan0      #路由器内网的物理接口
AuthServer {
    Hostname 192.170.1.104
    SSLAvailable no
    Path /
}

CheckInterval 60
ClientTimeout 5
FirewallRuleSet global {
}
FirewallRuleSet validating-users {
    FirewallRule allow to 0.0.0.0/0
}
FirewallRuleSet known-users {
    FirewallRule allow to 0.0.0.0/0
}
FirewallRuleSet unknown-users {
    FirewallRule allow udp port 53
    FirewallRule allow tcp port 53
    FirewallRule allow udp port 67
    FirewallRule allow tcp port 67
}
FirewallRuleSet locked-users {
    FirewallRule block to 0.0.0.0/0
}

注意这个Interface是物理接口,而不是下面OpenWRT web界面中看到的interface。注意不是下面这个:
wifidog5.png

可以看到我的Interface里面没有wlan0之类的选项,/etc/config/network里面也看不到。

root@OpenWrt:~# cat /etc/config/network
config interface ‘loopback’
    option ifname ‘lo’
    option proto ‘static’
    option ipaddr ‘127.0.0.1’
    option netmask ‘255.0.0.0’
config globals ‘globals’
    option ula_prefix ‘fd09:fd03:490d::/48′
config interface ‘lan’
    option proto ‘static’
    option ipaddr ‘192.168.1.1’
    option netmask ‘255.255.255.0’
    option ip6assign ’60’
    option _orig_ifname ‘eth0′
    option _orig_bridge ‘false’
config interface ‘WAN’
    option proto ‘dhcp’
    option _orig_ifname ‘gretap0′
    option _orig_bridge ‘false’
    option ifname ‘eth0′

之前我用gretap0和eth0设置ExternalInterface和GatewayInterface,不行。反着来也不行。网上搜了一圈,找到下面的方法来获取physical interface:

root@OpenWrt:~# ls -l /sys/class/net
lrwxrwxrwx    1 root     root             0 Jan  1  1970 eth0 ->../../devices/platform/ag71xx.0/net/eth0
lrwxrwxrwx    1 root     root             0 Jan  1  1970 lo -> ../../devices/virtual/net/lo
lrwxrwxrwx    1 root     root             0 Aug  2 15:58 wlan0 -> ../../devices/platform/ar933x_wmac/net/wlan0

源文档 http://unix.stackexchange.com/questions/57309/how-can-i-tell-whether-a-network-interface-is-physical-device-or-virtual-alia

OK,原来我这边也是有wlan0这个interface的,找到之后添加在wifidog.conf上。重启wifidog,成功。
另外:

You can also run wifidog in foreground/Debug mode:
wifidog -f -d 7
  -f means to run in foreground (do not become a background daemon)
  -d 7 increases Debug output level to the maximum

本文章由 http://www.wifidog.pro/2014/12/15/openwrt%E4%BD%BF%E7%94%A8wifidog%E5%AE%9E%E7%8E%B0%E8%AE%A4%E8%AF%81.html整理编辑,转载请注明出处

wifidog标准流程描述

一 认证流程描述
  i. Wifidog 运行之后建立一系列的防火墙规则,主要规则起到如下作用:

    1.阻断所有内网到外网的访问。

    2.开通内网到外网的 dns 访问。

    3.开通内网到认证服务器以及域名白名单的访问。

    4.对内网到外网 80 端口的访问转向到 wifidog 自己的 http 服务(2060 端口)。

  ii. 手机、pc 连接上来后,app 或者系统(安卓、ios 会自己连接到各自的服务器上来验证网络的连通性)会发起对外网的访问请求,dns 请求会被放过,然后对应的 80 端口的访问会被指向 2060 的 http 服务,其他的请求都会被拦截。
  iii. Wifidog 的 http 接到 web 请求后,基本上都会被指向 404 页面,404 页面会给客户端一个重定向返回(302),要求客户端重定向访问认证服务器的 login 页面,附加参数 gw_id、gw_address、gw_port、url。
  iv. 手机、pc 客户端加载、显示认证服务器的 login 页面,用户根据页面内容做相关的认证操作(qq 登录、微博登录、用户名密码登录、手机短信登录等多种登录方式) ,原则只有一个认证不成功就仍然让用户停留在认证服务器继续认证操作,认证成功给客户端一个 302 重定向返回,根据 login 接口提交上来的参数 gw_address、gw_port 跳转套 wifidog web 服务的/wifidog/auth 页面上,附带 token 和 url 参数。
  v. Wifidog 的 web 服务收到手机、pc 客户端的/wifidog/auth 请求后,会主动对认证服务器的 auth 接口发起一个验证请求, 附带参数 ip、 mac、 token、 stage=loginvi. 认证服务器的 auth 接口收到 wifidog 的请求, 要根据内部逻辑返回是否允许通过的应答 :

    Auth: 0 拒绝

    Auth: 1 允许

  vii. Wifidog 接收到验证结果后,如果拒绝访问,就会返回 302 给客户端,重定向到认证服务器的 gw_message 接口,附带 message=denied 参数,客户端的上网访问仍然会回到第二步骤;如果允许访问,则改动防火墙规则,开通改客户端的上网(至此客户端已经能够正常上网) ,然后返回 302 重点向给客户端,重定向到认证服务器的 portal 接口,附带参数 gw_id。

  viii. 认证服务器的的 portal 接口根据业务流成显示广告业或者做其他的跳转ix. 整个认证流程完成。

二 ping 心跳流程描述
  i. ping 接口 wifidog 检测认证服务器访问是否正常、并向认证服务器提交 wifidog的运行状态。
  ii. 定时 ping 认证服务器。
  iii. 提交的参数 gw_id、sys_uptime、sys_memfree、wifidog_uptime。

三 auth 心跳流程描述
  i. 和 ping 一样的频率定期请求认证服务器,并且有多少已认证客户端就发多少请求。
  ii. 用来向认证服务器提交客户端的状态以及执行认证服务的验证结果。
  iii. 提交的参数有:ip、mac、token、incoming、outgoing 、stage=counters。
  iv. 如果服务器返回拒绝,则 wifidog 改动防火墙规则,关闭该客户端的上网。

本文章由 http://www.wifidog.pro/2014/12/12/wifidog%E6%B5%81%E7%A8%8B.html 整理编辑,转载请注明出处

编写自己的WifiDog认证服务器

使用的是php来编写auth_server服务器,因为这样比较简单。
1· 首先是login.php:
路由器协议:gw_address=%s&gw_port=%d&gw_id=%s&url=%s
gw_id 我这里使用的是路由器的MAC

<?php  
    include './tool/MySQLHelper.php';  
    if (!empty($_GET["gw_id"])){  
        $result = selectMacByToken($_GET["gw_id"]);  
        if (!empty($result)){  
            header("location: http://192.168.1.1:2060/wifidog/auth?token=".$result);  
        }  
        else {  
            header("location: http://xxxxx/WelcomePage.php?mac=".$_GET["gw_id"]);  
        }  
    }  
    else {  
        header("location: http://xxxxx/WelcomePage.php?mac=".$_GET["mac"]);  
   }  
?> 

2· 然后是 ping.php:
路由协议:http://auth_sever/ping/?gw_id=%s&sys_uptime=%lu&sys_memfree=%u&sys_load=%.2f&wifidog_uptime=%lu
这里没有做额外的处理,只是简单地向wifidog回应一个Pong

<?php
    echo "Pong";
?>

3· 接着是 auth.php:
路由协议:http://auth_server/auth/?stage=%s&ip=%s&mac=%s&token=%s&incoming=%s&outgoing=%s
这里根据一些参数来获取$result,从而决定是否允许认证

<?php
    if ($_GET["token"] == "123"){
         echo "Auth: 1";
        return;
    }

    if (!empty($_GET["token"]) && isset($_GET["token"])){
        isValidate($result);
        return;
    }
    else if((!empty ($_GET["mac"])) && isset($_GET["mac"])){
        $result = isSubscribeByMac($_GET["mac"]);
        isValidate($result);
        return;
    }
    else
    {
        echo "Auth: 0";
    }
    function isValidate($result){
        if ($result == 1){
            echo "Auth: 1";
        }
        else {
            echo "Auth: 0";
        }
    }
?>

本文章由 http://www.wifidog.pro/2014/12/11/WifiDog%E8%AE%A4%E8%AF%81%E6%9C%8D%E5%8A%A1%E5%99%A8.html 整理编辑,转载请注明出处