分类 wifidog服务器 下的文章

openwrt Wifidog与AuthServer的交互

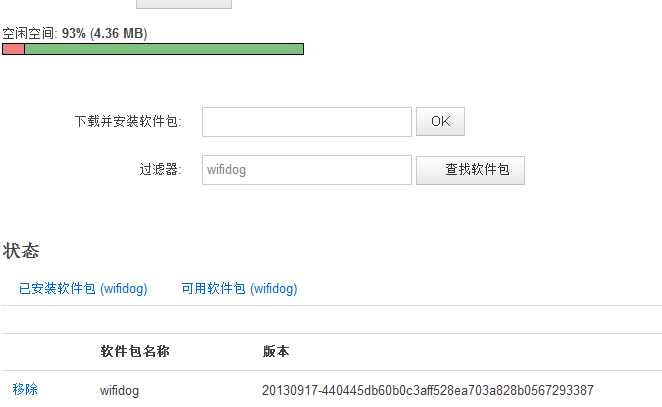
这里特别提一下,我发现在openwrt的download网站里,ar71xx有两个版本的wifidog,所以请根据需要确定好opkg的源,一个是2009版的wifidog,一个是2013版本的wifidog,我用的源是http://downloads.openwrt.org/snapshots/trunk/ar71xx.nand/packages/packages/,这个源的wifidog版本是wifidog_20130917-440445db60b0c3aff528ea703a828b0567293387_ar71xx,它们在login处有一个区别,后面会提。
先介绍一下wifidog与Auth服务器的交互协议:
1.首先是重定向,在首次登陆时,用户访问的url会被重定向到如下的地址:
login/?gw_address=%s&gw_port=%d&gw_id=%s&url=%s(2009版本的wifidog)
login/?gw_address=%s&gw_port=%d&gw_id=%s&mac=%s&url=%s(2013版本的wifidog)
这里有一个版本的问题,即2009的wifidog在重定向时不会在链接中带上mac参数,而2013版本的wifidog是会带上的,所以这里需要根据自己的应用特别注意。在用户首次连接路由上网时,它访问的url会被定向到login页面,并带上如上所述的参数,我们可以利用这些参数做生成token或其它一些判断等。而通常情况是在login中向用户返回通过wifi认证的方法,如带有用户名和密码的登录页面等。
2.用户认证协议:
auth_server:/auth/auth.php?stage=%s&ip=%s&mac=%s&token=%s&incoming=%s&outgoing=%s
一般情况下,认证服务器auth_server会根据用户输入的信息生成一个token,然后将用户重定向到wifidog的监听端口上,这个端口的默认地址为:192.168.1.1:2060/wifidog/auth?token=%s,wifidog得到这个token后,将其发送到auth_server认证服务器上进行认证。如果认证通过,auth_server返回“Auth: 1”,认证未通过则返回“Auth: 0”。具体参数如下。
0 - AUTH_DENIED - User firewall users are deleted and the user removed.6 - AUTH_VALIDATION_FAILED - User email validation timeout has occured and user/firewall is deleted1 - AUTH_ALLOWED - User was valid, add firewall rules if not present5 - AUTH_VALIDATION - Permit user access to email to get validation email under default rules-1 - AUTH_ERROR - An error occurred during the validation process
认证服务器通过获取以上链接的参数可以判断这个用户是否合法等。这个链接是认证服务器用来判断首次登陆的用户是否合法和正在连接的用户是否可以继续访问链接的方法。每隔一段时间,wifidog会向认证服务器发送信息,即通过如上所示的链接发送信息,通过这些参数,可以看到某个客户的上传流量、下载流量、mac地址、ip地址、token和、ip和stage。stage可能是两个参数,分别是counters或login。第一次登陆验证时,stage=login,其它时候stage=counters。
3.Ping协议
http://auth_sever/ping/?gw_id=%s&sys_uptime=%lu&sys_memfree=%u&sys_load=%.2f&wifidog_uptime=%lu
wifidog会向认证服务器发送一些信息,来报告wifidog现在的情况,这些信息是通过Http协议发送的,如上的链接所示,参数大概如字面意思,没仔细研究过,而作为认证服务器,auth_server应回应一个“Pong”。
4.认证成功后的跳转
portal/?gw_id=%s
在认证成功后,wifidog会将用户重定向至该页面。
5.若验证失败,则会根据失败原因跳转至如下页面
gw_message.php?message=denied
gw_message.php?message=activate
gw_message.php?message=failed_validation
注意一下,按照我对wifidog.conf的配置,在执行login时,相当于重定向至链接http://justyoung.com/wifidog/login.php?gw_id=XX....等等,其它执行的链接也是如此。

本文章由 http://www.wifidog.pro/2015/02/28/wifidog%E4%B8%8EAuth-Server%E4%BA%A4%E4%BA%92.html 整理编辑,转载请注明出处

Wifidog鉴权服务器wifidog-auth的搭建

原来已经配置好的apache2、python、trac系统
在/etc/apache2/sites-enabled下增加的新的配置文件(域名和对应的目录)

sudo /etc/init.d/apache2 restart

这是可以用新域名访问对应目录下index.php了,但无法执行php代码只能下载该文件

sudo apt-get install php5
sudo apt-get install libapache2-mod-php5 # 安装遇到麻烦
sudo apt-get install postgresql
sudo apt-get install php5-cgi php5-common php5-pgsql php-pear php5-xmlrpc php5-curl language-pack-en-base subversion
sudo pear install XML_RPC
wget http://sourceforge.net/projects/phlickr/files/Phlickr-0.2.5.tgz
sudo pear install Phlickr-0.2.5.tgz
sudo apt-get install openssh-server
sudo apt-get install postfix

选择"internet site with smart host",然后配置
svn checkout https:// dev.wifidog.org/svn/trunk/wifidog-auth #放到/var/www目录下

现在修改文件/var/www/wifidog-auth/wifidog/classes/Dependency.php,否则智能安装会失败

$sudo vim /var/www/wifidog-auth/wifidog/classes/Dependency.php

将第122行改为:'website' => "http://www.smarty.net/"
将第123行改为:'installSourceUrl' => http://www.smarty.net/files/Smarty-2.6.26.tar.gz

$sudo vim /var/www/wifidog-auth/wifidog/config.php

将define('DEFAULT_LANG', 'fr_CA');改为define('DEFAULT_LANG', 'en_US');

本文章由 http://www.wifidog.pro/2015/02/27/wifidog%E6%9C%8D%E5%8A%A1%E5%99%A8wifidog-auth%E5%AE%89%E8%A3%85.html 整理编辑,转载请注明出处

公共场所wifi认证解决方案wifidog+authpuppy(2)

二、 配置服务器和插件管理
1、 访问http://localhost ,通过管理员账户登录,配置authserver
1.png

配置完成后再次访问http://localhost 就会出现如下界面
2.png

2、 点击Manageplugins,点击View all available plugins and updates添加插件,点击后发现无法跳转,原因应该是插件的网站被墙了,大家让服务器科学上网一下就可以了。
安装apAuthLocalUserPlugin这个插件,并启用,就可以对登录账号进行管理了,更多插件的使用可以自己慢慢摸索。
3.png

三、 配置网络结点和路由器认证
1、 访问http://localhost 以管理员身份登录,点击Managenodes进行结点的管理,服务器默认为我们创建了一个叫My first node的结点,我们对其进行编辑,修改Name :wifidog,gw id:123456,deployment status 选择Deployed

2、 配置路由器,路由器在编译openwrt固件的时候,makemenuconfig后,在Network–>Captive Portals中选择wifidog.这样在刷完固件后路由器就有wifidog插件了:
4.png

3、 通过命令行访问路由器,windows下可以使用putty登录,执行如下命令,启动wifidog

/etc/init.d/wifidogenable
/etc/init.d/wifidog start

此时会报错,因为此时还没配置好服务器的信息。
4、 编辑/etc/wifidog.conf,window用户如果不会用vi等编辑器,可以使用winscp软件访问并修改,需要配置的主要有三项:

#这个需要与服务器中gw id相对应
GatewayID 123456
#查看自己的路由器进行配置,外网接口
ExternalInterfaceeth0.2
#路由器内网接口
GatewayInterface br-lan
#服务器配置
AuthServer {
    #服务器的ip地址
    Hostname192.168.0.224
    SSLAvailable yes
    Path /
}

5、 重启wifidog,连接该无线网络,开始验证。

四、wifidog的认证需要https的,于是开始安装https服务
1、 安装ssl

sudo apt-get install apache2

複製代碼
2、 开启ssl

sudo a2enmod ssl

複製代碼
3、 重启apache

sudo service apache2 restart

複製代碼
4、 创建一个ssl目录

sudo mkdir /etc/apache2/ssl

複製代碼
5、 创建一个自己认证的证书

sudo openssl req -x509 -nodes -days 3650 -newkey rsa:2048 -keyout /etc/apache2/ssl/apache.key -out /etc/apache2/ssl/apache.crt

複製代碼
输入信息得到:/etc/apache2/ssl/apache.key
7、 配置证书

sudo gedit /etc/apache2/sites-available/default-ssl.conf

複製代碼
8、 在ServerAdmin下添加一行,服务器域名或者ip地址

ServerName 127.0.1.1:443
ServerAlias authpuppy.test<span style="line-height: 1.5; background-color: rgb(255, 255, 255);">                          </span>

複製代碼
并修改如下内容:

SSLEngine on
SSLCertificateFile /etc/apache2/ssl/apache.crt
SSLCertificateKeyFile /etc/apache2/ssl/apache.key

複製代碼
9、 开启ssl并重启apache

sudo a2ensite default-ssl
sudo service apache2 reload

複製代碼
10、 此时访问https://localhost 可以访问,但是localhost下的其他路径时404错误
修改/etc/apache2/sites-enabled/default-ssl.conf 添加443虚拟目录

<VirtualHost *:443>
        DocumentRoot /var/www/html/authpuppy/web
        ServerName authpuppy.localhost
        SSLEngine on
        SSLCertificateFile /etc/apache2/ssl/apache.crt
        SSLCertificateKeyFile /etc/apache2/ssl/apache.key

        DocumentRoot /var/www/html/authpuppy/web
        DirectoryIndex index.php
        <Directory /var/www/html/authpuppy/web/>
               Options Indexes FollowSymLinks MultiViews
               AllowOverride All
               Order allow,deny
               allow from all
        </Directory>
</VirtualHost>

本文章由 http://www.wifidog.pro/2015/02/26/wifidog-authpuppy%E5%AE%89%E8%A3%85-2.html整理编辑,转载请注明出处

公共场所wifi认证解决方案wifidog+authpuppy(1)

服务器:ubuntu 14.04 + authpuppy
路由器:MERCURY MW4530R + wifidog

一、安装authpuppy服务端验证
1、 安装php开发环境:

sudo apt-get install apache2 php5-mysql libapache2-mod-php5 mysql-server

2、 启用apache rewrite,否则会出现(Therequested URL /install/3 was not found on this server.)错误

sudo a2enmod rewrite

3、 到https://launchpad.net/authpuppy 下载最新源码authpuppy-1.0.0-stable,解压并剪切到/var/www/html/authpuppy目录

sudo mv authpuppy /var/www/html/authpuppy

4、 为authpuppy赋予权限

chmod 777 /var/www/html/authpuppy/ -R

5、 修改/etc/apache2/sites-enabled/000-default.conf替换所有内容

sudo gedit /etc/apache2/sites-enabled/000-default.conf

如下:

<VirtualHost *:80>
       ServerAdmin webmaster@localhost
       ServerName authpuppy.localhost
       ServerAlias authpuppy.test

       DocumentRoot /var/www/html/authpuppy/web
       DirectoryIndex index.php
       <Directory /var/www/html/authpuppy/web/>
               Options Indexes FollowSymLinks MultiViews
               AllowOverride All
               Order allow,deny
               allow from all
       </Directory>

       Alias /sf /var/www/html/authpuppy/lib/vendor/symfony/data/web/sf
       <Directory "/var/www/html/authpuppy/lib/vendor/symfony/data/web/sf">
               AllowOverride All
               Allow from All
       </Directory>

       #ErrorLog /var/log/apache2/authpuppy/error.log

       # Possible values include: debug, info, notice, warn, error, crit,
       # alert, emerg.
       LogLevel warn

       #CustomLog /var/log/apache2/authpuppy/access.log combined

  </VirtualHost>

6、 重启apache

sudo service apache2 restart

7、访问http://localhost 出现authpuppy配置页面
1.png

8、 点击下一步继续,这一步会检测系统的环境是否满足authpuppy的要求,不满足的会显示红色,按要求配置好就可以点击下一步了。
2.png

9、创建数据库wifidog,并填写数据库名字、账号密码等信息,此处为了方便,使用root登录,读者可以新建一个user用于访问。
3.png

10、一直点击下一步,直到出现管理员用户配置页面,配置用户信息:
4.png

11、 最后配置成功,出现如下页面,此时authpuppy的基本配置完成:
5.png

12、以后再次访问http://localhost,就会出现如下页面,不需要重新配置了:
6.png

本文章由 http://www.wifidog.pro/2015/02/26/wifidog-authpuppy%E5%AE%89%E8%A3%85-1.html 整理编辑,转载请注明出处