分类 wifidog流程 下的文章

install AuthPuppy On OpenWRT with Lighttpd

  1. Install OpenWRT on an X86 platform.
    Following the instructions here (http://blog.ich8.com/post/4494), which could install a clean installtion of OpenWRT on an x86 platform with version 14.03.

  2. Setup LAMP
    It has been a while that the default sources on OpenWRT is wrong, that the offical sources has re-archit the directories. Here are some instructions.

2.1 Base part

source: http://downloads.openwrt.org/barrier_breaker/14.07/x86/generic/packages/base/
package list: libexpat libgd libjpeg libncurses libncursesw libopenssl libpcre libpng libpthread libreadline librt iptables-mod-extra iptables-mod-nat-extra

Note after install libpcre, system may not find the proper libpcre.so.0, just make a soft link from libpcre.so.1 in /usr/lib will make it work.

2.2 Lighttpd

source: http://downloads.openwrt.org/barrier_breaker/14.07/x86/generic/packages/packages/

package list: lighttpd lighttpd-mod-access lighttpd-mod-alias lighttpd-mod-cgi lighttpd-mod-fastcgi lighttpd-mod-rewrite

2.3 MySQL

source: http://downloads.openwrt.org/barrier_breaker/14.07/x86/generic/packages/oldpackages/

package list: mysql-server libmysqlclient

2.4 PHP

source: http://downloads.openwrt.org/barrier_breaker/14.07/x86/generic/packages/oldpackages/

package list: php5 php5-cgi php5-fastcgi php5-mod-apc php5-mod-gd php5-mod-mysql php5-mod-pdo php5-mod-pdo-mysql php5-mod-xml

  1. Setup PHP
    Modify /etc/php.ini. First make the doc_root empty, and then modify the max-memory size from 8MB to a much larger one.

  2. Setup Lighttpd
    4.1 Enable some plugins in Lighttpd following this page (http://wiki.openwrt.org/doc/howto/lamp)
    4.2 Enbale mod_rewrite which is used in AuthPuppy
    4.3 !IMPORTANT Migrate the rewrite rules in AuthPuppy’s .htaccess to url.rewrite part, like below:

    url.rewrite-once = (".php$" => "$0", ".html$" => "$0", "^$" => "index.html", "^([^.]+)($|\?.*$)" => "index.php/$1$2")

  3. Now you can install authpuppy and wifidog as usual.

It is much easier to record than try to make it.

本文章由 http://www.wifidog.pro/2015/02/26/openwrt-%E5%AE%89%E8%A3%85-wifidog%E8%AE%A4%E8%AF%81%E6%9C%8D%E5%8A%A1%E5%99%A8authpuppy.html 整理编辑,转载请注明出处
wifidog特点

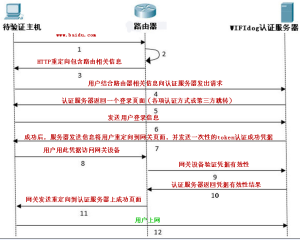
WIFIdog是一种新的认证方式,这种认证方式的优势在于安全性高,不容易被破解验证。
客户端发出初始化请求,比如访问www.baidu.com
网关的防火墙规则将这个请求重定向到本地网关的端口上。这个端口是Wifidog监听的端口。
Wfidog提供一个HTTP重定向回复,重定向到Web认证页面,重定向的Url的Querystring中包含了Gateway的ID,Gateway的FQDN以及其他的信息。
用户向认证服务器发出认证请求。
网关返回一个(可以是自定义的)splash(也称作“登录”)页面。
用户提供他的凭据信息,比如用户名和密码。
成功认证的话,客户端将会被重定向到网关的自己的web页面上,并且带有一个认证凭据(一个一次性的token)
用户就是用获取到的凭据访问网关。
网关去认证服务器询问token的有效性。
认证服务器确认token的有效性。
网关发送重定向给客户端,以从认证服务器上获取 成功提示页面,重定向到 http://portal_server:port/portal_script 这个位置。
认证服务器通知客户请求成功,可以上网了。
整个过程如下图所示:
1.png

本文章由 http://www.wifidog.pro/2015/02/15/395.html 整理编辑,转载请注明出处

为wifidog认证跳转url添加客户端ip地址

默认的的wifidog认证页面跳转url是这样的
login/?gw_address=%s&gw_port=%d&gw_id=%s&url=%s
Example: https://auth.ilesansfil.org/login/?gw_id=0016B6DA9AE0&gw_address=7.0.0.1&gw_port=2060
由于业务需要,需要在跳转到认证页面时加一个客户端内网IP地址,即ClienIPAddress

下载wifidog添代码,打开http.c,找到

/* Re-direct them to auth server */
char *urlFragment;
safe_asprintf(&urlFragment, "%sgw_address=%s&gw_port=%d&gw_id=%s&url=%s",
auth_server->authserv_login_script_path_fragment,
config->gw_address,
config->gw_port,
config->gw_id,
url);
debug(LOG_INFO, "Captured %s requesting [%s] and re-directing them to login page", r->clientAddr, url);
http_send_redirect_to_auth(r, urlFragment, "Redirect to login page");
free(urlFragment);

修改为

/* Re-direct them to auth server */
char *urlFragment;
safe_asprintf(&urlFragment, "%sgw_address=%s&gw_port=%d&gw_id=%s&url=%s&clientip=%s",
auth_server->authserv_login_script_path_fragment,
config->gw_address,
config->gw_port,
config->gw_id,
url,
r->clientAddr);
debug(LOG_INFO, "Captured %s requesting [%s] and re-directing them to login page", r->clientAddr, url);
http_send_redirect_to_auth(r, urlFragment, "Redirect to login page");
free(urlFragment);

重新编译以后就OK了

现在认证跳转url就带有客户端ip地址了。

本文章由 http://www.wifidog.pro/2015/02/15/wifidog%E6%B7%BB%E5%8A%A0%E5%AE%A2%E6%88%B7%E7%AB%AFIP.html 整理编辑,转载请注明出处

wifidog认证流程及相关重要函数调用

1、The client does his initial request, as if he was already connected, (e.g.: http://www.google.ca)
2、The Gateway’s firewall rules mangle the request to redirect it to a local port on the Gateway. When that’s the done, the Gateway provides an HTTP Redirect reply that contains the Gateway ID, Gateway FQDN and other informations
3、The Client does his request to the Auth Server as specified by the Gateway, see Login Protocol
4、The Gateway replies with a (potentially custom) splash (login) page
5、The Client provides his identification informations (username and password)
6、Upon succesful authentication, the client gets an HTTP Redirect to the Gateway’s own web server with his authentication proof (a one-time token), http://GatewayIP:GatewayPort/wifidog/auth?token=[auth token]
7、The Client then connects to the Gateway and thus gives it his token
8、The Gateway requests validation of the token from the Auth Server, see Client Protocol
9、The Auth Server confirms the token
10、The Gateway then sends a redirect to the Client to obtain the Success Page from the Auth Server, redirects to http://auth_server/portal/
12、The Auth Server notifies the Client that his request was successful

代码:

http_callback_404:
将未认证的请求重定向到Auth Server的登录界面:login页面

http_callback_auth:
客户端登陆成功后,Auth Server将客户端重定向到Gateway,形式如下:http://GatewayIP:GatewayPort/wifidog/auth?token=[auth token]

authenticate_client:
Gateway将拿到的token传给Auth Server,验证客户端,如果客户端被允许,将客户端重定向到Auth Server的portal界面Firewall.c中包含了对iptables相关的操作

本文章由 http://www.wifidog.pro/2015/02/13/wifidog%E8%AE%A4%E8%AF%81%E6%B5%81%E7%A8%8B.html 整理编辑,转载请注明出处