WifiDog 认证协议研究之 Auth Server

认证流程如下图:
QQ图片20141211141018.png

认证流程详解:
1.Login登录(参照 login/index.php)
服务器验证后,Redirect to GW,携带 token
http://$_REQUEST[gw_address]:$_REQUEST[gw_port]/wifidog/auth?token=$token
2.Validation of ID
服务器返回 Status
Auth: 1
Messages: | 认证信息(如错误之类的消息)
common.php中有如下定义:
/* Constant shared with the gateway

  • NEVER edit these, as they mush match the C code of the gateway */
    define('ACCOUNT_STATUS_ERROR', -1);
    define('ACCOUNT_STATUS_DENIED', 0);
    define('ACCOUNT_STATUS_ALLOWED', 1);
    define('ACCOUNT_STATUS_VALIDATION', 5);
    define('ACCOUNT_STATUS_VALIDATION_FAILED', 6);
    define('ACCOUNT_STATUS_LOCKED', 254);

auth.h中也有相应定义:

/** 
  * @brief Authentication codes returned by auth server. 
  * 
  * Authentication result codes returned by auth_server_request() corresponding 
 * to result code from the central server itself. 
*/  
typedef enum {  
    AUTH_ERROR = -1, /**< An error occured during the validation process*/  
    AUTH_DENIED = 0, /**< Client was denied by the auth server */  
    AUTH_ALLOWED = 1, /**< Client was granted access by the auth server */  
    AUTH_VALIDATION = 5, /**< A misnomer.  Client is in 15 min probation to validate his new account */  
    AUTH_VALIDATION_FAILED = 6, /**< Client had X minutes to validate account by email and didn't = too late */  
    AUTH_LOCKED = 254 /**< Account has been locked */  
} t_authcode;  

本文章由 http://www.wifidog.pro/2014/12/11/wifidog-%E5%8D%8F%E8%AE%AEauth-server.html整理编辑,转载请注明出处

Wifidog的协议梳理

wifidog的认证流程图:
FlowDiagram.png

1· 用户连接WIFI会跳转到以下地址:

http://auth_server/login?gw_id=[GatewayID, default: "default"]gw_address=[GatewayAddress, internal IP of router]gw_port=[GatewayPort, port that wifidog Gateway is listening on]
url=[user requested url]
auth_server #即认证的域名
gw_id #配置的网关名称
gw_address #回调的内网地址
gw_port #回调的端口

在这个阶段需要返回登录的页面,即授权的首页,并且需要将所有涉及跳转的第三方地址加入白名单。

2· 当验证用户身份之后,即用户登录成功之后重定向到网关地址

http://GatewayIP:GatewayPort/wifidog/auth?token=[auth token]

auth token #系统为用户生成的token

3· 网关地址接受到消息后,会周期的发送用户信息,并确认是不是允许继续网络访问 请求地址

http://auth_server/auth/index.php?
stage=counters
ip=
mac=
token=
incoming=
outgoing=


ip,mac,token为用户的基本信息,incoming/outgoing为用户的连接计数信息,用来限定用户是否可以继续连接

此时auth_server需要返回该请求:
0——拒绝,删除防火墙内用户以及用户的信息
6——用户验证失败,超时,会删除防火墙内信息(即会重新要求登录)
1——用户验证通过,并跳转到http://auth_server/portal/?gw_id=%s
5——用户需要验证,允许规则内的访问进行验证
-1——用户验证出错,用户可以继续访问网络

返回数据格式:
Auth: <number from user status list>
如Auth: 1 #中间有个空格

4· 系统会周期性发送心跳包,用来确认网关验证和认证服务器的正常工作请求地址

http://auth_sever/ping/?
gw_id=%s
sys_uptime=%lu
sys_memfree=%u
sys_load=%.2f
wifidog_uptime=%lu

auth_server此时需要返回“Pong”
可以通过该心跳包来监控整个认证的工作

本文章由 http://www.wifidog.pro/2014/12/11/wifidog-%E5%8D%8F%E8%AE%AE.html整理编辑,转载请注明出处

wifidog用php实现验证流程

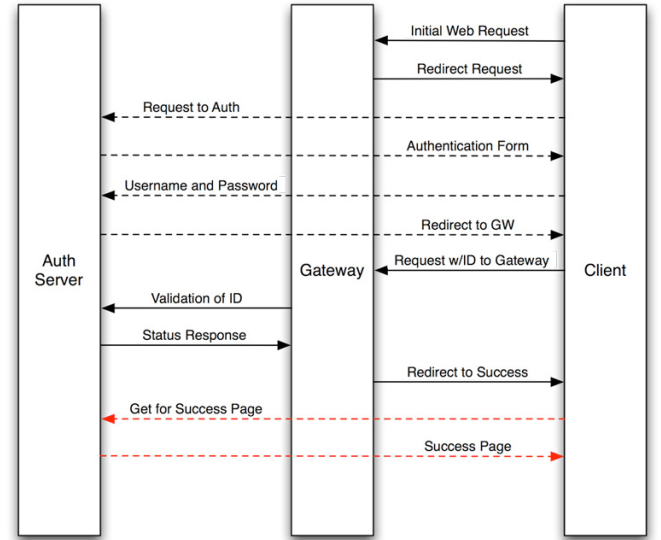
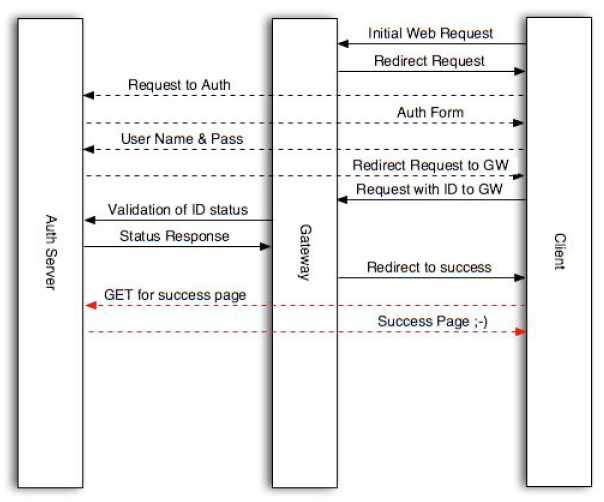
1.首先简单说说wifidog认证的过程

客户端首次连接到wifi后,浏览器请求将会被重定向到:

login/?gw_address=%s&gw_port=%d&gw_id=%s&url=%s

验证通过后,客户端被重定向到网关,url格式如下:

http://网关地址:网关端口/wifidog/auth?token=xx,

wifidong会启动一个线程周期性地报告每一个用户的状态信息,并通过如下地址发送给认证服务器:

auth_server:/auth/?stage=

ip=

mac=

token=

incoming=

outgoing=

认证服务器根据该状态信息决定是否允许该用户继续连接,并回复网关,回复格式为:Auth:状态码,

如: Auth:1

常用状态码:

0:AUTH_DENIED,表示拒绝

1:AUTH_ALLOWED,验证通过

验证通过后,将重定向到如下地址:

portal/?gw_id=%s

wifidog的ping协议:

wifidog通过ping协议将当前状态信息发送给认证服务器,发送地址为:

http://auth_sever/ping/?

gw_id=%s

sys_uptime=%lu

sys_memfree=%u

sys_load=%.2f

wifidog_uptime=%lu

认证服务器须返回一个“ Pong ”作为回应。

具体php实现代码如下

public function auth()
{
    //响应客户端的定时认证,可在此处做各种统计、计费等等
    /*
        wifidog 会通过这个接口传递连接客户端的信息,然后根据返回,对客户端做开通、断开等处理,具体返回值可以看wifidog的文档
        wifidog主要提交如下参数
        1.ip
        2. mac
        3. token(login页面下发的token)
        4.incoming 下载流量
        5.outgoing 上传流量
        6.stage  认证阶段,就两种 login 和 counters
    */

    $stage = $_GET['stage'] == 'counters'?'counters':'login';
    if($stage == 'login')
    {
        //XXXX跳过login 阶段的处理XXXX不能随便跳过的
        //默认返回 允许
        echo "Auth: 1";
    }
    else if($stage == 'counters')
    {
        //做一个简单的流量判断验证,下载流量超值时,返回下线通知,否则保持在线
        if(!empty($_GET['incoming']) and $_GET['incoming'] > 10000000)
        {
            echo "Auth: 0";
        }else{
            echo "Auth: 1\n";
        }
    }
    else
        echo "Auth: 0"; //其他情况都返回拒绝
        /*
            返回值:主要有这两种就够了
            0 - 拒绝
            1 - 放行

            官方文档如下
            0 - AUTH_DENIED - User firewall users are deleted and the user removed.
            6 - AUTH_VALIDATION_FAILED - User email validation timeout has occured and user/firewall is deleted(用户邮件验证超时,防火墙关闭该用户)
            1 - AUTH_ALLOWED - User was valid, add firewall rules if not present
            5 - AUTH_VALIDATION - Permit user access to email to get validation email under default rules (用户邮件验证时,向用户开放email)
            -1 - AUTH_ERROR - An error occurred during the validation process
        */
}

public function portal()
{
    /*
        wifidog 带过来的参数 如下
        1. gw_id
    */
    //重定到指定网站 或者 显示splash广告页面
    redirect('http://www.baidu.com', 'location', 302);
}
public function ping()
{
    //url请求 "gw_id=$gw_id&sys_uptime=$sys_uptime&sys_memfree=$sys_memfree&sys_load=$sys_load&wifidog_uptime=$wifidog_uptime";
    //log_message($this->config->item('MY_log_threshold'), __CLASS__.':'.__FUNCTION__.':'.debug_printarray($_GET));

    //判断各种参数是否为空
    if( !(isset($_GET['gw_id']) and isset($_GET['sys_uptime']) and isset($_GET['sys_memfree']) and isset($_GET['sys_load']) and isset($_GET['wifidog_uptime']) ) )
    {
        echo '{"error":"2"}';
        return;
    }
    //添加心跳日志处理功能
    /*
        此处可获取 wififog提供的 如下参数
        1.gw_id  来自wifidog 配置文件中,用来区分不同的路由设备
        2.sys_uptime 路由器的系统启动时间
        3.sys_memfree 系统内存使用百分比
        4.wifidog_uptime wifidog持续运行时间(这个数据经常会有问题)
    */

    //返回值
    echo 'Pong';
}
/**
    * wifidog 的gw_message 接口,信息提示页面
*/
function gw_message()
{
    if (isset($_REQUEST["message"])) {
        switch ($_REQUEST["message"]) {
            case 'failed_validation':
                //auth的stage为login时,被服务器返回AUTH_VALIDATION_FAILED时,来到该处处理
                //认证失败,请重新认证
                break;
            case 'denied':
                //auth的stage为login时,被服务器返回AUTH_DENIED时,来到该处处理
                //认证被拒
                break;
            case 'activate':
                //auth的stage为login时,被服务器返回AUTH_VALIDATION时,来到该处处理
                //待激活
                break;
            default:
                break;
        }
    }else{
            //不回显任何信息
    }
}

本文章由 http://www.wifidog.pro/2014/12/10/wifidog-php%E9%AA%8C%E8%AF%81.html 整理编辑,转载请注明出处

为wifidog认证跳转url添加客户端ip地址和MAC地址

默认的的wifidog认证页面跳转url是这样的
login/?gw_address=%s&gw_port=%d&gw_id=%s&url=%s
Example: https://auth.ilesansfil.org/login/?gw_id=0016B6DA9AE0&gw_address=7.0.0.1&gw_port=2060
由于业务需要,需要在跳转到认证页面时加一个客户端内网IP地址,即ClienIPAddress

下载wifidog添代码,打开http.c,找到

/* Re-direct them to auth server */
char *urlFragment;
safe_asprintf(&urlFragment, "%sgw_address=%s&gw_port=%d&gw_id=%s&url=%s",
    auth_server->authserv_login_script_path_fragment,
    config->gw_address,
    config->gw_port,
    config->gw_id,
    url);
debug(LOG_INFO, "Captured %s requesting [%s] and re-directing them to login page", r->clientAddr, url);
http_send_redirect_to_auth(r, urlFragment, "Redirect to login page");
free(urlFragment);

修改为

/* Re-direct them to auth server */
char *urlFragment;
char *mac = arp_get(r->clientAddr);
if(!mac)
{
     printf("mac cannot get\n");
     return;
}
safe_asprintf(&urlFragment, "%sgw_address=%s&gw_port=%d&gw_id=%s&url=%s&clientip=%s&clientmac=%s",
    auth_server->authserv_login_script_path_fragment,
    config->gw_address,
    config->gw_port,
    config->gw_id,
    url,
    r->clientAddr,
    mac);
debug(LOG_INFO, "Captured %s requesting [%s] and re-directing them to login page", r->clientAddr, url);
http_send_redirect_to_auth(r, urlFragment, "Redirect to login page");
free(urlFragment);

重新编译以后就OK了

现在认证跳转url就带有客户端ip地址了
http://authServer/login/?gw_address=10.0.0.254&gw_port=2060&gw_id=79194CFB58&url=http%3A//www.baidu.com&clientAddr=10.0.0.100&clientmac=00:23:43:a3:b1:d5

本文章由 http://www.wifidog.pro/2014/12/10/wifidog-login%E5%8D%8F%E8%AE%AE%E6%B7%BB%E5%8A%A0%E5%AE%A2%E6%88%B7%E7%AB%AFIP-MAC.html 整理编辑,转载请注明出处